
Summary of Contents for Q-Pumps QIM Series
- Page 1 Assembly installation manual Q I M / Q D B M i x e r S e r i e s QIM/QDB-M01 www.qpu mps .co m support@qpumps.com 36-01...
-
Page 2: Table Of Contents
Assembly and installation manual QIM/QDB Mixer Series Thank you for purchasing a Q-Pumps product! This manual contains installation and maintenance instructions for the QIM/QDB Mixer Series It also includes a part list as well as a troubleshooting chart to assist in determining pump mal- function and practical advices for the maintenance and operation of the equipment. -
Page 3: About This Manual
The purchaser by acceptance of delivery assumes all liability for the consequences of use or misuse by it, its employees or third parties. Unless they are approved in advance, Q-Pumps does not assume any costs related to parts and / or service. -
Page 4: Safety
Indicates a potentially hazardous situation which, if not avoided, could result in death or serious injury. Safety labels are placed on every pump. DO NOT remove any labeling on any Q-Pumps pro- duct. Replace any label that is missing. QIM/QDB-M01... -
Page 5: Installation
Assembly and installation manual QIM/QDB Mixer Series DESCRIPTION WARNING Before servicing pump, disconnect electrical power source, carefully relieve all pressure and drain all fluids from pump and connected piping. Before servicing pump, disconnect electrical power source. QIM/QDB Mixer Series closed-coupled pumps are made up of two sections, power or drive section and the liquid end or pump section. -
Page 6: How To Install The Piping
Assembly and installation manual QIM/QDB Mixer Series HOW TO INSTALL THE PIPING GENERAL This section provides some do’s and do not’s of piping which will aid in obtaining the maximum efficiency and service from your pump. Piping should be independently supported at both the suction inlet and discharge outlet. -
Page 7: Assembly Preliminaries
Assembly and installation manual QIM/QDB Mixer Series ASSEMBLY PRELIMINARIES WARNING Before servicing pump, disconnect electrical power source, carefully relieve all pressure and drain all fluids from pump and connected piping. Before beginning the assembly procedure identify every element that is going to be installed, you can use the exploded view and part list shown in pages 8 and 9. -
Page 8: Exploded Assembly
Assembly and installation manual QIM/QDB Mixer Series QIM/QDB-M01... -
Page 9: Part List
Assembly and installation manual QIM/QDB Mixer Series PART LIST ITEM DESCRIPTION ITEM DESCRIPTION Casing Allen screw Impeller Internal mechanical seal Stub shaft Rotary holder Back plate Rotary single seal face Backplate pin Static single seal fase Backplate cup (only models Single seal spring 4410/6410) Rotary holder O-ring... -
Page 10: Assembly
Assembly and installation manual QIM/QDB Mixer Series S TA RT TH E AS S E M BLY It is highly recommended that you use the general diagram to identify the components and thus be able to carry out the assemblies and sub- assemblies that will be explained below. -
Page 11: Adapter Assembly
Assembly and installation manual QIM/QDB Mixer Series 2. ASSEMBLY THE ADAPTER TO THE MOTOR Place the stainless adapter (71) on the motor flange and fix it with hexagonal screws and tighten to the torque values recommended in Chart 1. Chart 1 – Torque values for tightening the adapter screws Torque ft-lb Models NEMA Models IEC... -
Page 12: Spacing Of The Impeller And Stub Shaft
Assembly and installation manual QIM/QDB Mixer Series 3. SPACING OF THE IMPELLER AND STUB SHAFT The correct functioning of the pump depends on the separation of the impeller (2S) from the backplate (11A) and the fixation of the stub shaft (6P) on the motor shaft. Follow the next steps to fix the stub shaft on the motor shaft: 3a. - Page 13 Assembly and installation manual QIM/QDB Mixer Series 3c. Put the impeller key (24C) on the keyway of the stub shaft. Place only the rotary holder of the mechanical seal (96A) together with its respective O-ring (96E) until it seats on the shoulder of the stub shaft.
- Page 14 Assembly and installation manual QIM/QDB Mixer Series 3d. Once the assembly is tightened place a spacer of 0.060” (1.53 mm) thru 0.070” (1.78 mm) between the back of the impeller and the front of the backplate. You may use a caliper, some shims or a washer with that width to set the critical distance for the correct performance of the mechanical seal.
-
Page 15: Assembling And Installing The Mechanical Seal
Assembly and installation manual QIM/QDB Mixer Series 3e. Using the 3/8” rod and the hexagonal socket and wrench to untighten the impeller nut to remove the elements previously assembled. Take the impeller nut, impeller gasket, impeller and impeller key off. Do not forget to remove also the spacer used to determinate the stub shaft position. - Page 16 Assembly and installation manual QIM/QDB Mixer Series Place and fix the backplate with the stationary seal into the adapter, as in step 3b. 4b. Assembly the rotary single seal face (96B), the rotary seal O-ring (96G), spring (96D) and rotary holder O-ring (96E) into the rotary holder (96A). Remember that you can use water or dishes soap to lubricate or glue O-rings and gaskets to the metal elements to facilitate assembly.
-
Page 17: Assembling The Casing
Assembly and installation manual QIM/QDB Mixer Series Tight the assembly as previously did before in step 3c. For models 114 and 214 use a torque of 25 ft.lb and a torque of 40 ft.lb for the rest of the models when tightening the impeller nut. - Page 18 Assembly and installation manual QIM/QDB Mixer Series 5b. Tighten the clamp assembly to close the casing to the adapter, be sure it is centered and level around all the circumference. Avoid that the casing fits unevenly in the adapter to prevent it from rubbing against the impeller.
-
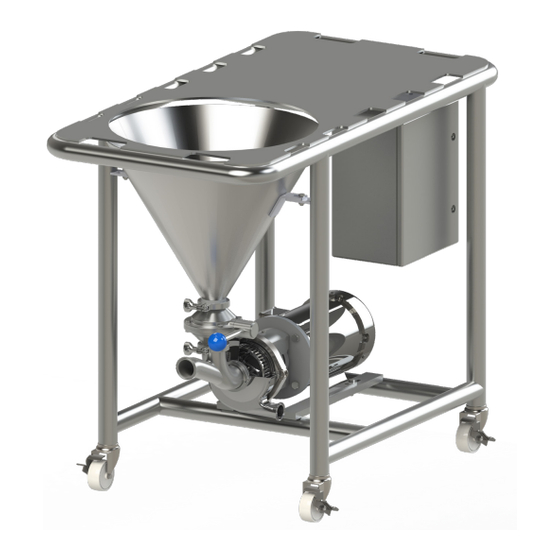
Page 19: Assembling The Qdb
Assembly and installation manual QIM/QDB Mixer Series 6. ASSEMBLING THE QDB 6a. Identify the elements that conform the standard QDB assembly. Figure 1. (C) – Clamp assemblies (x 3 pieces) (G) – Clamp Gaskets (x 3 pieces) (H) – Hopper (M) –... - Page 20 Assembly and installation manual QIM/QDB Mixer Series 6c. Place the QIM onto the QDB table and fix the motor using the hexagonal screws (T1) and nuts (T2) to the brackets on the table. Do not tight the screws until the hopper (H) is installed.
- Page 21 Assembly and installation manual QIM/QDB Mixer Series 6e. Continue mounting the hopper on the tabs at the sides of the poles of the table. Use the hexagonal screws (T3) and nuts (T4) to maintain in position the hopper but do not tight them yet so you can lift the hopper to install the ball valve (V).
- Page 22 Assembly and installation manual QIM/QDB Mixer Series Notes. Before starting the pump check that the motor turns in a counterclockwise direction. Keep the suction line flooded and the mechanical seal lubricated with the fluid which is going to be pumped. Never operate the pump when dry or it may damage the seal. Maintain enough NPSH available in the suction line to avoid the pump to cavitate.
-
Page 23: Common Problems
QIM/QDB Mixer Series QUICK GUIDE FOR SOLVING COMMON PROBLEMS Q-Pumps products are relatively easy to maintain with the exception of the sanitary process. Just as with any other element of machining, problems may arise. This section offers a guide for identifying and correcting the majority of the pumping problems. For problems with you motor, contact the manufacturer directly for best assistance. - Page 24 Assembly and installation manual QIM/QDB Mixer Series Acceso “A” #103, Fraccionamiento Industrial Jurica, Querétaro, Qro., México, 76130 Teléfono: +52 (442) 218 4570 / 218 7400 Fax: +52 (442) 218 4577 support@qpumps.com w w w. q p u m p s . c o m...
Need help?
Do you have a question about the QIM Series and is the answer not in the manual?
Questions and answers