
Summary of Contents for Explore Scientific iEXOS100
- Page 1 AZIMUTH ADJUSTER ADAPTER INSTRUCTION MANUAL COMPATIBLE WITH iEXOS-100 TWILIGHT TWILIGHT TRIPOD MEDIUM TRIPOD HEAVY TRIPOD...
-
Page 2: Tools Needed
DRAWING IS THE SOLE PROPERTY OF EXPLORE SCIENTIFIC MANUFACTURING LLC. ANY REPRODUCTION IN PART OR AS A WHOLE FINISH SEE NOTE 2 WITHOUT THE WRITTEN PERMISSION OF EXPLORE SCIENTIFIC MANUFACTURING LLC. IS SCALE: 1:1 SHEET 1 OF 1 PROHIBITED. DO NOT SCALE DRAWING Twilight Medium... - Page 3 INSTALLATION FOR ORIGINAL iEXOS-100 TRIPOD See page 6 for Twilight Medium and Heavy Tripod Installation 1. Remove the plastic ring from the top of the tripod by loosening and removing the Phillips screw. 2. Using the plastic ring as a guide, cut the drill template pattern with an X-acto®...
- Page 4 INSTALLATION 3. Align the template on the tripod using the North Pole leg edges and the side set screw. The lines that form a box will align with the North Pole leg. The diagonal line that clips the side of that box will point to the set screw position.
-
Page 5: Installation
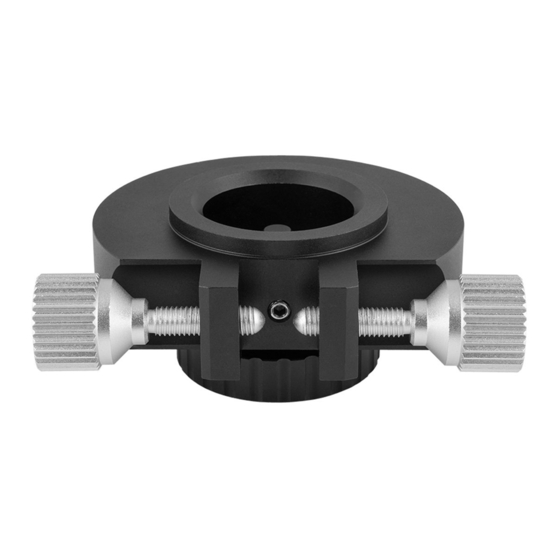
INSTALLATION 6. Place the AZ Pin into the hole and secure it from below using the provided M4 screw, lock washer, and flat washer. 7. Attach the Azimuth Adjuster Adapter to your iEXOS 100 mount by centering the adapter 180 degrees from the iEXOS 100 serial number on the front of the mount. - Page 6 INSTALLATION 8. Use the 3mm L wrench to tighten the three set screws that are located 120 degrees apart. 9. Place the iEXOS 100 mount and Azimuth Adjuster Adapter assembly on the tripod head by centering the AZ pin on the tripod head between the two Large Silver Azimuth Adjusting...
- Page 7 INSTALLATION FOR TWILIGHT HEAVY & MEDIUM TRIPODS 1. Remove E/C clip from t-bar. 2. Add included spacer on top of the existing spacer on t-bar and install the assembly back in the tripod using the E/C clip. V. 02 – Oct. 2019...
- Page 8 INSTALLATION 3. Center Azimuth adjuster adapter with the iExos-100 serial number in front of the mount. 4. Use the self-center knob, screw it in all the way and make sure it is hand tight. V. 02 – Oct. 2019...
- Page 9 INSTALLATION 5. Used the included 3mm wrench to tighten all 3 set screws located 120 degrees apart. 6. Screw in and secure the T-Bar screw to the azimuth self-center knob. Mount iEXOS-100 polar latitude adjustable base with the azimuth-adjusting screws approximately half way to tripod head by aligning the two knobs with the tripod nose.
- Page 10 INSTALLATION 7. Use the spreader bar knob to secure the spreader bar to the tripod’s legs. V. 02 – Oct. 2019...
- Page 11 INSTALLATION 8. The mount is ready to polar align using the azimuth adjuster adapter. V. 02 – Oct. 2019...
- Page 12 For detailed instructions on how to polar align an equatorial mount, visit: explorescientific.com/polaraligning explorescientific.com ©2019 Explore Scientific, LLC. All model names and logos are registered trademarks.
Need help?
Do you have a question about the iEXOS100 and is the answer not in the manual?
Questions and answers