
Summary of Contents for BTM ULBG 452-18
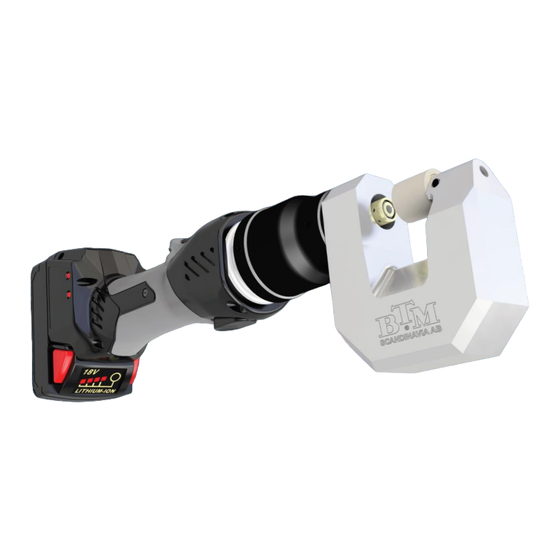
- Page 1 Battery powered hand-held machine ULBG 452-18 BTM Scandinavia AB ● Franska vägen 32 ● S-393 56 KALMAR ● Tel: +46 480 868 75 ● www.btmscand.se...
-
Page 2: Table Of Contents
5,2 Error codes Sektion 6: 6.0 Mechanics Recommended spare parts BOOM lists Sektion 9: 9.0 Data sheets Sektion 10: 10.0 CE-Marking 10.1 Declaration BTM Scandinavia AB ● Franska vägen 32 ● S-393 56 KALMAR ● Tel: +46 480 868 75 ● www.btmscand.se... -
Page 3: Marking
The manual also contains description of Clinch tools its inspection and maintenance as recommended. As an additional help for maintenance are drawings and parts lists. Components and spare parts ordered from BTM Scandinavia AB 1. The punch must always be in its original position, posterior position. The punch is hidden and protected by the holder (stripper). -
Page 4: Manual
2.0 OPERATOR MANUAL 2.1 Safety information This instruction applies for BTM Battery powered hand held unit ULBG452 This unit is specially designed for clinching with BTM Tog-L-Loc system®. Operating personnel are expected to have read and understood the safety instructions supplied with this equipment, be familiar with the location and operation of each safety component, to be trained in the safe use and be aware of the risks that are specific to this type of equipment. - Page 5 NOTE! Beware of moving parts. NOTE! Do not use the machine standing in water or in wet environment. Spare parts: Use only original BTM components to this system. Warning messages: If the safety signs or warning signs on the machine are worn or damaged, ensure exchange before using the equipment.
-
Page 6: Product Description
Battery powered machine for clinching. Manual/Instruction C-frame with tooling Clinch machine Tooling - Die Tooling – punch with stripper Battery charger Chargeable battery Sample BTM Scandinavia AB ● Franska vägen 32 ● S-393 56 KALMAR ● Tel: +46 480 868 75 ● www.btmscand.se... - Page 7 Punch with stripper Start/Stop C-frame Reset key Indicator Battery LED Indicator Service LED Indicator Battery Battery lock-out release BTM Scandinavia AB ● Franska vägen 32 ● S-393 56 KALMAR ● Tel: +46 480 868 75 ● www.btmscand.se...
-
Page 8: Function Description
Pull the C-frame over the plates to be joined, place the punch and the die where you want to clinch. Start Press start button, hold down until the punch turns. The reversal takes place automatically after reaching the moment. BTM Scandinavia AB ● Franska vägen 32 ● S-393 56 KALMAR ●... - Page 9 Move the machine abt: 20-30mm for next clinch.. Min 11mm Minimum space between two joints is 11,0mm If the distance between two joints is to tight the joints will crack BTM Scandinavia AB ● Franska vägen 32 ● S-393 56 KALMAR ●...
-
Page 10: Material
0,7 – 2,0mm Clinching Max combined thickness 3,0mm When mixing material thickness always the thicker material must be on the punch- side and the thinner material at the die-side. BTM Scandinavia AB ● Franska vägen 32 ● S-393 56 KALMAR ●... -
Page 11: Checklist For Operator
Stripper without damages Die without taps, whole leafs The Elastomer (blue ring) provides good resiliense of the spring Clean and remove dirt Stripper Punch Elastomer BTM Scandinavia AB ● Franska vägen 32 ● S-393 56 KALMAR ● Tel: +46 480 868 75 ●... - Page 12 Check continuously a joint, compare to specified dimensions a) BD (Button Dimension) b) CT (Cap Thickness) BTM Scandinavia AB ● Franska vägen 32 ● S-393 56 KALMAR ● Tel: +46 480 868 75 ● www.btmscand.se...
-
Page 13: Tooling
See instructions later in this section. Check the dimension of the joint, Button Cap Thickness and Button Diameter. If not in accordance mesuring what is recommended, contact BTM Scandinavia for additional support. Tn – Hals T f –... -
Page 14: Terms And Definitions
The die depth is the measurement from moving blade edge down to the bottom in the die. This dimension is fixed and present of BTM for each specific application. A shallow-AD causes a bad interlock (latching) and therefore lower peel strength. With a deep-AD the wall thickness at the "neck"... - Page 15 1 pcs Die Tog-L-Loc® 3, 8 AD=.060’’ 794600FE 1 pcs Punch Tog-L-Loc® 3, 8 PTR=.010 033993 1 pcs Stripper Tip 010613 BTM Scandinavia AB ● Franska vägen 32 ● S-393 56 KALMAR ● Tel: +46 480 868 75 ● www.btmscand.se...
- Page 16 Losen the 2 allen screws (M4) on the ring between the power unit and the C-frame (pic Remove C-frame by turning counterclockwise from the power unit. Skruv M4 Pic 1 BTM Scandinavia AB ● Franska vägen 32 ● S-393 56 KALMAR ●...
- Page 17 Make sure it is the right article number of the new die Mount the new die, tighten the mounting screw and mount the C-frame (section 3.4.4) Pic 2 Pic 3 Pic 4 BTM Scandinavia AB ● Franska vägen 32 ● S-393 56 KALMAR ●...
- Page 18 Kontrollera CT (knappens tjocklek) och/eller BD (knappens diameter) mått efter varje byte av stans eller dyna. Pic 5 Pic 6 Stripper Pic 7 BTM Scandinavia AB ● Franska vägen 32 ● S-393 56 KALMAR ● Tel: +46 480 868 75 ●...
- Page 19 Mount the C-frame by turning it clockwise on the power unit. Tighten the 2 allen-screws on the ring After assembly, the head is still rotable 360º Pic 8 Pic 9 Pic 10 BTM Scandinavia AB ● Franska vägen 32 ● S-393 56 KALMAR ●...
- Page 20 3.5 Setting CT, Cap Thickness and BD, Button Dimension Button diameter (BD) and Cap thickness (CT) is firmly adjusted by BTM before delivery. If these measurements differ with more than +/- 0,3mm from the recommended values, check that the punch and the die are flawless. Is it still anomalies, please contact BTM Scandinavia AB for support.
- Page 21 Backing off the shut hight will increase the cap thickness. Therefore you will find more informations in capter tool change. Cap thicknesses, as specified by BTM, are intended to give the optimum of joint strength and tool life.
-
Page 22: Trouble Shooting
Trouble Shooting for Clinch tools and Clinch joints Description Clinch tool Top View Button Side View Button Clinch tool o.k. Cap Thickness o.k. Uniform strong pressed Clinch joint Die Top View Joint o.k. Button o.k. Uniform pressed Pressed, mushroom-shaped Button Guard o.k. - Page 23 Description Clinch tool Top View Button Side View Button Clinch tool not o.k. 1 Blade missing Cap thickness not o.k. Not a uniform pressed clinch joint ACTION: Please add 1 Blade Button not o.k. Joint not o.k. Die not o.k.
- Page 24 Description Clinch tool Description Clinch tool Clinch tool not o.k. Clinch tool not o.k. Anvil defect Spring is broken ACTION: ACTION: Please change the die Please change spring Die not o.k. Die not o.k. Clinch tool not o.k. ...
- Page 25 Description Clinch tool Description Clinch tool Clinch tool not o.k. Clinch tool not o.k. Blades are broken Blades otherwise inserted Action: Action: Please change the blades Please insert the blades otherwise Dioe not o.k.. Die not o.k. S.
- Page 26 Description Clinch tool Description Clinch tool Punch o.k. Punch not o.k. Coating is good Crack at the Punch Tip Action: Please change punch Punch not o.k. Punch o.k. Clinch tool not o.k. Bow at the Punch Tip Action: ...
- Page 27 Description Clinch tool Top View Bowl Punch not o.k. Star-shaped cracks and/or Synclinal formation at the concave concave punch tip crack ACTION: Please change punch marks Button surface not o.k. Punch not o.k. Concave and/or marks in the bowl ...
- Page 28 S. 7...
-
Page 29: Maintenance
Change the battery to a full light flashes. charge. Put the replaced battery in the charger. Spare parts In need of spare parts, please contact BTM Scandinavia AB Franska vägen 32 S-392 56 KALMAR Tel. +46 480 868 75 www.btmscand.se BTM Scandinavia AB ●... -
Page 30: Error Codes
5.2 Error codes BTM Scandinavia AB ● Franska vägen 32 ● S-393 56 KALMAR ● Tel: +46 480 868 75 ● www.btmscand.se... - Page 31 Die Tog-L-Loc® 3,8 794600FE Rec. Spare part Punch Tog-L-Loc® 3,8 033993 Rec. Spare part Stripper Tip 010613 Rec. Spare part Charger 230VAC ULBG452 Battery Li-Ion, 18VDC, 1,5Ah ULBG452 BTM Scandinavia AB •Franska Vägen 32 • SE-393 52 Kalmar • www.btmscand.se...
- Page 32 DO NOT SCALE DRAWING CORPORATION REMOVE FIRST THREAD FROM ALL TAPPED HOLES. CUSTOMER BTM STANDARD BREAK ALL SHARP CORNERS WITH .020 TO .030 FILLET/RADIUS. REMOVE ALL BURRS & STAMP OR MARK ALL WITH BTM NUMBER. STANDARD TOLERANCES GEOMETRIC TOLERANCES TITLE TL-3.8-S.25 PUNCHES FLATNESS ANGLES ±0°-30'...
- Page 33 REMOVE FIRST THREAD FROM ALL TAPPED HOLES. CUSTOMER BTM STANDARD BREAK ALL SHARP CORNERS WITH .020 TO .030 FILLET/RADIUS. BLADE DET. #1 (3 PIECES) & REMOVE ALL BURRS & STAMP OR MARK ALL WITH BTM NUMBER. 0.76 [.030] 794600DE 794601D ELASTOMER DET. #2 (ONE) ARE...
Need help?
Do you have a question about the ULBG 452-18 and is the answer not in the manual?
Questions and answers