Table of Contents
Advertisement
Quick Links
Advertisement
Table of Contents

Related Manuals for Explore Scientific 20 Ultra Light Dobsonian Gen II


Summary of Contents for Explore Scientific 20 Ultra Light Dobsonian Gen II
- Page 2 Besuchen Sie unsere Website über den folgenden QR Code oder Weblink um weitere Informationen zu diesem Produkt oder die verfügbaren Übersetzungen dieser Anleitung zu finden. Visit our website via the following QR Code or web link to find further information on this product or the available translations of these instructions.
-
Page 3: Table Of Contents
Table of contents 1 Validity note .............................. 4 2 Properties:............................... 4 3 About this Instruction Manual........................ 5 4 Purpose of use.............................. 5 5 General safety instructions ........................... 5 6 Parts overview and scope of delivery ...................... 6 7 Choice of location ............................ 7 8 Unpack................................ 7 9 Assembly of the basic elements ........................ 7 10 Mounting the counter weights ........................ 8 11 Mounting and adjustment of the secondary mirror cage ................ 9 12 Mounting the stray light shield ........................ 10... -
Page 4: Validity Note
1 Validity note This documentation is valid for the products with the following article numbers: 0116950 Manual version: 0820 Manual designation: Manual_0116950_UL-Dobson-20_en_EXPSC_v082020a Always provide information when requesting service. 2 Properties: • Open truss tube design in all-aluminium construction • Mounting as Dobson system •... -
Page 5: About This Instruction Manual
3 About this Instruction Manual NOTICE These operating instructions are to be considered a component of the device. Read the safety instructions and the operating manual carefully before using this device. Keep this instruction manual in a safe place for future reference. When the device is sold or given to someone else, the instruction manual must be provided to the new owner/user of the product. -
Page 6: Parts Overview And Scope Of Delivery
NOTICE Danger of material damage! Improper handling may result in damage to the unit and/or accessories. Therefore, use the device only in accordance with the following safety information. • Do not disassemble the device! In the event of a defect, please contact the after sales support number listed below. -
Page 7: Choice Of Location
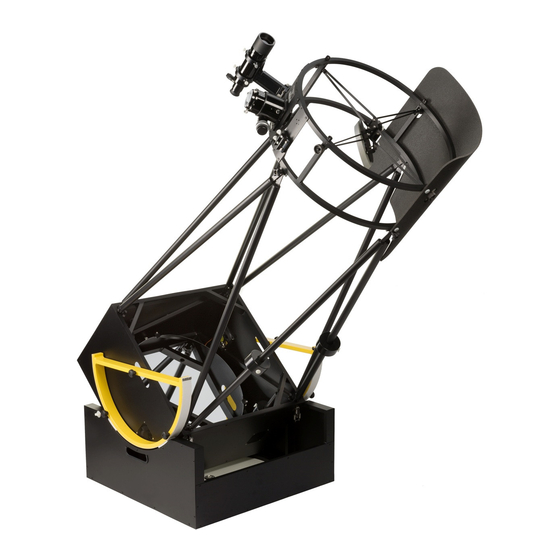
7 Elevation wheels 8 Fan 9 DC-in socket 10 On/off switch 11 Tension lock 12 Mirror box lid 13 Mirror box 14 Viewfinder slot 15 Focusing unit with 10:1 gear reduction 16 Viewfinder 17 Battery compartment with carrying bag 18 DC hollow plug 19 Collimation tool Scope of delivery: 2 altitude wheels, 1 rocker box, 1 viewfinder 8x50, 1 secondary mirror cage with 2 viewfinder slots and... -
Page 8: Mounting The Counter Weights
3. Screw the two altitude wheels each with three long knurled screws on both sides of the main mir- ror box. NOTICE! The mounting can only be done in one possible way with the elevator wheel pointing downwards towards the power connection socket (see detailed illustration). 4. -
Page 9: Mounting And Adjustment Of The Secondary Mirror Cage
CAUTION! Be extremely careful when attaching the balance weights. Weights can fall and dam- age the main mirror! Always transport the balance weights separately from the optics during transport and sufficiently secure them against slipping! NOTICE! The four balance weights are mounted at different positions. Select only the mounting points described below! It is recommended to protect the main mirror from possible damage by means of a suitable cover be- fore mounting. -
Page 10: Mounting The Stray Light Shield
12 Mounting the stray light shield Illustration 6: Mounting the stray light shield 1. Place the stray light shield opposite the eyepiece extension with the recesses over the adjusting screws of the secondary mirror cage. 2. Screw the stray light shield with the 4 short white flat-head screws to the interception mirror cage. 3. -
Page 11: Power Supply For The Fans
14 Power supply for the fans Illustration 8: Connecting the Battery Pack NOTICE! Only use the supplied Battery Pack or a suitable power supply unit (DC 12V) for the power supply! 1. Insert 8 x 1.5V type D batteries according to the markings in each battery compartment. 2. -
Page 12: Adjusting And Focusing The Eyepiece Extension
16 Adjusting and focusing the eyepiece extension NOTICE Do not move the focus wheel beyond the end point when the clamping screw is tightened! Eyepiece extension and gear parts may be damaged. Loosen the clamping screw before focusing. When the end point is reached (slight resistance when turning), do not turn the eyepiece slide further out. - Page 13 Illustration 9: Mirror adjustment by using the adjustment screws Let's look at the image in a typical Newtonian reflector telescope with a usual aperture ratio (i.e. a smaller aperture ratio). When the observer looks through the telescope (without eyepiece), the eye of the observer, the secondary mirror, primary mirror and eyepiece extension appear relatively exactly centered in the middle.
-
Page 14: Star Search
Illustration 11: Fine adjustment Schemata I to III During the fine adjustment one looks at a bright star with as high a magnification as possible. Allow the telescope to adapt to the ambient temperature for at least 30 minutes so that rising warm air from the mirror does not disturb the star image. -
Page 15: Cleaning And Maintenance
Dark adaptation Allow your eyes to get used to the darkness. This dark adaptation lasts about 15 to 20 minutes and starts anew after each - even short - light disturbance. Use a lamp with a red filter, e.g. to read maps or work on the telescope. -
Page 16: Technical Data
• If the air humidity is high, the glass may fog up and moisture may form. This is not a defect! In this case, allow the device to acclimatise at room temperature for some time so that the residual hu- midity can be reduced. - Page 20 Edenbridge, Kent TN8 6HF Bresser Iberia SLU United Kingdom Servicio al Cliente Explore Scientific c/Valdemorillo,1 Nave B * Number charged at local rates in the UK (the amount you will be charged per phone call will depend on the tariff of your phone P.I.
Need help?
Do you have a question about the 20 Ultra Light Dobsonian Gen II and is the answer not in the manual?
Questions and answers