
Subscribe to Our Youtube Channel
Related Manuals for Klarfit Sea Mule SL

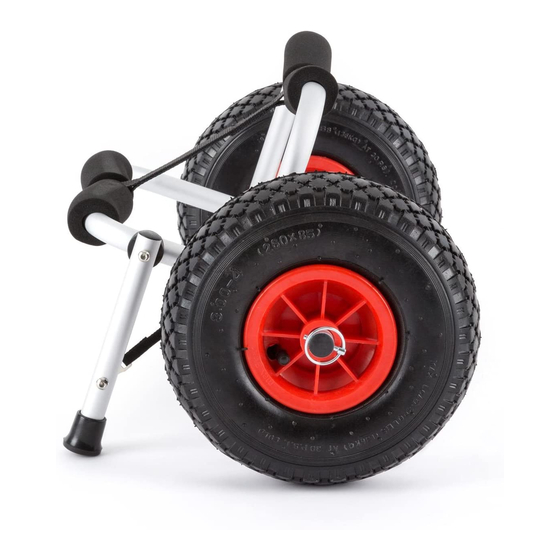
Summary of Contents for Klarfit Sea Mule SL
- Page 1 10029503 10029504 Sea Mule SL Kajakwagen Kayak Trolley Carro de transporte para kayak Chariot de kayak Carrello per kayak...
-
Page 3: Table Of Contents
Sehr geehrter Kunde, wir gratulieren Ihnen zum Erwerb Ihres Gerätes. Lesen Sie die folgenden Hinweise sorgfältig durch und befolgen Sie diese, um möglichen Schäden vorzubeugen. Für Schäden, die durch Missachtung der Hinweise und unsachgemäßen Gebrauch entstehen, übernehmen wir keine Haftung. Scannen Sie den folgenden QR-Code, um Zugriff auf die aktuellste Bedienungsanleitung und weitere Informationen rund um das Produkt zu erhalten. -
Page 4: Sicherheitshinweise
SICHERHEITSHINWEISE Bestimmungsgemäßer Gebrauch: Dieses Gerät ist zum Transport eines Einerkajaks bestimmt. Der Hersteller haftet nicht für den Gebrauch, der über die bestimmungsgemäße Verwendung überschreitet. • Die falsche Anwendung dieses Gerätes und schlechtes Urteilsvermögen können zu Verletzungen führen. Treffen Sie bei der Benutzung des Gerätes stets Sicherheitsvorkehrungen und lassen Sie Umsicht walten. -
Page 5: Montage
MONTAGE Montieren Sie auf jeder Seite des Wagens ein Rad an der jeweiligen Achse und sichern Sie die Räder mit den Klappsplinten. Stecken Sie jeden Splint in die jeweilige Achse und klappen Sie den Ring um. Damit fixieren Sie den Klappsplint. -
Page 6: Befestigungsmöglichkeiten
BEFESTIGUNGSMÖGLICHKEITEN Verwenden Sie die mitgelieferten Spanngurte, um das Kajak am Wagen zu befestigen. Da die Kanuvariaten sich unterscheiden, kann das Kajak in verschiedenen Positionen befestigt werden, um zur jeweiligen Form zu passen. Achten Sie darauf, dass die Spanngurte vor dem Transport völlig gesichert sind und nicht durchhängen. - Page 7 Dear Customer, Congratulations on purchasing this device. Please read the following instructions carefully and follow them to prevent possible damages. We assume no liability for damage caused by disregard of the instructions and improper use. Scan the QR code to get access to the latest user manual and more product information.
-
Page 8: Security Instructions
SECURITY INSTRUCTIONS Intended usage: This product is intended for transporting a single canoe or kayak only. Use of the kayak dolly beyond the product‘s original intent is not guaranteed or supported as acceptable use by the manufacturer. • Injuries from this product can result from improper use and poor judgement. -
Page 9: Mounting
MOUNTING Attach a wheel to each side of the dolly cart wheel axle and secure it in place with a wheel pin. Each pin slides through the axle, then flip the ring over to hold it in place. Pass through the loop Pass through... -
Page 10: Mounting Options
MOUNTING OPTIONS Use the included tie-down strap to secure a canoe or kayak to the dolly. Since kayak and canoe designs vary, the dolly cart can be mounted in different locations to fit these configurations. Ensure the tie-down strap is completely secured and free of excess slack before transporting a canoe or kayak. - Page 11 Estimado cliente: Le felicitamos por la adquisición de este producto. Lea atentamente el siguiente manual y siga cuidadosamente las instrucciones de uso con el fin de evitar posibles daños. La empresa no se responsabiliza de los daños ocasionados por un uso indebido del producto o por haber desatendido las indicaciones de seguridad.
-
Page 12: Indicaciones De Seguridad
INDICACIONES DE SEGURIDAD Uso previsto del aparato: Este aparato está diseñado para transportar un solo kayak. El fabricante no es responsable de cualquier otro uso, distinto al uso previsto. • El uso incorrecto de este aparato y el mal discernimiento pueden provocar lesiones. -
Page 13: Montaje
MONTAJE Monte una rueda en cada lado del carro en el eje respectivo y asegure las ruedas con los pasadores de clavija. Inserte cada pasador de clavija en el eje respectivo y doble el anillo. De esta manera, el pasador queda bloqueado. Pasa a través del bucle... -
Page 14: Posibilidades De Montaje
POSIBILIDADES DE MONTAJE Use las correas de tensión suministradas para asegurar el kayak al carro. Como hay kayaks de diferentes formas, se puede fijarlos en diferentes posiciones para adaptarlos mejor al carro. Compruebe que las correas de tensión estén completamente aseguradas y no queden colgando, ya que podría provocar que el carro se resbale, sobre todo, en terreno difícil. - Page 15 Chère cliente, cher client, Toutes nos félicitations pour l’acquisition de ce nouvel appareil. Veuillez lire attentivement et respecter les instructions de ce mode d’emploi afin d’éviter d’éventuels dommages. Le fabricant ne saurait être tenu pour responsable des dommages dus au non-respect des consignes de sécurité...
-
Page 16: Consignes De Sécurité
CONSIGNES DE SÉCURITÉ Utilisation prévue : Cet appareil est destiné au transport d‘un seul kayak. Le fabricant n‘est pas responsable d‘une utilisation hors du cadre prévu. • Une mauvaise utilisation de cet appareil et une mauvaise appréciation peuvent entraîner des blessures. Prenez toujours des précautions de sécurité... -
Page 17: Montage
MONTAGE Montez une roue de chaque côté du chariot sur l‘essieu et fixez les roues avec les goupilles fendues pliantes. Placez chaque goupille fendue dans l‘axe et repliez l‘anneau pour y fixer la goupille fendue. Passer par la boucle Passer par la boucle Serrez une sangle... -
Page 18: Options De Fixation
OPTIONS DE FIXATION Utilisez les sangles fournies pour attacher le kayak au chariot. Comme il existe différents modèles de kayaks, vous pouvez l‘attacher dans différentes positions adaptées à sa forme. Assurez-vous que les sangles d‘arrimage sont bien fixées avant le transport et ne se relâchent pas. - Page 19 Gentile cliente, La ringraziamo per aver acquistato il dispositivo. La preghiamo di leggere attentamente le seguenti istruzioni per l’uso e di seguirle per evitare possibili danni tecnici. Non ci assumiamo alcuna responsabilità per danni scaturiti da una mancata osservazione delle avvertenze di sicurezza e da un uso improprio del dispositivo.
-
Page 20: Avvertenze Di Sicurezza
AVVERTENZE DI SICUREZZA Utilizzo corretto: questo dispositivo è progettato per il trasporto di un kayak monoposto. Il produttore non si assume alcuna responsabilità per utilizzi che trascendono l’uso corretto. • L’utilizzo errato di questo dispositivo e una cattiva capacità di giudizio possono causare lesioni. -
Page 21: Montaggio
MONTAGGIO Montare su ogni lato del carrello una ruota sul rispettivo asse e fissarle con le copiglie pieghevoli. Inserire ogni copiglia nel rispettivo asse a piegare l’anello, in modo da fissarle. Passare attra- verso il circuito Passare attra- verso il circuito Fissare una cinghia su ogni... -
Page 22: Possibilità Di Fissaggio
POSSIBILITÀ DI FISSAGGIO Utilizzare le cinghie di fissaggio in dotazione per bloccare il kayak. Dato che ci sono diverse tipologie di kayak, è possibile fissarli in diverse posizioni in base alle diverse forme. Assicurarsi che le cinghie siano completamente fissate prima del trasporto e che non penzolino, altrimenti possono causare lo scivolamento del carrello, in particolare su terreni sconnessi.
Need help?
Do you have a question about the Sea Mule SL and is the answer not in the manual?
Questions and answers