Advertisement
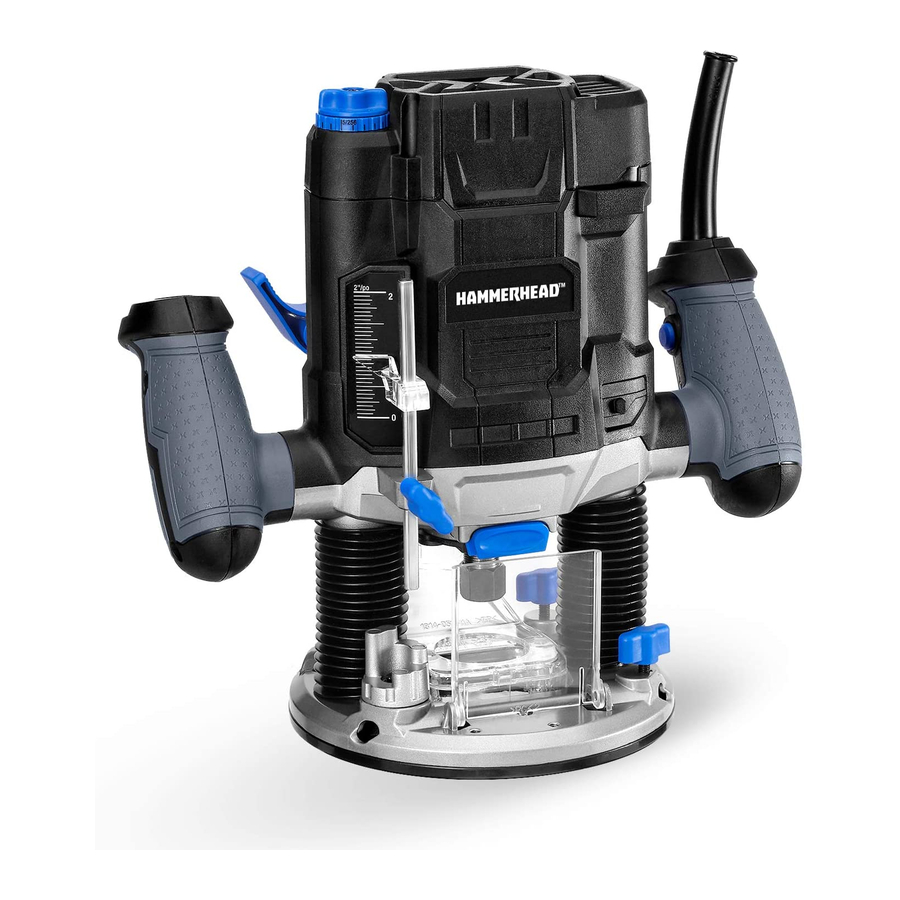
10.0 AMP PLUNGE ROUTER
MODEL HAPR100
ATTACH YOUR RECEIPT HERE
Serial Number _____________________ Purchase Date ______________________
Questions, problems, missing parts? Before returning to your retailer, call
our customer service department at 1-877-888-1880, 8:30 a.m. – 8:00 p.m.
EST (Monday – Friday) & 10:00 a.m. – 6:00 p.m. EST (Saturday and Sunday).
Advertisement
Table of Contents

Related Manuals for Hammerhead HAPR100


Summary of Contents for Hammerhead HAPR100
- Page 1 10.0 AMP PLUNGE ROUTER MODEL HAPR100 ATTACH YOUR RECEIPT HERE Serial Number _____________________ Purchase Date ______________________ Questions, problems, missing parts? Before returning to your retailer, call our customer service department at 1-877-888-1880, 8:30 a.m. – 8:00 p.m. EST (Monday – Friday) & 10:00 a.m. – 6:00 p.m. EST (Saturday and Sunday).
-
Page 2: Table Of Contents
TABLE OF CONTENTS Product Specifications ........... . 3 Safety Information . -
Page 3: Product Specifications
Please read and understand this entire manual before attempting to assemble or operate this product. If you have any questions regarding the product, please call Hammerhead customer service at 1-877-888-1880, 8:30 a.m. – 8:00 p.m. EST (Monday – Friday) &... -
Page 4: Safety Information
IMPORTANT: This tool should only be serviced only by a qualified service technician. IMPORANT SAFETY INSTRUCTIONS SAVE THESE INSTRUCTIONS-This manual contains important safety and operating instructions for router Model HAPR100. DANGER To reduce the risk of fire or electric shock, carefully follow these operating instructions. - Page 5 SAFETY INFORMATION Work area safety • Keep work area clean and well lit. Cluttered or dark areas invite accidents. • Do not operate power tools in explosive atmospheres, such as in the presence of flammable liquids, gases or dust. Power tools create sparks which may ignite the dust or fumes.
- Page 6 SAFETY INFORMATION • Remove any adjusting key or wrench before turning the power tool on. A wrench or a key left attached to a rotating part of the power tool may result in personal injury. • Do not overreach. Keep proper footing and balance at all times. This enables better control of the power tool in unexpected situations.
- Page 7 SAFETY INFORMATION • Keep handles and grasping surfaces dry, clean and free from oil and grease. Slippery handles and grasping surfaces do not allow for safe handling and control of the tool in unexpected situations. Service • Have your power tool serviced by a qualified repair person using only identical replacement parts.
-
Page 8: Preparation
SAFETY INFORMATION • Allow sufficient run-down time for bit after turning the router off. Wait for it to come to a complete stop before removing it from the workpiece. • Never slow the router down with your hands. • Do not touch the bit immediately after operation. It may be extremely hot and could burn you. -
Page 9: Package Contents
PACKAGE CONTENTS 10.0AMP PLUNGE ROUTER... - Page 10 PACKAGE CONTENTS PARTS DESCRIPTION Fine adjustment knob Wrench storage Handle Locking lever Depth rod Depth stop turret Spindle lock button Knob for edge guide Chip shield Plunge lock lever ON/OFF switch Collet nut Dust extraction adaptor Base plate Lock-off button Depth-of-cut scale Depth indicator Edge Guide...
-
Page 11: Operating Instructions
OPERATING INSTRUCTIONS 1. Installing/removing the router bit To install the bit a) Unplug the router. b) Rotate the chip shield to flat. c) Place the router upside down on a smooth, flat surface. d) Keep the spindle lock button depressed and rotate the spindle until the spindle lock fully engages. - Page 12 OPERATING INSTRUCTIONS 2. Coarse adjusting the depth of cut The depth of cut is the distance between the depth rod and the depth stop turret. The depth rod and the depth stop turret are used to control cutting depth as follows. a) Unplug the router.
- Page 13 OPERATING INSTRUCTIONS 3. Fine adjusting the depth of cut The router is equipped with a fine adjustment mechanism, which can be used after the plunge lock has been set at any plunge position and provides precise adjustment of the router bit position for unmatched accuracy.
- Page 14 OPERATING INSTRUCTIONS 4.Deep cuts Use the depth stop turret to change among different depths without changing the depth rod settings. The most common use of this feature is making successively deeper cuts to achieve a final depth of cut that is too deep to accomplish in a single pass.
- Page 15 25000 diameter cutting bits 28000 HAPR100 comes with a collet (Φ1/4") ,This collet is only used for the cutting bits with 1/4 inch shank. WARNING: Make sure use only rotary cutting bits of the correct shank diameter for the collet mounted on the router.
- Page 16 OPERATING INSTRUCTIONS 6. On/off swtich The router is equipped with a lock-off button to avoid unintentional starting. To switch on, depress the lock-off button and squeeze the on/off switch. To switch off, release the on/off switch. 7. Dust extraction adaptor Dust extraction prevents large accumulations of dust, high concentrations of dust in the ambient...
- Page 17 OPERATING INSTRUCTIONS 8. Routing with the edge guide a) Insert the edge guide rods through the holes in the base plate. b) Slide the edge guide to desired width and fasten it with the knobs for the edge guide. c) Guide the router with uniform feed and sideward pressure on the edge guide along the edge of the workpiece.
- Page 18 OPERATING INSTRUCTIONS 10. Feeding the Router The secrets to professional routing are a careful set-up for the cut, selecting the proper depth of cut, knowing how the cutter bit reacts in your workpiece, and the rate and direction of feed of the router. a) Direction of Feed-External Cuts External Cuts Feeding the bit from left to right will...
- Page 19 OPERATING INSTRUCTIONS b) Direction of Feed- Internal Cuts GUIDE OUTSIDE When making an internal cut, such as a groove, dado, or slot, always have the Bit Rotation guide you are using with the router (edge guide, straight edge, or board guide) on the right-hand side of the router as you Thrust make the cut.
- Page 20 OPERATING INSTRUCTIONS 11. Feed rate The proper rate of feed depends on several factors: the hardness and moisture content of the workpiece, the depth of cut, and the cutting diameter of the bit. When cutting shallow grooves in soft woods such as pine, you may use a faster rate of feed. When making deep cuts in hardwoods such as oak, you should use a slower rate of feed.
- Page 21 OPERATING INSTRUCTIONS With the reduced load on the motor caused by the slow feed, the cutter bit has a tendency to bounce off the sides of the cut in the workpiece, producing a cut with a rippled finish instead of clean straight sides. 12.
-
Page 22: Care And Maintenance
CARE AND MAINTENANCE WARNING: Always disconnect the device before performing any adjustment or maintenance operation. if the replacement of the supply cord is necessary, this has to be done by the manufacturer or his agent in order to avoid a safety hazard Disconnect from the power supply immediately if the supply cord is damaged. -
Page 23: Troubleshooting
TROUBLESHOOTING Suspected malfunctions are often due to causes that the users can fix themselves. Therefore, check the product using this section. In most cases the problem can be solved quickly. WARNING: Only perform the steps described within these instructions! All further inspection, maintenance and repair work must be performed by an authorised service centre or a similarly qualified specialist if you cannot solve the problem yourself! PROBLEM... -
Page 24: Warranty
This Router is warranted to the original purchaser from the original purchase date for 24 Months, Hammerhead consumer portable power tool models will be free from defects in material or workmanship for a period of ninety days if the tool is used for professional use.
Need help?
Do you have a question about the HAPR100 and is the answer not in the manual?
Questions and answers