Table of Contents
Advertisement
Quick Links
Advertisement
Table of Contents

Related Manuals for GAIN EXPRESS WEA-289

Summary of Contents for GAIN EXPRESS WEA-289
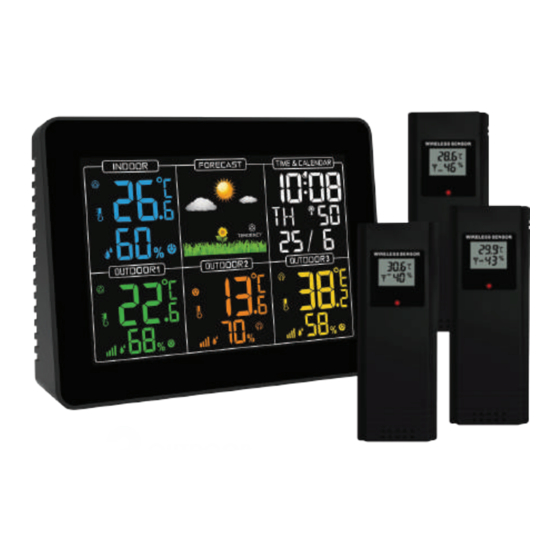
- Page 1 COLORFUL SCREEN DISPLAY OUTDOOR SENSORS...
-
Page 2: Table Of Contents
CONTENTS Page English ..................1 - 9 Features ................... Main Parts ................... LCD full display ................... Sensor Parts ................... Package Includes ................... Default Settings ................... Operations ................... Setting up the Main unit ................... Weather Trend ................... Installation ................... Detail Specifications ................... Safety notes ................... -
Page 3: English
FEATURES • Time display in English • Time display as hour and minute and second • Calendar in month and year from 2000 to 2099 • Hour in 12H/24H • Temperature in °C/°F • Three sensors displaying at the same time •... -
Page 4: Lcd Full Display
2. UP button Under normal mode, press this button to switch Celsius or Fahrenheit unit for temperature. For adjusting the date and time in the setting mode and alarm mode 3. DOWN button For adjusting the date and time in the setting mode and alarm mode 4. -
Page 5: Sensor Parts
Current time Symbol for enabled alarm Display of seconds or symbol for the alarm time (depending on the selected mode) Trend symbol “rising” Indoor temperature (in °C / °F) Symbol for the temperature Symbol for the humidity Indoor humidity (in %) CH1 Outdoor temperature (in °C / °F) Symbol for the sensor connection status CH1 Outdoor Humidity (in %) -
Page 6: Package Includes
PACKAGE INCLUDES • 1 x Weather station • 3 x Sensors for outdoors • 1 x USB line • 1 x User manual DEFAULT SETTINGS Time: AM 0:00 Date: Jan 1st, 2016 Temperature °C Alarm function off Hour in 24H NOTE: This weather station will be reset when changing new batteries. -
Page 7: Setting Up The Main Unit
If the main unit cannot receive the signal after three minutes, you can hold and press “CH” button at the back of main unit to re-register or take out the batteries and repeat the previous steps from a ~ e. The sensors will be reset after changing new batteries. -
Page 8: Weather Trend
• Turning on / off alarm Press “SET” button to enter alarm time display (AL) mode, Press UP or DOWN button to enable the alarm. The symbol will be displayed. Press UP or DOWN button again to disable the alarm. The symbol will disappear from the display. -
Page 9: Detail Specifications
Before the final installation, ensure that there is sufficient reception between the intended installation locations. When installing the sensor, ensure that it is protected from direct sunlight and rain. The international standard height for measuring air temperature is 1.25m (4ft) above ground. -
Page 10: Safety Notes
NOTE: If the operating area is higher than the range, the temperature will display “HI” If the operating area is lower than the range, the temperature will display “LO” INDOOR/OUTDOOR HUMIDITY (MAIN UNIT AND SENSORS) Operating humidity range 20% RH ~ 95%RH ±... -
Page 11: Warning
WARNING - BATTERIES AND USB LINES Immediately remove and dispose of dead batteries from the product. Only use batteries (or rechargeable batteries) that match the specified type. Do not mix old and new batteries or batteries of a different type or make. When inserting batteries, note the correct polarity (+ and - markings) and insert the batteries accordingly.