Table of Contents
Advertisement
USER GUIDE
WHAT YOU'LL NEED
• Second Shooter Pro
• Slider
• Motor
• Mount
• Camera Control Cable
(
or external intervalometer)
TABLE OF CONTENTS
Controller. . . . . . . . . . . . . . . . . . . . . . . . . . . . . . . . . . . . . . . . . . . . . . . . . . . . . . . . . . . . . . . . . . . . . . . . . . .
• Slider
Motor. . . . . . . . . . . . . . . . . . . . . . . . . . . . . . . . . . . . . . . . . . . . . . . . . . . . . . . . . . . . . . . . . . . . . . . . .
Axis. . . . . . . . . . . . . . . . . . . . . . . . . . . . . . . . . . . . . . . . . . . . . . . . . . . . . . . . . . . . . . . . . . . . . . . . .
• Intervalometer
kOS. . . . . . . . . . . . . . . . . . . . . . . . . . . . . . . . . . . . . . . . . . . . . . . . . . . . . . . . . . . . . . . . . . . . . . . . . . . . . . .
App. . . . . . . . . . . . . . . . . . . . . . . . . . . . . . . . . . . . . . . . . . . . . . . . . . . . . . . . . . . . . . . . . . . . . . . . . . . . .
• Setting Up PS4
Mode. . . . . . . . . . . . . . . . . . . . . . . . . . . . . . . . . . . . . . . . . . . . . . . . . . . . . . . . . . . . . . . . . . . . . . . . . . . .
Move. . . . . . . . . . . . . . . . . . . . . . . . . . . . . . . . . . . . . . . . . . . . . . . . . . . . . . . . . . . . . . . . . . . . . . . .
•
Turntable. . . . . . . . . . . . . . . . . . . . . . . . . . . . . . . . . . . . . . . . . . . . . . . . . . . . . . . . . . . . . . . . . . . . . . . . . . . .
Move. . . . . . . . . . . . . . . . . . . . . . . . . . . . . . . . . . . . . . . . . . . . . . . . . . . . . . . . . . . . . . . . . . . . . . .
. . . . . . . . . . . . . . . . . . . . . . . . . . . . . . . . . . . . . . . . . . . . . . . . . . . . . . . . . . . . . . . . . . . . . . . . . . .
Lapse. . . . . . . . . . . . . . . . . . . . . . . . . . . . . . . . . . . . . . . . . . . . . . . . . . . . . . . . . . . . . . . . . . . . . . . . . .
Motion. . . . . . . . . . . . . . . . . . . . . . . . . . . . . . . . . . . . . . . . . . . . . . . . . . . . . . . . . . . . . . . . . . . . . . . . .
Firmware. . . . . . . . . . . . . . . . . . . . . . . . . . . . . . . . . . . . . . . . . . . . . . . . . . . . . . . . . . . . . . . . . . . . .
™
. . . . . . . . . . . . . . . . . . . . . . . . . . . . . . . . . . . . . . . . . . . . . . . . . . . . . . . . .
Connect. . . . . . . . . . . . . . . . . . . . . . . . . . . . . . . . . . . . . . . . . . . . . . . . . . . . . . . . . . . . . . . .
Controller. . . . . . . . . . . . . . . . . . . . . . . . . . . . . . . . . . . . . . . . . . . . . . . . . . . . . . . . . . . . .
. . . . . . . . . . . . . . . . . . . . . . . . . . . . . . . . . . . . . . . . . . . . . . . . . . . . . . . . . . . . . . . . . . . . . .
. . . . . . . . . . . . . . . . . . . . . . . . . . . . . . . . . . . . . . . . . . . . . . . . . . . . . . . . . . . . . . . . . .
SETUP & CONFIGURATION
SECOND SHOOTER PRO
2
3
3-5
6
6
7
8
8
9
10
10
10
11
12
12
13
14
14
Advertisement
Table of Contents

Subscribe to Our Youtube Channel
Related Manuals for Kessler Second Shooter Pro


Summary of Contents for Kessler Second Shooter Pro
-
Page 1: Table Of Contents
USER GUIDE SETUP & CONFIGURATION SECOND SHOOTER PRO WHAT YOU’LL NEED • Second Shooter Pro ™ • Slider • Motor • Mount • Camera Control Cable or external intervalometer) TABLE OF CONTENTS Controller................ -
Page 2: The Controller
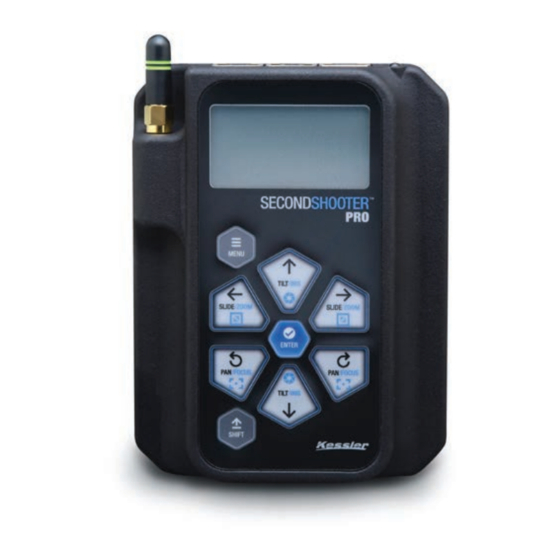
USER GUIDE THE CONTROLLER SECOND SHOOTER PRO Extended Range WiFi Antenna This isn’t just for style, the external antenna provides a longer operational range. It is recommended not to block the antenna from the receiving device for maximum operational range. -
Page 3: Getting Started: Hardware Set-Up
USER GUIDE GETTING STARTED SECOND SHOOTER PRO HARDWARE SET-UP Slider Motor Choose your desired motor speed by arranging the proper combination of motor pulleys. The metal pin on the Slider motor is to be used for storing the extra pulley. - Page 4 USER GUIDE GETTING STARTED SECOND SHOOTER PRO Install the Small Pulley onto the Slider Motor. The pre-installed belt (labled 110XL) on the Slider Motor is to be used in most applications. However, if using the Small Pulley in conjunction with the Shuttle Pod, Shuttle Pod Mini, Shuttle Dolly or Pocket Dolly v2.0 follow steps 5-6.
- Page 5 *This combination requires the pulley from the Motor Mount Kit to be used on the slider. SLOW (HIGH TORQUE) Mount Slider motor to slider using a Kessler Motor Mount. Connect CAT5 cable from Slider motor to the SLIDER port on the Controller.
-
Page 6: Pan & Tilt Axis
Mount your Pan & Tilt head utilizing the 3/8”-16 and ¼” – 20 holes on the underside of the Head. (Recommended Mounting: Kessler Kwik Release + 3/8”-16 Kwik Short Plate) Connect CAT5 cable from the side of the Pan base to the PAN port on the controller. -
Page 7: Using Kos
SECOND SHOOTER PRO To use the Second Shooter Pro controller with kOS software, you will need kOS for Second Shooter v4.5 or greater for Mac, Windows or iPad. The Second Shooter Pro is not compatible with kOS software versions prior to v4.5. -
Page 8: Remote App
SECOND SHOOTER PRO PAIRING THE SECOND SHOOTER REMOTE APP Go to your iPhone settings>Wifi> and select Second Shooter Pro. Return to the Second Shooter Remote app and the connection should automatically be made. For further support and troubleshooting, see Second Shooter Remote manual. -
Page 9: Controller
OPERATING MODE is going to be a master or slave unit. (If bridging a Second Shooter Pro and first generation Second Shooter Controller you will want to set the Second Shooter Pro controller as the master unit.) -
Page 10: Setting Up A Move
USER GUIDE SETTING UP A MOVE SECOND SHOOTER PRO After powering up the system you will be presented with four options: • P R O G R A M M O V E • M A N U A L M O V E •... -
Page 11: Program Move
USER GUIDE SETTING UP A MOVE SECOND SHOOTER PRO PROGRAM MOVE Select P R O G R A M M O V E to set the 1st (begin) and 2nd (end) key frames for the move. Be sure each axis is in the desired position before selecting... -
Page 12: Loop/Scrub
USER GUIDE SETTING UP A MOVE SECOND SHOOTER PRO Now choose one of the following shooting modes: • LO O P / S C R U B • T I M E L A P S E • S T O P M OT I O N... -
Page 13: Stop Motion
USER GUIDE SETTING UP A MOVE SECOND SHOOTER PRO Set the R A M P value by selecting with Enter and adjusting with the Up and Down arrows: Ramp – • Percentage value indicates the change in speed of the movement over the entire move. -
Page 14: Updating Firmware
USER GUIDE UPDATING FIRMWARE SECOND SHOOTER PRO Download and extract the attached zip file. There are 2 files within the zip. The one you will need is S E C O N D S H O OT E R +. I M G Plug in the power cord for the Second Shooter controller.
Need help?
Do you have a question about the Second Shooter Pro and is the answer not in the manual?
Questions and answers