Table of Contents
Advertisement
AUTOMATIC ICE MAKER
ITEM: 94023
OWNER'S MANUAL AND SAFETY INSTRUCTIONS
SAVE THIS MANUAL: KEEP THIS MANUAL FOR SAFETY WARNINGS, PRECAUTIONS, ASSEMBLY,
OPERATING, INSPECTION, MAINTENANCE AND CLEANING PROCEDURES. WRITE THE PRODUCT'S
SERIAL NUMBER ON THE BACK OF THE MANUAL NEAR THE ASSEMBLY DIAGRAM (OR MONTH
AND YEAR OF PURCHASE IF PRODUCT HAS NO NUMBER).
FOR QUESTIONS PLEASE CALL OUR CUSTOMER SUPPORT: (909) 628 0880 MON-FRI 9AM TO 3PM PST
Advertisement
Table of Contents

Related Manuals for Barton 94023


Summary of Contents for Barton 94023
- Page 1 AUTOMATIC ICE MAKER ITEM: 94023 OWNER’S MANUAL AND SAFETY INSTRUCTIONS SAVE THIS MANUAL: KEEP THIS MANUAL FOR SAFETY WARNINGS, PRECAUTIONS, ASSEMBLY, OPERATING, INSPECTION, MAINTENANCE AND CLEANING PROCEDURES. WRITE THE PRODUCT’S SERIAL NUMBER ON THE BACK OF THE MANUAL NEAR THE ASSEMBLY DIAGRAM (OR MONTH AND YEAR OF PURCHASE IF PRODUCT HAS NO NUMBER).
-
Page 2: Important Safety Information
IMPORTANT SAFETY INFORMATION GENERAL SAFETY WARNINGS When using electrical appliances, basic safety precautions should be followed to reduce the risk of fire, electric shock, and injury to persons or property. Read all instructions before using any appliance. SAFETY The warnings, precautions, and instructions discussed in this instruction manual cannot cover all possible conditions and situations that may occur. - Page 3 IMPORTANT SAFETY INFORMATION WARNING! DO NOT damage the refrigerant circuit. WARNING! Children should be supervised to ensure that they DO NOT play with the appliance. WARNING! This appliance must be earthed. And use the 110-120V/60Hz earthed power supply. DANGER! Risk Of Fire or Explosion. Flammable Refrigerant Used. DO NOT Use Mechanical Devices To Defrost Ice Maker.
-
Page 4: Specifications
SPECIFICATIONS RATINGS NOTE: TESTED AT 70°F ROOM TEMPERATURE AND 50°F WATER TEMPERATURE. -
Page 5: Main Unit
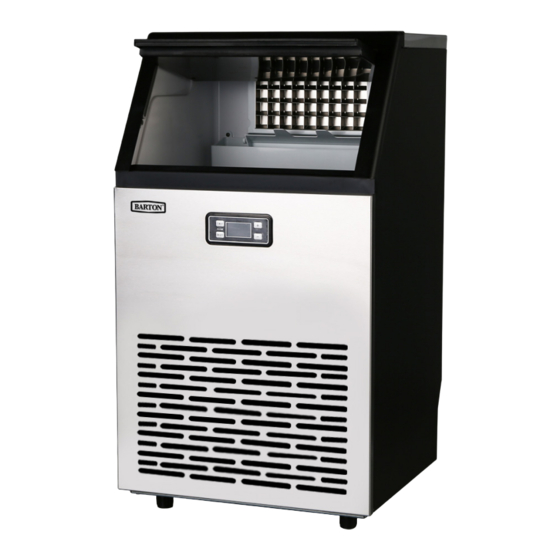
INFORMATION MAIN UNIT 1. Top cover 2. Door for ice taking 3. Ice-making & its water tank assembly: Including ice-making evaporator, water tank, water pump and some detecting parts 4. Front panel 5. Operation panel 6. Air outlet: Must keep the air circulate smoothly, hot air will blow out when unit running. 7. - Page 6 INFORMATION ICE-MAKER WATER TANK PARTS A. Water dividing pipe with nine little holes, water will flow out from these little holes. If no water flows out, it can be disassembled and cleaned. B. Evaporator (ice-making module) C. Ice full detecting board: Use to detect the inner cabinet is full of ice or not, and to check the ice-harvest process is over or not.
-
Page 7: Operation Panel
INFORMATION OPERATION PANEL A. “TIMER CLEAN” Button: Quickly press this button once, to enter the Timer setting program; And press this button for more than 5 seconds, to enter the Cleaning program. B. “ON/OFF”button: When the unit is off, press this button to turn on the unit; And during the Self-cleaning program, or normal ice-making state, press this button to turn off the unit at once;... -
Page 8: Unpacking Your Ice Maker
OPERATION UNPACKING YOUR ICE MAKER 1. Remove the exterior and interior packaging. Check if all the accessories, including instruction manual, ice scoop, white water supplying hose, 1/4 inches to 1/2 inches water quick connector and the water draining pipe, etc., are inside or not. If any parts are missing, please contact our customer service. 2. -
Page 9: Electrical Requirement & Connections
OPERATION To ensure proper ventilation for your ice maker, the front of the unit must be completely unobstructed. Allow at least 6” clearance at rear, and 2” of two sides for proper air circulation. Allow about 20 inches high space at top to fill water freely from unit top when using manual water supply way and for proper air circulation. - Page 10 OPERATION RECOMMENDED GROUNDING METHOD IMPORTANT: Be sure to use the new hose-sets supplied with the appliance to connect to water mains and that old hose-sets should not be reused. 1. Connect the water supplying hose to the unit (For automatic water supplying). Step 1: First remove the clipper on the water inlet port for main water supplying (indicated in the following illustration “B”) located at unit back, then pushing inwards the anti-dusty plug, use your other hand’s finger to press the out circle to fix the anti-dusty plug, then take down the anti-dusty plug;...
-
Page 11: Display Controls
OPERATION DISPLAY CONTROLS 1. Starting up: Plug in the power plug, the symbol will flash in the display window,press the ON/OFF button on the control panel, the machine will start to make ice when the external pipe add water to reach the standard level on the water tank through the electromagnetic water valve, then the symbol will change to light on always in display window and symbol rotate;... -
Page 12: Automatic Self-Cleaning Program
OPERATION How to Cancel Timer: When the unit has a timing, the display window will display “XX H”, press TIMER button, the timing is cancelled after the number on the screen and “H” are extinguished. When the unit has a timing, the display area in the lower left corner will display the timing time and the ice making setting time and the display content will be switched every 5S. -
Page 13: Preparing The Icemaker For Long Storage
OPERATION PREPARING THE ICE MAKER FOR LONG STORAGE If the ice maker will not be used for a long time, or is to be moved to another place, it will be necessary to drain out all of the water in the system. 1. -
Page 14: Maintenance
MAINTENANCE INTERIOR CLEANING FOR ICE STORAGE BIN The ice storage bin should be sanitized occasionally. Clean the bin before the ice maker is used for the first time and reused after stopping for an extended period of time. It is usually convenient to sanitize the bin after the ice making system has been cleaned, and the storage bin is empty. - Page 15 MAINTENANCE SUGGESTION: After cleaning the interior parts and install back to its respective position, and return machine to work, discard first batch of ice. SYSTEM CLEANING USING NU-CALGON NICKLE SAFE ICE-MACHINE CLEANER Minerals that are removed from water during the freezing cycle will eventually form a hard scaly deposit in the water system.
-
Page 16: Cleaning Suggestion
MAINTENANCE CLEANING SUGGESTION 1) DAILY CLEANING The ice shovel, door and the water dividing pipe should be cleaned by yourself per each day. At the end of every day, rinse the ice shovel and wipe the both sides of the door with a clean cloth. 2) SEMI-MONTHLY CLEANING The ice shovel, ice bin, water tank, the ice-full detecting plate and the surface of the evaporator are to be cleaned by yourself semi-monthly according to interior cleaning program. -
Page 17: Troubleshooting
TROUBLESHOOTING... -
Page 18: Parts Diagram
PARTS DIAGRAM... -
Page 19: Parts List
PARTS LIST... -
Page 20: Please Read The Following Carefully
WARRANTY PLEASE READ THE FOLLOWING CAREFULLY THE MANUFACTURER AND/OR DISTRIBUTOR HAS PROVIDED THE PARTS LIST AND ASSEMBLY DIAGRAM IN THIS MANUAL AS A REFERENCE TOOL ONLY. NEITHER THE MANUFACTURER OR DISTRIBUTOR MAKES ANY REPRESENTATION OR WARRANTY OF ANY KIND TO THE BUYER THAT HE OR SHE IS QUALIFIED TO MAKE ANY REPAIRS TO THE PRODUCT, OR THAT HE OR SHE IS QUALIFIED TO REPLACE ANY PARTS OF THE PRODUCT.
Need help?
Do you have a question about the 94023 and is the answer not in the manual?
Questions and answers
I need to replace my operation panel as mine has burnt out
The provided context does not explain how to replace the operation panel for Barton part number 94023. It states that all repairs and parts replacements should be done by certified and licensed technicians, not by the buyer.
Therefore, the operation panel replacement must be performed by a qualified service professional.
This answer is automatically generated