Table of Contents
Advertisement
Quick Links
Distributed by:
Ultima Health & Wellness Solutions
www.ultimahealthsolutions.com
1-855-254-2220
All rights reserved. No part of this document may be
reproduced or transmitted in any form or by any means,
mechanical, photocopying, or recording
without prior written permission from E Pulse Magnetics International
1
Advertisement
Table of Contents

Related Manuals for Ultima EPulse Elite


Summary of Contents for Ultima EPulse Elite
- Page 1 Distributed by: Ultima Health & Wellness Solutions www.ultimahealthsolutions.com 1-855-254-2220 All rights reserved. No part of this document may be reproduced or transmitted in any form or by any means, mechanical, photocopying, or recording without prior written permission from E Pulse Magnetics International ...
- Page 2 ...
-
Page 3: Table Of Contents
Safety Against Risk of Fire ........v Mechanical Safety ..........v Safety Precautions In Using the Device ......vi Quick Start Guide ........vii-viii Safety Operations ........ix-xi Probe Replacement Procedure (Appendix A) ..... xii-xiv EPulse Elite User Controls (Appendix B) ......xv ... -
Page 4: Safety Notice
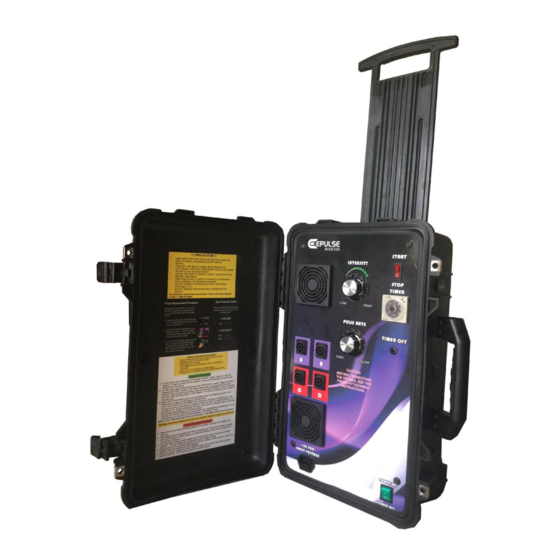
EPulse Elite Specification Size: 24.0” x 15” x 11“ Frequency: 1-50Hz Weight: 42lbs / 19kg Input Voltage: 120 VAC / 60Hz Fuse Rating: 4-Amp (The fuse is located below the input power socket) ... -
Page 5: Safety During Installation And/Or Maintenance
Safety During Installation and/or Maintenance Do not attempt to lift without assistance. Clean the enclosure with “armor all” or like substance with soft cloth Any service on this equipment that requires removal of any covers can expose parts which involve the risk of electric shock or personal injury. -
Page 6: Safety Against Risk Of Fire
Fuses protect certain electrical circuits within this device against over-current conditions. For continued protection against the risk of fire, replace the fuse only with the same type and rating specified in this Instruction Manual (Refer EPulse Elite Specification section). ... -
Page 7: Safety Precautions In Using The Device
Safety Precautions in using the device Connect the probe to the device before toggling the START/STOP switch to START( I ) position. Rest the probe on a non-metallic material (i.e. wooden or plastic chair) when not in use. Refer to Appendix A on how to connect the probes. When the START/STOP switch is on the START (... -
Page 8: Quick Start Guide
Quick Start Guide: Quick guide on how to operate the EPulse Elite Before beginning of operation: Make sure that the green POWER ON/OFF switch is in the OFF position. Start/Stop switch is in the STOP(O) position. Probe terminals are connected. ... - Page 9 POWER OFF/Reset Procedure: 1. When the PRE-SET time on the timer has expired (default is 15 minutes), the TIMER OFF LED indicator will light up. 2. Or, the pulsing may be stopped ANYTIME by toggling the START/STOP switch towards the STOP [O] position. [Skip S tep 3 t o restart the pulsing O R skip to S tep 4 o nwards to turn off the machine.] ...
-
Page 10: Safety Operations
Safety Operations For the safe operation of the device, the following should be observed: 1. Make sure POWER ON/OFF switch is in the OFF [O] position at all times when NOT IN USE. 2. BEFORE TURNING ON the device, make sure the Probes are connected to the Probe Connections (Refer to picture below and Appendix A) then rest the probe on a ... - Page 11 4. Set the TIMER to desired number of minutes of pulsing (default setting is 15 minutes). The TIMER is set by turning the TIMER knob clockwise or counter-clockwise to set the time from 5 to 30 minutes. ...
- Page 12 6. Toggle the START/STOP switch to START( I ) position for the device to start pulsing. ...
- Page 13 7. Set the PULSE RATE knob to desired setting. Turn the knob to the RIGHT for SLOWER pulse rate and to the LEFT for FASTER pulse rate. Note also that turning the knob to the EXTREME position to EITHER LEFT OR RIGHT will cause the pulsing to stop;...
-
Page 14: Probe Replacement Procedure
Make sure the POWER ON/OFF switch is in the OFF position and the device is disconnected from the main power source. Note: The Probe Attachment Instruction can be found on the inside of the lid of EPulse Elite. Refer to the picture below. ... - Page 15 To remove the probe, pull the silver latch. (always remove the probe connector to the right first). DO NOT let go of the silver latch until the connector is removed. II. CONNECTING TWO (2) PROBES To use two (2) probe only, connections A and C (yes, NOT B) will be used for the first probe, then connections B and D will be used for the second probe. ...
- Page 17 Similar to Step #1, take any of the probe connector for the second probe and aim it towards S ocket B of the probe connections. Insert the probe connectors at an angle as shown below Similar to Step #2, insert the other connector of the second probe to S ocket D then turn both connectors towards the right until you hear a click ...
-
Page 18: Epulse Elite User Controls
EPulse Elite User Controls (Appendix B)
Need help?
Do you have a question about the EPulse Elite and is the answer not in the manual?
Questions and answers