Advertisement
Quick Links
Quick Installation Guide
Hawkvision
TM
Universal Smart
Camera
Model No. HNC3W
Package Contents
• 1x HNC3W HawkVision Universal Smart Cam
• 1x Power Adapter 5V/1.2A
• 1x Camera Stand/Mounting Kit
• 1x Three foot Ethernet Cable
• 1x Setup CD-ROM
• 1x Quick Installation Guide (QIG)
System Requirements
• Windows XP or later with an available CD/DVD-Rom Drive
(only required for initial setup)
• A LAN Port on your network (only required for initial setup)
• Wireless 802.11b/g/n network (only if you wish to connect
to your network wirelessly.)
• Power Outlet
• Computer Platform for viewing: Windows XP or later, Mac
OS 10.4 or later
CPU: Intel Pentium III 800MHz or above
RAM: 512MB
Resolution: 800x600 or above
Interface: Internet Explorer 6.0+, Firefox 2.0+, Safari
2.0+, or Chrome
• SmartPhone/Tablet Interface (optional): iOS or Android
EagleSense App
www.hawkingtech.com
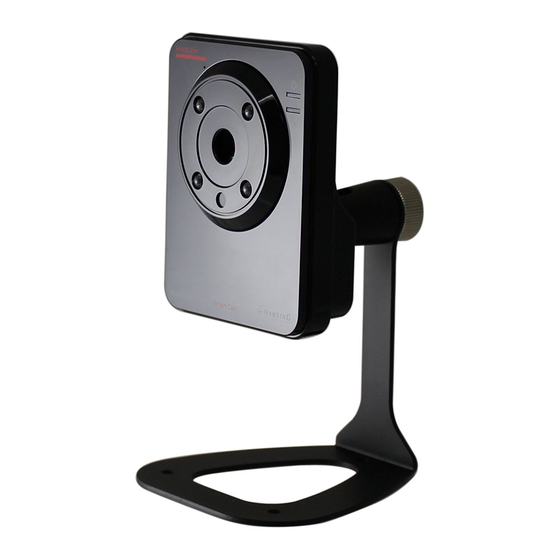
PRODUCT DESCRIPTION
WPS
Reset
Ethernet
DC 5V
PRE-CONFIGURATION
Hardware Setup
Installing the Camera Stand
The camera comes with a camera stand, which uses a swivel ball screw head
to lock to the camera's back mount. When the camera stand is attached, you
can place the camera anywhere by mounting the camera through the three
screw holes on the base of the camera stand.
Connecting the Camera to the Network
Use the provided Ethernet cable to connect the camera to your local area network
(LAN). Connect the AC power adapter to the camera and it will be powered on
automatically. You can verify the status from the Power LED on the front panel of
the camera. Once connected, the LINK LED will also flash a green light,
indicating that the camera is ready for use.
Technical Support: 1.888.202.3344
Internal Microphone
Allows the camera to receive sound/voice
Power
LED is on, when the power adapter is connected and plugged into an outlet
Link LED
Indicates the camera's network connectivity with flashing green light
Camera Lens
IR (Infrared) Lights
Turns on when camera is in Low Light/Night Vision Mode
Reset Button
Press and release to reboot the camera. Press and hold for more than
5 seconds to perform a factory reset.
WPS (Wi-Fi Protected Setup) Button
Press and release to initiate easy wireless connection with WPS devices
LAN Port
Used to connect the camera via Ethernet cable.
Camera Mount
Hole to connect to the camera stand.
Power Plug (5V/1.2A)
Plug the provided AC adapter to power on the device.
E-mail: Techsupport@hawkingtech.com
Advertisement

Subscribe to Our Youtube Channel
Related Manuals for Hawking Hawkvision HNC3W

Summary of Contents for Hawking Hawkvision HNC3W
- Page 1 PRODUCT DESCRIPTION Internal Microphone Quick Installation Guide Allows the camera to receive sound/voice Power Hawkvision LED is on, when the power adapter is connected and plugged into an outlet Link LED Universal Smart Indicates the camera’s network connectivity with flashing green light Camera Lens Camera IR (Infrared) Lights...
- Page 2 Phone: 1.888.202.3344 E-mail: Techsupport@hawkingtech.com ©2012 Hawking Technologies, Inc. All rights reserved. All trademarks herein are the property of their respective owners. IOS is a trademark or registered trademark of Cisco in the U.S. and other countries. Android is a trademark of Google Inc. No affiliations are implied or expressed.
Need help?
Do you have a question about the Hawkvision HNC3W and is the answer not in the manual?
Questions and answers