
Subscribe to Our Youtube Channel
Summary of Contents for SIIG CE-H25Y11-S1
- Page 1 Dual View Wireless Media Presentation User Manual P/N CE-H25Y11-S1 P/N CE-H26611-S1 04-1272A P/N CE-H26711-S1...
- Page 2 Can transmit smart devices’ mirror, photos, videos, music etc. Support USB plug-in auto pairing for Wireless Media Presentation Support “Airplay” for apple device. Package contents (CE-H25Y11-S1) Dual View Wireless Media Presentation (WMS) USB A/C Dongle Power adapter DC 12V/1.5A ...
- Page 3 Specification: WMS Specification HDMI output 1x HDMI 19-pin female connector 3840x2160@60Hz,3840x2160@30Hz, Video Output Resolution 1920x1080@60Hz, Format Compliance HDMI1.4/HDMI2.0 1080P @ <60Hz Airplay for IOS devices Video Capacity: 1080P @ <60Hz "WirelessMedia" app 1080P @ <30Hz for all show-me button HDCP HDCP1.4/HDCP2.2 Analog Audio Output 1x 3.5mm PC audio female connectors...
-
Page 4: Table Of Contents
Catalogue Layout ..................................6 Software Interface ..............................12 Installation ................................14 Wiring Diagram............................... 16 Video Connection ..............................16 Audio Connection ..............................17 LAN connection ..............................19 Usage of USB device ............................... 20 Quick-to-Start ................................. 21 Mobile device: Wireless Connection ......................21 Mirroring ................................ - Page 5 Config File ................................61 Uart Setting ................................61 Security Settings ..............................62 Password ................................63 Connection password ............................. 64 Firmware upgrade ..............................64 Other settings ................................. 65 Clear history after meeting ............................ 65 About device ................................66 Updating WirelessMedia ............................66 Check current firmware information ........................
-
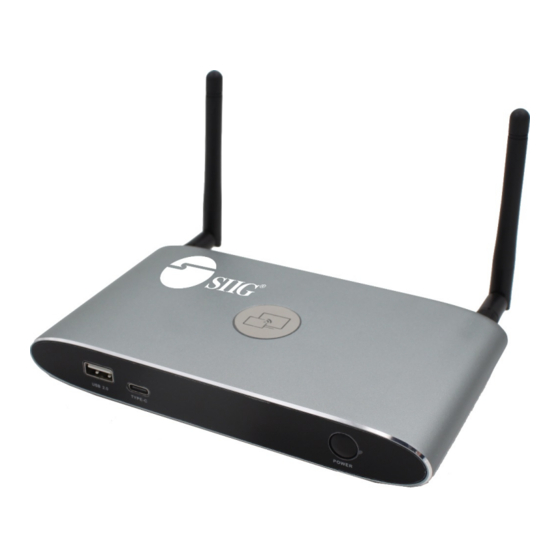
Page 6: Layout
Layout Name Description USB port, for dongle pairing, mouse control, Front USB connector USB touch screen etc. Front Type-C connector Type-C port, for dongle pairing. Initializing indicates RED, power on indicates Back-lit LED indicator flashing GREEN, “Ready to share” indicates static GREEN, “Sharing”... - Page 7 Mechanical fixture points. The mechanical fixture points are located at the bottom of the base unit. Name Description 2 channel analog audio output, Connect a 3.5mm mini- Line audio jack PC connector from this jack to the Line in jack of an output audio system.
- Page 8 USB port The USB port is used to update the software of the WMS. The USB port is used for pairing the dongle and base unit, when the transmitter is plugged-in. The USB port is used for connecting a mouse to create/upgrade Launcher by clicking Download ...
- Page 9 Default Configuration Ethernet: Proxy: None IP setting: DHCP Wireless network: Frequency: 5GHZ Channel: 40Hz Auto change Wi-Fi hotspot password: 5minute Display & Audio HDMI resolution: Auto HDMI CEC: Device auto power off: ON ...
- Page 10 Transmitter-HDMI Dongle Name Description HDMI Using HDMI connector of the button can be plugged into a connector PC/Laptop for sharing your screen. Supply power, or plug into the base unit for pairing the USB connector Button to the Base Unit or upgrade the dongle. Touch the sensor button to start displaying the content of Touching the PC/Lap-top’s screen on the main screen.
- Page 11 LED ring indicator behavior When LED indicator is static green, it’s ready to mirror your PC desktop on the main screen. When LED indicator is static red, 1) it’s mirroring your PC desktop on the screen, 2) pairing is done. You ...
-
Page 12: Software Interface
Software Interface Home Screen Name Description Wi-Fi Direct mode: internal access point is enabled Wi-Fi Infrastructure mode: “Client-Mode“ , Wi-Fi connection to router is established, icon displays the current signal strength. Wi-Fi Indicator A secure Wi-Fi connection is established, or connection to a router failed: Wi-Fi is not available: LAN Infrastructure mode: access point is disabled... - Page 13 only displayed, when timer is active; Password-timer time until the password is changed automatically. Refresh Wi-Fi- Generate new password manually for securing your password Wi-Fi network. Wi-Fi IP: address of base unit in wireless LAN Wi-Fi IP Assigned IP: address of base unit in LAN; ...
-
Page 14: Installation
Installation The installation chapter gives an overview of the different ways to install and connect WirelessMedia Base Unit. Overview: Installation methods for the Base unit Table mounting Wall mounting Recommendations about antenna placement and orientation WMS Power Connection ... - Page 15 Necessary parts • 2 mounting screws • 2 plugs How to install 1. Drill two holes in the wall as indicated on the drawing. Horizontal distance: 177 mm ± 0.15 2. At the bottom of Base Unit, turn in 2 flat screws into 2 holes to be fasten enough. Note: Mounting screws and plugs are not included in the WirelessMedia box .
-
Page 16: Wiring Diagram
Wiring Diagram Power over Ethernet If the LAN Ethernet switcher support POE (Power over Ethernet), it could power up the Base-unit instead of using the external power adapter. (WMS LAN2 Port is support POE.) Video Connection Connect the HDMI Output of base unit to a 4K or Full-HD display by a HDMI cable. Connect the power adapter to the base unit DC power socket and connect the other side plug to an available electrical outlet and switch the base unit on. -
Page 17: Audio Connection
Audio Connection WirelessMedia transmitter can transmit the audio output of the PC/Lap-top, re-direct and send to the Base Unit together with the video signal. The audio will be output at line levels from mini jack socket 3.5mm connector and via the HDMI output connectors simultaneously. It’s up to the user to decide whether or not to send the audio signal together with the video signal. - Page 18 How to connect separate audio 1. Connect an audio cable with mini jack socket 3.5mm connector into the audio of the Base Unit 2. Connect the other side to the meeting room’s sound system. Sound is not sent out WirelessMedia button will keep capturing and send the audio of PC/Lap-top, since PC/Lap is successfully mirroring desktop to the main screen.
-
Page 19: Lan Connection
LAN connection The Base Unit can be connected to a local network or directly to a PC/lap-top. For normal operation, a LAN connection is not necessary. When needed, it’s suggested to connect the WMS to the Internet. 1. Connect a network cable with RJ-45 connector into the LAN port of Base Unit. 2. -
Page 20: Usage Of Usb Device
Usage of USB device Please use a USB Mouse or Touchscreen: 1. To configure the Security level check button, DOWNLOAD BUTTON, INFO. 2. To control the sharing PC/Lap-top. 3. To activate system upgrading 4. For white board or annotation during a presentation, WirelessMedia transmits Video, Audio and the USB-HID function for mouse-control and click-function of a touchscreen. -
Page 21: Quick-To-Start
Quick-to-Start Mobile device: Wireless Connection Download the application namely “WirelessMedia” (for example scan QR-Code in Home screen) in Android Google Play market for Android mobile device. For IOS devices, use Airplay to mirror the desktop. WirelessMedia provides two way to discover the WMS for mobile devices. Portable hotspot, to connect the hotspot to connect the WMS. - Page 22 Enable portable hotspot: Check the SSID and PASS (Password) are shown on the Homepage, as shown below. Enable LAN connection: Be sure the WMS is connected to the Network. When Local IP shows an active IP address, such like 192.168.3.32, it indicates WMS is successfully connected to the LAN and get an appointed IP address. Note: When it shows “N/A”, means the WMS is not connected to the LAN (Local Area Network) by CAT cable or it failed to get an available IP address by the corporation router.
- Page 23 Pairing transmitter with base unit 1. Connect the USB of USB A/C Dongle or Transmitter-HDMI Dongle, to pair all the transmitters with base unit. The home page displays as shown below. 2. When plug in transmitters, the message table shows “USB dongle is booting, please wait…” as shown below 3.
- Page 24 4. After completing the pairing, the message table shows “Succeeded to pair!” on the home page, as shown below. Then, please un-plug the transmitters and use it for the mirroring on your laptop. If error-message “Configuration fail” is shown, please check the connection of USB/type C to keep stable after plug-in, and try again.
-
Page 25: Mirroring
Mirroring PC/Lap-top USB A/C Dongle: 1. Plug USB A/C Dongle into USB/Type C port to pair with base unit. The “WirelessMedia-windows.exe” for USB A/C windows PC/Lap-top, “WirelessMedia-macOS.app” for Macbook will be auto downloaded into Dongle 2. Plug USB A/C Dongle into PC/Laptop/MACbook and click the “Launcher” to run. USB A/C Dongle will auto change PC’s wifi to the target base unit wifi. - Page 26 Note: for second time user, USB A/C Dongle will automatically run to share screen, no need to click “Launcher”. Transmitter-HDMI Dongle 1. Plug USB port of Transmitter-HDMI Dongle to base unit to pair. 2. Plug USB port and HDMI port of Transmitter-HDMI Dongle to PC/Laptop/MacBook. (USB port for power) 3.
- Page 27 Mobiles Devices Sharing on Android devices 1. Open the “WirelessMedia” application. 2. Connect your mobile device to one of the displayed Wi-Fi networks. 3. Open the “WirelessMedia2” application in your mobile device, and you will see the Home Page of “WirelessMedia2”...
- Page 28 4. Select the base unit you want to connect, enter password and mirror. 5. After completing the pairing, it shows OSD “Welcome ***” on the home page. For example, if we connect it by a HUAWEI-PLA-AL00, it shows a “Welcome HUAWEI-PLA-AL00” on screen, as shown below.
- Page 29 6. Now you can mirror your desktop of your mobile. 7. Click again the button “Share Screen” to stop mirroring. You could click “my device” to check the device status and firmware verssion. Sharing on IOS devices 1. With AirPlay technology, user can stream his screen or music, (YouTube-) videos, pictures … wireless to Base-unit.
-
Page 30: Preview Window
Preview Window At touch-screen or with mouse of Base-unit, you can click on LEFT or RIGHT-arrow (2), to show the small preview-windows as a bar on the right edge of the screen, or to hide them, if they are disturbing. Once the preview windows are activated, you see live-pictures (1) of all connected transmitters and android devices via “WirelessMedia”... -
Page 31: Whiteboard
Whiteboard: write all your ideas and share the digital notes with anybody. Different colors of pen and background can be selected. Annotation: draw or write annotations in overlay within your documents, presentations. Save and share everything that was discussed. Different colors of pen can be selected. How to start Whiteboard or Annotation mode The “Preview window”... - Page 32 Use the toolbar to select one of the following functions. Icons Function Tool bar 1 Add an empty page Delete the actual page Display previous or next page Undo: one step backward in changes Redo: one step forward in changes Tool bar 2 Erase part of drawings or annotation, change diameter by a longer tap...
- Page 33 Draw basic geometric shapes Select color of board, the drawing will be kept will pop up, when “Pen” or “Draw shape” or “Select color of Tool bar 3 board” is selected, for individual change of size of Pen, Shape or color. Tool bar 4 Save the current screenshot on local storage (PNG+WMN) File options...
-
Page 34: Annotation
Annotation Click on icon to enter the Annotation function. Use the toolbar to select one of the following functions. Icons Function Undo: one step backward in changes Redo: one step forward in changes Erase part of drawings or annotation, change diameter by a longer tap Tool bar 1 Clear the entire drawing/writing on the screen... - Page 35 Close Whiteboard to go back to Home screen, actual project can be saved on local storage (WMN) Close Whiteboard to go back to Home screen, Tool bar 1 Save the current screenshot on local storage (PNG) Download the drawings to connected users Scan the QR-code with your mobile’s camera or enter the given IP-address in a browser.
-
Page 36: Web Setting Management Configuration
Web Setting Management Configuration Connect base unit ID & Password or LAN IP to laptop, to enter Wi-Fi IP browser page to configure settings of base unit. The “WirelessMedia-windows.exe” and “WirelessMedia-Pro.exe” for windows PC/Lap-top, “WirelessMedia-macOS.app” for Mac OS X, “user manual” and “WirelessMedia” for Android can be downloaded here. - Page 38 The main interface of Setting is shown as below, including Network settings, Display & Audio, System settings, Security settings, Firmware upgrade, Other settings, About device.
-
Page 39: Network Settings
Network settings Wireless network To take the full benefits of the WirelessMedia possibilities, WMS should be properly integrated in the organization’s network (company/university/school). This wizard allows user to create a custom configuration for integration of WirelessMedia into the existing wireless infrastructure in larger organizations. - Page 40 Wireless network configuration wizard Enter a device name for the Base-unit. We recommend to take a descriptive name, if you have more than WirelessMedia installed. The default name is “WMS-XXXX”. Only "a-z","A-Z","0-9","-_" and space are legal character. Click “Next step”. The following three connection methods are available:...
- Page 41 Wireless Direct Mode After Factory Reset, WMS base unit starts up in the default Stand-Alone “Wireless direct mode” configuration, where the Base-unit creates its own wireless access point, which all transmitters use to connect. This is typical for a quick setup for small group meetings. The Wi-Fi icon for the “Wireless direct mode”...
- Page 42 Click “Next step” to Set up Wi-Fi access point Set-up Wi-Fi access point includes, Frequency, Channel, Password. Frequency: Click to select 2.4 GHz or 5 GHz Wi-Fi frequency. Default is 5 GHz. Channel: Click to select the Wi-Fi channel. Default is 5 GHz, 40. ...
- Page 43 Wireless Infrastructure mode WirelessMedia can connect to a wired and a wireless network simultaneously. The basic unit is firmly "connected to the company network with LAN. Guest users connect to Wi-Fi "Guest" access. The employees (“Staff”) connect to their usual access point of the corporate network, without having to change the Wi-Fi. This is very useful for organizations, which have a wireless “Guest”...
- Page 44 The dongle is connected to the Wi-Fi access Point of Guest network, which in turn is connected to the internal Wi-Fi access Point of WirelessMedia. (The dongle can also be configured to connect to the enterprise’s access point.) Mobile users stay connected to their current network, have access to their normal corporate environment, as well as Internet access.
- Page 45 Click “Next step” to edit or change Guest network SSID and Staff network SSID. Wi-Fi name of guest and staff will be shown on home screen after “Submit settings”. After submitting successfully, please re-pair dongle with base unit.
- Page 46 “USB dongle connects to base unit via LAN.” Choose a LAN network which is used for the company staff users. Note: usually in this mode, dongle paired for internal staff usage. Select SSID: Choose a wireless network to connect to base unit for guest. Password: enter password to connect the base unit to the guest network.
- Page 47 Wifi name of guest and staff will be shown on home screen after “Submit settings” After submitting successfully, please re-pair dongle with base unit. LAN Infrastructure Mode In this configuration the built-in Wi-Fi access point of WirelessMedia is disabled: The dongle and/or the mobile devices can connect to the secured wireless access point of the company network.
- Page 48 The Staff-users connect to their usual access point of Company network, without the need to change the Wi-Fi. Follow the instructions of the configuration wizard for “LAN infrastructure mode”. When pairing the dongles, by plugging the dongle in the USB /Type C port of the Base-unit, will be automatically paired to the Staff access point, and NOT to “WirelessMedia”...
-
Page 49: Ethernet
Wifi name of guest and staff will be shown on home screen after “Submit settings” After submitting successfully, please re-pair dongle with base unit. Ethernet Configure the Ethernet settings. -
Page 50: Auto Change Password
Auto change password The password remains unchanged for all participants of the meeting, while at least one dongle or a Wi-Fi network of a mobile device are connected with Base-unit. After the user is disconnected, a configurable time runs. The changeable password will be fixed by connecting a dongle to PC/Laptop or connect a mobile unit ... -
Page 51: Display & Audio
Display & Audio HDMI HDMI Resolution Select the resolution at HDMI output of Base-unit. Existing HDMI output resolution as below: Auto 3840x2160 @30Hz 3840x2160 @60Hz 3840x2160 @50Hz 1920x1080 @60Hz 1920x1080 @50Hz 1920x1080 @30Hz Note: if the display is only support FULL HD, the 4K resolution will not be shown on the list of the below resolution. - Page 52 HDMI CEC Base unit support CEC function if the connected display support CEC function. Device auto power off: ON (Default): Display will automatically turn off when base unit is powered off. OFF: Display will not automatically turn off when base unit is powered off. ...
-
Page 53: Audio
Audio Choose audio output: Jack: output only 3.5mm mini-jack audio. HDMI: output only HDMI audio. Jack&HDMI (Default): output Jack & HDMI audio Volume User can select volume of display from 0 to 100. -
Page 54: Airplay Screen Quality
Airplay screen quality Click to select the image quality when transmit apple device by “AirPlay” mode. -
Page 55: Screen Display Id
Screen display ID show device name and password when mirroring: Name (ID) and Wi-Fi-password can be shown or hided at top status-line of main screen. Show PCs user name when mirroring. Show user name, status of “Remote control“. (locked/unlocked) -
Page 56: Home Screen Background Image
Home Screen background image When powering WirelessMedia the start screen will be displayed. User can change background image of Home screen. Select the image (jpg, bmp, png with resolution 1920x1080 p.) from suitable directory and activate for selection. You can return to Standard Home screen every time. -
Page 57: System Settings
System settings Buttons: Show Device name, MAC Address, Serial Number, Device Version, Device Status, Last Action, Item Operate. Paired Show properties of connected dongles and can be managed from this page. -
Page 58: Date & Time
Date & Time Includes Automatic date & time, Set date, Set time, Select time zone. Automatic date & time: Check to use a NTP time server to provide time as system time. Set date: Click in the input filed to fill out the appropriate date. ... -
Page 59: Auto Standby
Auto standby If the Auto Standby mode is activated, WirelessMedia will automatically switch to power saving mode, a selectable time after the last dongle was plugged out, or Wi-Fi of a mobile unit was disconnected, or there is no operation at the system. Time is selectable from Never to 30 minutes. In Standby green LED in top of Base-unit is flashing and HDMI-output is switched off. -
Page 60: Language
Language Select an installed display language. Reset Doing factory reset to restore unit. -
Page 61: Config File
Config File Config File is a packaged file which contains all the configuration parameter of the WMS, which could be downloaded and copied to multiple device which needs to use the same configuration. Uart Setting... -
Page 62: Security Settings
Security Settings Security level Based on user requirements, three different security levels can be set in the menu of WirelessMedia, to satisfy different security requirements, according to different security sensitive environments or security policies. A security level is a predefined set of settings. Click on the corresponding entry in the menu if you want to adjust the respective security features. -
Page 63: Password
Password Change admin password for entering setting menu on webser. Default password, or after a RESET, is “admin”. You can change the password as you like. You can also deactivate the password entry, set the appropriate checkmark and 'Save'. -
Page 64: Connection Password
Connection password Two type of password format can be chosen to show on home screen. 4-digits password, beginning with 0000 8-digits password Firmware upgrade To upload local updating files to upgrade base unit. -
Page 65: Other Settings
Other settings Auto create launcher Determines, when using a USB memory at one USB-port of Base-unit, the Starter-program “WirelessMedia” will be copied automatically on USB memory. Enable or disable the corresponding box. Clear history after meeting Pictures, videos, music of mobile units will be stored in memory of Base-unit. This memory can optionally be erased, at the end of a meeting, when the dongle is pulled from the Laptop / PC. -
Page 66: About Device
About device Check the firmware version of base unit and web server version. Updating WirelessMedia An update of the firmware can be useful to take the advantage of new features of WirelessMedia or to fix known issues and bugs. WirelessMedia includes two methods of updating. Updating by USB stick and webserver. -
Page 67: Check Current Firmware Information
Check current firmware information Base-unit: webserver “console” menu / About device. Windows OS Dongle/Launcher: firmware version can be visual in the ““WirelessMedia”.exe” program icon in windows status bar by right-clicking the ““WirelessMedia”” icon and select “About”, as shown below. Click “About” to check dongle and launcher program version. - Page 68 MAC OSX: Dongle/Launcher: firmware version can be visual in the ““WirelessMedia”.app” program icon in MAC OSX status bar, by clicking the ““WirelessMedia”” icon and select “About”, as shown below. Click “About” to check dongle and launcher program.
- Page 69 Firmwares are NOT matching: When dongle firmware or “Launcher” firmware are older version, or in other words dongle firmware or “Launcher” firmware doesn’t match with the base unit version, it shows up ““WirelessMedia” ATTENTION” alert message box in the window OS or MAC OSX, as below. When mismatching occurs, please do the following steps to update the firmwares, as indicates in the message box.
-
Page 70: Upgrading Firmware Of Base Unit
Upgrading firmware of base unit: There are two ways to upgrade base unit as below. First method to upgrade base unit as below: The base unit device can be updated through a USB drive as below. Copy the updating file “update.img” to the root directory of the USB drive. Connect the USB drive to either USB port of Base-unit. -
Page 71: Upgrading And Pairing Of Dongle
The display device shows the Home Screen after normal boot of the device, you can disconnect USB- drive. Perform “Factory Reset” when the firmware update is complete? Only when the associated “Release notes” are requiring an additional „Factory Reset“, perform it via the menu “System settings”... -
Page 72: Upgrading Launcher
2. “Pairing” to the Base-unit is done automatically afterwards, it shows as below 3. Plug out the dongle. Now, the upgrading progress is finished. Update all other dongles accordingly. Upgrading Launcher: Attention: The USB driver should be FAT 32 format not NTSC format. After upgrading Base unit and Dongle, the launcher should be written with the actual launcher program for Windows, MAC and Apps for mobile-units. - Page 73 Method 2: Via WIFI 1. Connect PC to WMS’s SSID and enter password in homepage, see pictures as below: 2. Open Browser and enter WiFi IP: 192.168.43.1:8000. 3. Click to enter “Launcher” download webpage. Shown as below: 4. Choose and click Windows or MAC launcher to download. 5.
-
Page 74: Operation Guide
Two methods to execute the launcher for first time user Copy the program to PC, and click to execute it to share PC screen. Connect dongle to PC; click to run program from the USB drive and share PC screen. ... - Page 75 3. Click dongle or the visual button again to stop mirroring, LED or window color shows green again. Right click the WirelessMedia status icon in Windows taskbar to open up the context- menu. “About”: You can check the software versions of the Base-unit, the dongle and the launcher program. ...
- Page 76 (LAN connection: several receivers possible) (Wi-Fi: only 1 receiver) 4. Enter base unit password and click “connect”, the system is ready to share. You can also manually connect by entering the name (SSID) or IP address. (click icon Enter the corresponding base unit password, press 'OK', the system is “Ready to share”.
- Page 77 5. Click “Ready to share” in PC, when window color is static red, the screen is mirroring to the main screen. 6. Click the visual button again, to stop mirroring, window color shows green again. You can minimize the APP-window, in Windows taskbar you can see if screen is mirroring or not Right click the WirelessMedia status icon in Windows taskbar to open up the context- menu.
- Page 78 Options for Microsoft Windows PC / Laptop – Extended Screen Click the icon in App to open/close “options”. “Options”: Extended Screen: Transfers extended desktop of active source. (depending on your operating system, may require the installation of the virtual driver “ExtendedDisplay“ for function with Windows 10). The primary screen (1) is displayed on the laptop and the virtually extended screen (2) is displayed on the main screen.
- Page 79 Note: If you select the “Extended Screen” feature, Windows automatically switches to “Extended Mode”. If you stop the transfer with “WirelessMedia” (Pause), Windows remains in " Extended Mode" until you press "Windows key + P" on the laptop to select the "PC screen only" mode. “Remote control”...
-
Page 80: Mac Os Pc/Laptop With Dongle
Keep Aspect Ratio: Keep the original aspect ratio to display on the main screen. Remote Control Lock: (function under developing.) Low Latency Mouse: The setting is applied individually for this laptop only. The shape of mouse-pointer is equal the shape in application. -
Page 81: Mac Os Pc/Laptop Without Dongle
“Exit”: End APP. Exiting the App completely. If you click the "close" in the top menu bar of the app, the app is only minimized and can be recalled again in the dock at any time. 6. Disconnect at end of meeting. MAC OS PC/Laptop without Dongle For first time user, you have to copy the Launcher program ”WirelessMedia for Mac”... - Page 82 (LAN connection: several receivers possible) (Wi-Fi: only 1 receiver) 4. Enter base unit password and click “connect”, the system is “Ready to share”. You can also manually connect by entering the name (SSID) or IP address. (click icon Enter the corresponding base unit password, press 'OK', the system is “Ready to share”. 5.
-
Page 83: Options For Apple Macos, Macbook - Extended Screen
“Exit”: End APP. Exiting the App completely. If you click the “close” in the menu bar of the app, the app in the top menu-bar is only minimized and can be recalled again from the top menu-bar at any time. Options for Apple MacOS, MacBook –... -
Page 84: Transmitting Ios Mobile Device
“Options”: Extended Screen: Transmits the Extended desktop (“Use a Separate Display”) only via AirPlay, when activated for Display on WirelessMedia. Keep Aspect Ratio: Keep the original aspect ratio to display on the main screen. Lowest Latency (Mouse): The setting is applied individually for this laptop only. - Page 85 2. Connect your mobile device to one of the displayed Wi-Fi networks. 3. The main interface of “WirelessMedia2” is shown as below. Click the device list refresh button , which is highlighted in red circles as shown below: 4. Select the base unit you want to connect, enter password and mirror.
-
Page 86: Wifi Recommendation Setting
5. When sharing to main screen, it shows OSD “Welcome ***” on the home page. For example, if we connect it by a HUAWEI-PLA-AL00, it shows a “Welcome HUAWEI-PLA-AL00” on screen, as shown below. 6. Now you can mirror your desktop of your mobile. 7. -
Page 87: Check The Wifi Rssi On Dongle Or Mobiles
Check the WIFI RSSI on dongle or Mobiles Please use a WIFI analysis software to place it at the same place as the dongle or mobiles, to measure the WIFI RSSI (Received Signal Strength Indicator). We recommend the RSSI shall be above -70dB to be good enough to keep a stable signal transmission. - Page 88 construction elements, …can Change the orientation of cause reflections the antennas at the rear deteriorating the wireless panel of base unit to the signal. transmitter direction. Remove or limit as much as Obstacles between dongles possible all obstructions ...
- Page 89 computer power, to save Update driver of graphic- energy. The transmission of card. HD video requires a certain End low power mode at amount of CPU power to laptop. guarantee the optimum quality of the transmission. Video is not shown on screen The content use HDCP WirelessMedia input can’t ...
- Page 90 DHCP is not enabled. No Wi-Fi connection between Wrong Wi-Fi frequency Check mobile device to select the mobile device with Base Unit correct 2.4GHz or 5GHz Wrong SSID and password Enter the correct SSID No audio when transmit local file Unsupportive audio format, If possible, reformat it to the to Base Unit...
- Page 91 in order to allow this sound- flower to install on the Mac Book. Run the WirelessMedia.app again, it’ll auto-install the sound-flower to the MACBook. There is no sound via AirPlay. The volume is set too low, on the Increase the volume on the mobile device.
Need help?
Do you have a question about the CE-H25Y11-S1 and is the answer not in the manual?
Questions and answers