Table of Contents
Advertisement
Owner's Manual
Thank you, and congratulations on your choice of the BOSS
SP-505 Groove Sampling Workstation.
Before using this unit, carefully read the sections entitled:
• USING THE UNIT SAFELY (page 2–3)
• IMPORTANT NOTES (page 4–5)
These sections provide important information concerning
the proper operation of the unit.
Additionally, in order to feel assured that you have gained a
good grasp of every feature provided by your new unit,
Owner's manual should be read in its entirety. The manual
should be saved and kept on hand as a convenient reference.
Printing Conventions in This Manual
• Text or numerals enclosed in square brackets [ ] indicate buttons.
PLAY button
[PLAY]
REC button
[REC]
• Reference such as (p. **) indicate pages in this manual to which
you can refer.
Copyright © 2001 BOSS CORPORATION
All rights reserved. No part of this publication may be reproduced in any form
without the written permission of BOSS CORPORATION.
Advertisement
Table of Contents

Related Manuals for Boss SP-505


Summary of Contents for Boss SP-505
-
Page 1: Printing Conventions In This Manual
Owner’s Manual Thank you, and congratulations on your choice of the BOSS SP-505 Groove Sampling Workstation. Before using this unit, carefully read the sections entitled: • USING THE UNIT SAFELY (page 2–3) • IMPORTANT NOTES (page 4–5) These sections provide important information concerning the proper operation of the unit. - Page 2 USING THE UNIT SAFELY Used for instructions intended to alert the user to the risk of death or severe injury should improperly. Used for instructions intended to alert the user to the risk of injury or material damage should the unit be used improperly.
- Page 3 012b • Immediately turn the power off, remove the AC adaptor from the outlet, and request servicing by your retailer, the nearest Roland Service Center, or an authorized Roland distributor, as listed on the “Information” page when: • The AC adaptor, the power-supply cord, or the plug has been damaged;...
-
Page 4: Important Notes
IMPORTANT NOTES 291a In addition to the items listed under “USING THE UNIT SAFELY” on page 2–3, please read and observe the following: Power Supply • Do not use this unit on the same power circuit with any device that will generate line noise (such as an electric motor or variable lighting system). -
Page 5: Using Memory Cards
Before Using Memory Cards (SmartMedia) Using Memory Cards • Carefully insert the Memory card all the way in—until it is firmly in place. fig.11-01a The surface without gold contacts must be upward • Never touch the terminals of the Memory card. Also, avoid getting the terminals dirty. -
Page 6: Table Of Contents
Press the pads to play sounds ... 17 Listening to the preset patterns ... 18 An overview of the SP-505 ... 19 How the sections of the SP-505 are connected ... 19 How the SP-505 is organized ... 19 Applying effects ... 21 Recording a sample... - Page 7 Starting sampling automatically when sound is input ... 39 Applying an effect while you sample... 40 Selecting the input source ... 40 Sampling procedure ... 41 Re-sampling samples (Resampling)... 42 Resampling procedure 1 (Auto) ... 42 Resampling procedure 2 (Manual) ... 43 Chapter 4.
- Page 8 Chapter 12. Using the SP-505 with other MIDI devices ...71 About MIDI... 71 Changing the MIDI settings ... 71 Synchronizing the performance of the SP-505 and an external MIDI device ... 72 Sync mode settings ... 72 Chapter 13. Making system settings...73 About the CONFIG parameters ...
-
Page 9: Main Features
Main Features The SP-505 is a groove sampling workstation that provides all the functionality you need to produce dance music. Chop function The “Chop” function detects the attacks within a sampled phrase, and divides the sample into separate sound events. -
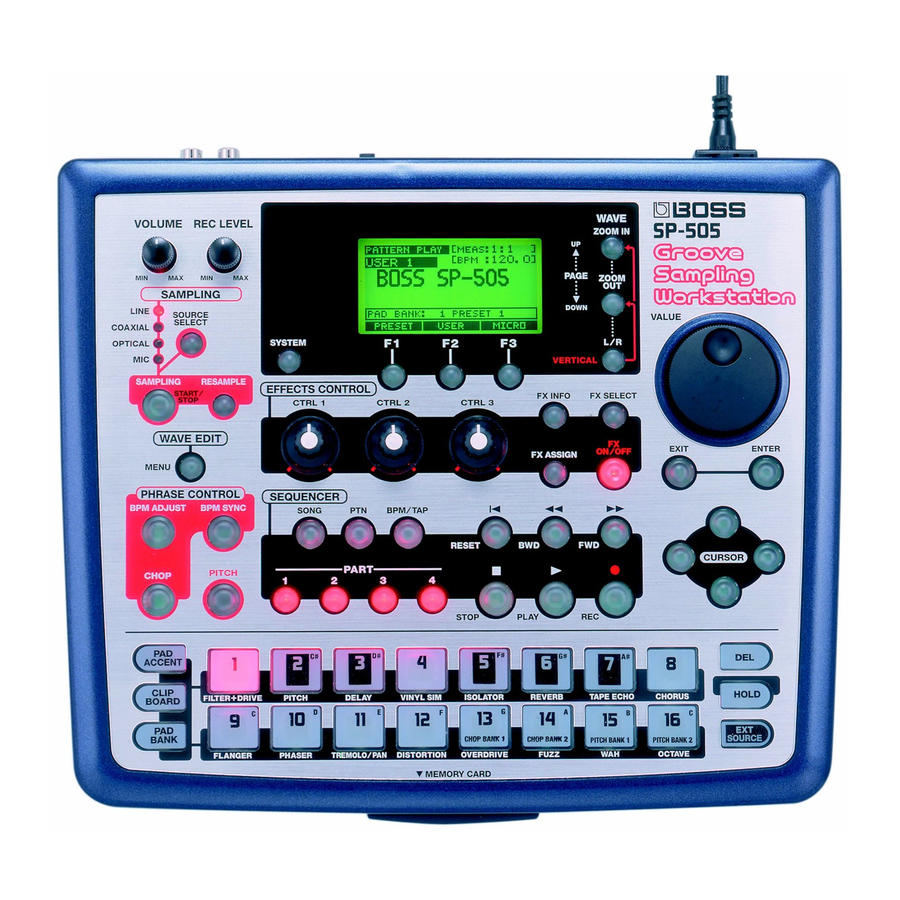
Page 10: Names Of Things And What They Do
( 1 ) ( 2 ) ( 3 ) ( 4 ) VOLUME (Volume Knob) Adjusts the overall volume of the SP-505. REC LEVEL (REC Level Knob) Adjusts the volume during sampling. Adjusts the EXT SOURCE volume. (2) SAMPLING SOURCE SELECT Button This selects the input source (input jack) that is to be sampled. - Page 11 PITCH Button This allows you to play scales with the sample. SYSTEM Button Press this button when you want to make system-related settings, such as adjusting the display contrast or setting the MIDI channel. Display A variety of information is shown here. F1–F3 Buttons The function of these buttons will change depending on the screen.
- Page 12 Names of Things and What They Do REC (Recording) Button Press this button when you want to record a song or pattern. VALUE Dial Use this to adjust the value of a setting. EXIT Button Press this button to cancel an operation. You are returned to the Play page.
-
Page 13: Rear Panel
AC Adaptor Jack Connect the supplied AC adaptor (BRC series) to this jack. * Never use any AC adaptor other than the one that was supplied with the SP-505. Doing so can cause malfunctions. (12) POWER Switch This switch turns the power on/off. -
Page 14: Quick Start
Quick Start Making the Connections 1. Make sure of the following for all the equipment you will be connecting. • The power is turned off. • The volume is turned down. 2. Connect the AC adaptor (BRC series) to the AC adaptor jack, and plug it into an AC outlet. fig.00-01 * Use only the BRC series. -
Page 15: Turning The Power On
1. Before turning on the power, check the following points: • Have the connections been made correctly? • Have you turned down the volume on the SP-505 and all connected devices? • If you are using a memory card, make sure that it is firmly inserted all the way. -
Page 16: The Sp-505'S Display
Quick Start The SP-505’s display Broadly speaking, the SP-505 displays two types of screens. Parameter list display fig.00-06 The scroll bar in the right of the screen shows the current location of the cursor relative to the entire list. Press CURSOR [ ] [ ] to move the cursor up or down in steps of a single line. -
Page 17: Press The Pads To Play Sounds
You will hear the sound that was sampled on the SP- 303. * If an SP-303 memory card is used by the SP-505, the SP- 505’s own files may be saved on the memory card. This will reduce the available space on the memory card. -
Page 18: Listening To The Preset Patterns
Quick Start Listening to the preset patterns The SP-505 contains 40 preset patterns, each consisting of several measures. fig.00-10 1. Press [PTN]. Make sure that the display shows the following. (For a preset pattern) fig.00-301 (For a user pattern) fig.00-302 A display like those shown above is called the “Play... -
Page 19: An Overview Of The Sp-505
How the sections of the SP-505 are connected fig.00-14 Pads Sampler The SP-505 does not contain a sound generator (a section that creates sound). Instead, it records (samples) various sounds such as music and vocals, and plays back these sounds. Effects This section applies various effects to the sampled sound (samples). -
Page 20: What Is A Pattern
A sample of an actual performance is generally called a “phrase sample.” When using a phrase sample on the SP-505, set the Play Type sample parameter to “PHRASE.” This allows the BPM (tempo) of the sample to automatically be adjusted to match the playback BPM of the sequencer BPM. -
Page 21: Applying Effects
2,4,7 6,10 1. Turn on the POWER switch of the SP-505. 2. Press pad [1]. The sample will play. 3. Press [FX ASSIGN] in the Effect section. 4. Press the pad to which you want to apply an effect. -
Page 22: Recording A Sample
5,10 3 1. Connect your CD player to the SP-505’s LINE IN jacks or DIGITAL IN jack. 2. Press [PAD BANK]. A list of the pad banks will be displayed. -
Page 23: If You Are Not Satisfied With The Sampled Sound
* Sampling will stop automatically if you exceed the available sampling time. 10. Press the pad to play back the sampled sound. When sampling ends, the BPM will be calculated automatically from the length of the sample. You can use the BPM Adjust function (p. -
Page 24: Changing The Bpm (Tempo) Of The Sample (Bpm Adjust)
Quick Start Changing the BPM (tempo) of the sample (BPM Adjust) fig.00-201 1. Turn on the POWER switch of the SP-505. 2. Press [PAD BANK]. A list of the pad banks will be displayed. fig.00-100 3. Select the pad bank. -
Page 25: Synchronizing The Bpm (Tempo) Of Several Samples (Bpm Sync)
Synchronizing the BPM (tempo) of several samples (BPM Sync) You can synchronize the BPM of the sixteen pads in the currently selected pad bank. fig.00-202 1. Turn on the POWER switch of the SP-505. 2. Press [PAD BANK]. A list of the pad banks will be displayed. fig.00-100 3. -
Page 26: Dividing A Sample Between Several Pads (Chop)
Quick Start Dividing a sample between several pads (Chop) The “Chop” function of the SP-505 detects the attacks within a sampled phrase, and divides the original sample into samples containing individual sound events. The divided samples will be assigned to the 32 pads of “chop banks (1–2)”... -
Page 27: Playing Pitches With A Sample (Pitch)
Playing pitches with a sample (Pitch) The SP-505’s “Pitch” function lets you play different pitches with a sample. * It is not possible to play pitches with a stereo sample. * It is not possible to play pitches with samples of the Pitch bank. - Page 28 Quick Start * When you play pitches using a sample, unwanted space may occur at the beginning or end of the sound. After the Pitch function is executed, settings will be made automatically, so only the necessary portion is sounded. If you want to make fine adjustments, refer to “Specifying the start/end points of the sound (Omitting unwanted portions)”...
-
Page 29: Chapter 1. Playing Samples From The Pads
You will hear the sound that was sampled on the SP- 303. * If an SP-303 memory card is used in the SP-505, the SP- 505’s own files may be saved on the memory card. This will reduce the available amount of space on the memory... -
Page 30: The Number Of Samples That Can Be Played Simultaneously
Chapter 1. Playing samples from the pads The number of samples that can be played simultaneously A total of eight sounds, including those played back by a song/pattern and those played from the pads, can be played simultaneously. Each stereo sample counts as two sounds. If more than eight pads are pressed, the sample of the last- pressed pad will be given priority and will sound, and the sample of a pad you pressed earlier will stop sounding. -
Page 31: Changing How The Sample Sounds Or Stops (Pad Play)
“Looping” refers to making the sample continue playing repeatedly from the beginning (Start Point) to the end (End Point). On the SP-505 you can create basic rhythms by looping samples. For each sample, you can select one of the following settings (Loop Mode). -
Page 32: Playing A Sample Backward (Reverse Playback)
“Keep Power On!” Playing an audio input signal (EXT Source) Even without sampling, the SP-505 lets you use a pad to control an internal input sound, and start/stop the sound and apply effects in the same way as a sample. -
Page 33: Adjusting The Ext Source Settings
Adjusting the EXT source settings You can change the following settings for the EXT source. Type The Lch and Rch signals from LINE IN will be MONO: mixed, and output to LINE OUT. STEREO: The Lch and Rch signals from LINE IN will be output to LINE OUT Lch and Rch respectively. -
Page 34: Chapter 2. Using The Internal Effects
Chapter 2. Using the internal effects * You can have any one effect turned on at a given time. Multiple effects cannot be on simultaneously. If you do want to use multiple effects on a sample, or if you need to have a different effect applied to each individual effect, then use “resampling.”... -
Page 35: Selecting An Effect
3. Press [EXIT], [SONG], or [PTN] to return to the Play screen. Chapter 2. Using the internal effects Turning the effect on/off The SP-505 contains 26 different effects. You can press [ON/ OFF] to select whether these effects will be applied (on) or not (off). [FX ON/OFF] lit: The effect will be applied. -
Page 36: Effects List
Chapter 2. Using the internal effects Effects List DSP EFFECTS 1. FILTER + DRIVE CUTOFF Low-pass filter with overdrive. Adjusts the cutoff frequency. Cuts the high frequencies and adds distortion. 2. PITCH SHIFTER PITCH Modifies the pitch. Changes the pitch up or down two octaves. - Page 37 DSP EFFECTS 13. OVERDRIVE DRIVE Mildly distorts the sound. Adjusts the depth of distortion. 14. FUZZ DRIVE Adds harmonics and distorts the Adjusts the depth of distortion. sound. 15. WAH SENS Produces a “wah” effect Adjusts the sensitivity of the Wah effect.
- Page 38 Chapter 2. Using the internal effects (*1) Of the samples to which the effect is applied, the time (delay time) is specified in note value units relative to the tempo of the sample of the sync-source pad. The types of notes that can be set: thirty-second note eighth-note triplets quarter-note triplets (...
-
Page 39: Chapter 3. Recording Samples
Chapter 3. Recording samples * Unauthorized recording (sampling) of audio material whose copyright is owned by a third party is prohibited by law, except for the special case of personal use. Do not make illegal recordings. * Boss Corporation will take no responsibility for any claim of damages made against you by copyright holders on the basis of illegal recordings you may make using Boss products. -
Page 40: Applying An Effect While You Sample
CD player or mic. fig.03-01b Press [SAMPLING]. 2. Press [SAMPLING]. [SAMPLING] will blink, and the SP-505 will be in standby mode. Never turn off the power while the display indicates “Keep Power On!” 3. Press [SOURCE SELECT] to select the input source. -
Page 41: Sampling Procedure
Sampling procedure 1. Press [SAMPLING]. [SAMPLING] will blink, and the SP-505 will be in standby mode. At this time, pads to which no sample has been assigned will blink. * If samples are assigned to all pads in the currently selected pad bank, no pad will blink. -
Page 42: Re-Sampling Samples (Resampling)
Chapter 3. Recording samples Re-sampling samples (Resampling) On the SP-505, previously recorded samples can be sampled once again. This is called “resampling.” For example, this allows multiple samples to be played simultaneously and then sampled to combine them into one sample, or to be resampled with an effect applied. -
Page 43: Resampling Procedure 2 (Manual)
Resampling procedure 2 (Manual) 1. Press [RESAMPLE] to make the button light. [SAMPLING] will blink, and the SP-505 will be in standby mode. At this time, pads to which no sample has been assigned will blink. * If samples are assigned to all pads in the currently selected pad bank, no pad will blink. -
Page 44: Chapter 4. Changing The Settings Of A Sample
Chapter 4. Changing the settings of a sample Procedure 1. Press the pad of the sample whose settings you want to change. 2. Press [WAVE EDIT]. fig.04-01a 3. Use CURSOR [ ] [ ] to select the setting (parameter) that you want to change. 4. -
Page 45: Playing A Sample Backward
Playing a sample backward If you want a sample to play in reverse (backward), select “Reverse” in step 3 of “Procedure” on p. 44. Reverse ON, OFF The sample will play in the reverse direction. (Reverse playback) OFF: The sample will play in the normal direction. (Normal) * If you change the reverse settings while a sample is sounding, the modified setting will take effect the next time the sample is... -
Page 46: Adjusting The Bpm (Tempo) Of A Sample
Chapter 4. Changing the settings of a sample Adjusting the BPM (tempo) of a sample 1. In the Play screen, press [BPM ADJUST]. 2. Use the VALUE dial to specify the BPM (tempo). Play BPM 40.0–200.0 The top line displays the original BPM (tempo). You can also press CURSOR [ ] to make adjustments in 0.1 BPM units. -
Page 47: Adjusting The Volume Of A Specified Region Of The Sample
* It is not possible to specify the start/end points in a way that would leave less than 70 ms between the beginning and end of the sound. * If you set the start point at the beginning of the waveform, and set the end point at the end of the waveform, the highlighted region will return to normal, and the start/end points will be cancelled. - Page 48 Chapter 4. Changing the settings of a sample 5. Use CURSOR [ ][ ] to move the entire screen left or right, use the VALUE dial to move the wave pointer to the end of the region in which you want to change the volume, and then press [F2] (END).
-
Page 49: Chapter 5. Deleting Or Copying A Sample
Chapter 5. Deleting or copying a sample Deleting a sample 1. Press [SONG] or [PTN] to access the Play screen. 2. Press [DEL]. 3. Press the pad whose sample you want to delete. You may select more than one pad. If you want to select a sample of another pad bank, switch pad banks (p. -
Page 50: Copying Multiple Samples
Chapter 5. Deleting or copying a sample Copying multiple samples 1. Press [SONG] or [PTN] to display the Play screen. 2. Hold down the pad of the sample that you want to copy, and press [CLIPBOARD]. The sample will be copied to the clipboard, and [CLIPBOARD] will light. -
Page 51: Chapter 6. Applying Special Processing To A Sample
Chapter 6. Applying special processing to a sample Dividing a sample into individual notes (Chop) The SP-505’s “Chop” function divides a sample at each of the attacks in the sample waveform, and assigns each divided sample to a pad. For example, a drum phrase can be divided into samples containing separate rhythm instruments such as “bass... -
Page 52: Adding A Dividing Point
Chapter 6. Applying special processing to a sample By holding down [L/R] and pressing [ZOOM IN] [ZOOM OUT], you can zoom-in or zoom-out on the vertical axis (amplitude axis) of the waveform. When adding or making fine adjustments to the dividing point, the number of samples at the location of the wave pointer will be displayed in the upper right of the screen. -
Page 53: Making Fine Adjustments To The Dividing Points
Never turn off the power while the display indicates “Keep Power On!” Making fine adjustments to the dividing points 1. In step 5 of the “Chop” procedure (p. 51), press [F3] (EDIT). The sample waveform will be displayed. 2. Use the VALUE dial to move to the dividing point whose location you want to adjust. -
Page 54: Playing Pitches With A Sample (Pitch)
Chapter 6. Applying special processing to a sample Playing pitches with a sample (Pitch) The “Pitch” function allows you to play pitches using a sample (single note). * It is not possible to assign pitches to a stereo sample. * It is not possible to assign pitches to a sample from one of the Pitch banks. -
Page 55: Chapter 7. Playing Songs And Patterns
You can press [BPM/TAP] four times or more to set the BPM to the corresponding interval (Tap Tempo function). * This cannot be changed if the SP-505 is synchronized to an external MIDI device. 4. Press [EXIT], [SONG], or [EXIT] to return to the Play screen. -
Page 56: Selecting And Playing Songs From The Song List
5. Press [STOP] to stop playback. * It is not possible to switch songs while a song is playing. Playing patterns * In addition to its 40 preset patterns, the SP-505 can store 100 user patterns. 1. Press [PTN]. fig.07-04 2. -
Page 57: Selecting And Playing A Pattern From The Pattern List
Selecting and playing a pattern from the pattern list 1. Press [PTN]. 2. Press [F1] (PRESET) or [F2] (USER). The preset pattern or user pattern list will appear. fig.07-06 3. Use the VALUE dial to select a pattern, and press [ENTER] to confirm your selection. -
Page 58: Chapter 8. Creating Patterns
Chapter 8. Creating patterns About pattern recording A pattern can be recorded in the following two ways. Realtime recording Realtime recording lets you record by striking pads while you listen to the metronome. The pattern will play back repeatedly, and the data you input will be combined with the existing data. -
Page 59: Erasing Unwanted Performance Data (Realtime Recording)
A count-in will not be inserted if recording was started by a Start message from an external MIDI device. If you press [F1] (RHR ON), rehearsal mode will be selected. Pressing the pads will produce sound, but nothing will be recorded. Press [F1] (RHR OFF) once again to exit rehearsal mode. -
Page 60: Viewing The Performance Data (Microscope Edit)
Chapter 8. Creating patterns GATE (gate time) This indicates the length that the sound will be heard. 384: whole note 192: half note quarter note eighth note 16th note 32nd note 64th note Press [F1] (MEAS) to move the cursor to the “MEAS” position. -
Page 61: Adjusting The Dynamics (Accent) Of The Sound (Microscope Edit)
Adjusting the dynamics (accent) of the sound (Microscope Edit) In step 7 of Microscope Editing (p. 60), press [F1] (EVENT) to move the cursor to the patch performance data (Event field). Move the cursor to the ACC (accent) location of the pad data whose volume you want to adjust, and use the VALUE dial to adjust the accent. -
Page 62: Assigning A Name To A Pattern
Chapter 8. Creating patterns fig.08-10 7. Press [EXIT]. You are returned to the recording standby screen. 8. Press [STOP] to exit recording. Never turn off the power while the display indicates “Keep Power On!” Assigning a name to a pattern 1. -
Page 63: Chapter 9. Creating A Song
Chapter 9. Creating a song About song recording A song is created by connecting patterns that you create. On the SP-505 you can connect a maximum of 999 patterns. Making song settings Initial BPM: BPM (tempo) of the song 40.0–200.0, PTN BPM... -
Page 64: Deleting A Pattern
Chapter 9. Creating a song 9. When you are finished inputting patterns, press [STOP]. You are returned to the song recording standby screen. 10. Press [STOP] to exit recording. Never turn off the power while the display indicates “Keep Power On!” Deleting a pattern 1. -
Page 65: Chapter 10. Deleting Or Copying A Pattern Or Song
Chapter 10. Deleting or copying a pattern or song Deleting a pattern or song 1. Press [SONG] or [PTN] to display the Play screen. 2. Press [SYSTEM] to display the System screen. fig.10-01a * It is not possible to display the System screen while a pattern or song is playing. -
Page 66: Chapter 11. Using A Memory Card
Inserting a memory card Memory cards (SmartMedia) must only be inserted when the SP-505’s power is switched OFF. If the power is on when you insert a card, not only the memory card, but also the internal data can be destroyed. -
Page 67: Saving Data On A Memory Card (Save)
3. Press [F3] (CARD). 4. Press [F3] (SAVE). * If the memory card has been formatted in a format that cannot be used by the SP-505, “SAVE” will not appear above [F3]. Please format the card. (p. 66) 5. Press [F1] (SAMPLE). -
Page 68: Loading Memory Card Data Into Internal Memory (Load)
Loading sequencer data Sample and sequencer (pattern/song) data that you’ve saved on a memory card can be loaded back into the SP-505 as follows. 1. Press [SONG] or [PTN] to display the Play screen. 2. Press [SYSTEM] to display the System screen. -
Page 69: Deleting Data From A Memory Card
SP-505. * Before you continue, save the WAV/AIFF files from your computer onto a memory card. 1. With the power of the SP-505 turned off, insert the memory card into the memory card slot, then turn on the power switch. -
Page 70: Precautions Concerning The Loading Of Wav/Aiff Files
* If a memory card is not inserted, “CARD” will not appear above [F3]. 4. Press [F2] (LOAD). * If the memory card has been formatted in a format that cannot be read by the SP-505, “LOAD” will not appear above [F2]. Please format the card. (p. 66) 5. Press [F3] (FILE). -
Page 71: Chapter 12. Using The Sp-505 With Other Midi Devices
* Do not use a MIDI cable to directly connect the SP-505’s MIDI IN connector to its own MIDI OUT connector (creating a loop). The SP-505 may fail to operate correctly if this is done. About MIDI MIDI stands for Musical Instrument Digital Interface. It is a... -
Page 72: Synchronizing The Performance Of The Sp-505 And An External Midi Device
BPM (Sync mode). Connections for synchronized performance Use a MIDI cable to connect the MIDI OUT connector of the master device to the MIDI IN connector of the SP-505. fig.12-03 MIDI OUT Master Slave (SP-505) Sync mode settings 1. -
Page 73: Chapter 13. Making System Settings
Chapter 13. Making system settings Here’s how to make system settings (such as LCD Contrast) for the SP-505. About the CONFIG parameters LCD Contrast: 1–16 This adjusts the LCD contrast. Pad Protect: (BANK 5–16) OFF, ON For each pad bank, you can apply Protect to prevent the samples from being erased. -
Page 74: Chapter 14. Restoring The Factory Settings
Chapter 14. Restoring the factory settings Use the Initialize operation when you want to restore the system and pattern data to the factory settings. You can restore all data to the factory settings at once, or select a specific type of data, such as sequencer settings, to be initialized. -
Page 75: Chapter 15. Appendices
Chapter 15. Appendices Troubleshooting If the SP-505 does not operate as you expect, check the following points. If this does not resolve the problem, please contact the nearest Roland Service Center or your dealer. No sound/volume is too low Is the power of the SP-505 and connected devices... -
Page 76: Internal Memory
In this case, it is possible that all of the internal memory data may be damaged. If you continue using the SP-505 in this state, further malfunctions may occur. Please initialize the internal memory. When you initialize, all data in internal memory will be... -
Page 77: External Midi Device
Is the external MIDI device set to transmit note messages? Make sure that the note numbers of the note messages are in the range of note numbers that the SP-505 is able to receive. (p. 83) Check the settings of the external MIDI device. -
Page 78: Error Message List
Check whether the MIDI cable has been disconnected or broken. MIDI Buffer Full! Too many MIDI messages were received all at once, and the SP-505 was unable to process all of them. Reduce the amount of MIDI messages being transmitted to the SP-505. MIDI Error! A MIDI message was not received correctly. -
Page 79: System Related
The format of the inserted memory card is a format that the SP-505 cannot use. The SP-505 is able to use only 8–128 MB Smart Media memory cards with a 3.3 V power supply. Please check the type of card you are using. -
Page 80: Parameter List
Chapter 15. Appendices Parameter List Parameter Sampling SOURCE SELECT Type Grade Auto With BPM Resampling SOURCE SELECT Type Grade Auto Wave Edit Level Panpot Pad Play Loop Mode Reverse Play Type Measure Beat Amplify BPM Adjust Play BPM BPM Sync SYNC BPM Chop Resolution... - Page 81 Parameter Display Position Swing Position Position Percentage Percentage Part 1 Swing Part 1 Swing Part 2 Swing Part 2 Swing Part 3 Swing Part 3 Swing Part 4 Swing Part 4 Swing System Utility Configuration LCD Contrast LCD Contrast Pad Protect Pad Protect Metronome Level Metronome LV...
-
Page 82: Preset Sample
Chapter 15. Appendices Preset Sample Sample Name BANK TR808 Kick 1 TR808Cowbell TR808 Snr TR808 Clap TR909 Snr 3 CR78 Beat TR808 CHH TR808 Kick 2 CR78 Guiro TR808 Conga TR808 OHH TR808 Tom CR78 Tamb TR606 Cym Techno Scene 808 Maracas Hip Kick HipJazz Snr... -
Page 83: Midi Implementation
MIDI Implementation Model: SP-505 Date: Aug. 10, 2001 Version: 1.00 1. RECOGNIZED RECEIVE DATA Channel Voice Message Note On/Off Receive the note on/off in the MIDI channel number which is designated with "Pads Channel" in the system parameter “SYSTEM/UTILITY/MIDI.” Note On... -
Page 84: System Exclusive Message
Active Sensing Status * Whenever the SP-505 receives this message, it monitors the interval of the incoming data.If the subsequent message has not arrived within about 400 ms after the previous data it processes all tracks as though it has received All Sound Off, and mutes the sounding voices, then stops monitoring receiving interval. -
Page 85: Program Change
Active Sensing Status * Always transmitted at intervals of approximately 250 ms. System Exclusive Message Status Byte About Model ID The SP-505 uses 00H 39H as a Model ID. Universal System Exclusive Message INQUIRY MESSAGE Identity Reply Status Byte 39H 01H... -
Page 86: Channel Voice Message
Chapter 15. Appendices 3. Messages stored in sequencer Channel Voice Message The following channel voice messages on the MIDI channel number specified by the system parameter “SYSTEM/UTILITY/MIDI” setting “Pads Channel” are stored. Note On/Off Status Second Third n = MIDI Channel Number: 00H - 0FH (ch.1 - ch.16) mm = Note Number: 23H - 33H (35 - 51) / 23H(35), 3CH - 48H (60 - 72) -
Page 87: Midi Implementation Chart
MIDI Implementation Chart Groove Sampling Workstation Model SP-505 Function... Basic Default Channel Changed Default Mode Messages Altered Note Number : True Voice Note On Velocity Note Off After Key's Touch Channel's Pitch Bend Control Change Program : True Number Change... -
Page 88: Specifications
Chapter 15. Appendices Specifications SP-505: Groove Sampling Workstation Maximum Polyphony 8 notes Internal Memory Samples: 250 (16 banks) Expansion Card Memory Samples: 256 (16 banks) Maximum Sampling Time Internal (times approximate) STANDARD LONG 2 minutes 5 minutes Memory card (times approximate) -
Page 89: Index
Index Accent ... 61 Add ... 52 Auto ... 42 Beat ... 45 BOTTOM ... 46 BPM ... 24–25, 33, 46, 55 BPM ADJUST ... 24, 33, 46 BPM SYNC ... 25 Card bank ... 29 Card Cover ... 5 CHOP ... - Page 90 Index SOURCE SELECT ... 22, 32, 40 SP-303 ... 17, 29 Start Point ... 31 Stereo sampling ... 39 Sub-window ... 16 Swing ... 61 Sync Mode ... 71–72 SYNC SOURCE ... 34 Synchronize ... 25, 72 SYSTEM ... 65–74 Tempo ...
-
Page 91: Federal Communications Commission Radio Frequency Interference Statement
IMPORTANT: THE WIRES IN THIS MAINS LEAD ARE COLOURED IN ACCORDANCE WITH THE FOLLOWING CODE. BLUE: NEUTRAL BROWN: LIVE As the colours of the wires in the mains lead of this apparatus may not correspond with the coloured markings identifying the terminals in your plug, proceed as follows: The wire which is coloured BLUE must be connected to the terminal which is marked with the letter N or coloured BLACK. - Page 92 02670412 ‘01-10-B3-21N...
Need help?
Do you have a question about the SP-505 and is the answer not in the manual?
Questions and answers