Table of Contents
Advertisement
Quick Links
Advertisement
Table of Contents

Summary of Contents for Next Wave Automation Ready2Lift
- Page 2 15 September 2014 Updates of this manual are available at www.nextwaveautomation.com. Ready2Lift and the configuration of these products are either registered trademarks or trademarks of Next Wave Innovation. Software copyright by Next Wave Innovation. All rights reserved. All other trademarks are the property of their respective owners.
-
Page 3: To Our Customers
Thank you for purchasing a Ready2Lift! Your Ready2Lift system brings the speed and precision of computer-controlled machinery to your shop. This manual tells you about your Ready2Lift system and how to operate and maintain it. Please read the manual carefully. The manual also includes our warranty and important safety information. -
Page 4: Serial Number Information
Serial Number Information Record your Ready2Lift serial number here for safe keeping. Ready2Lift Serial Number: ____________________________________________ R2Lv1.0 – October 6, 2014 2014 Ready2Lift | 2... -
Page 5: Table Of Contents
To Our Customers ........................1 Serial Number Information ......................2 Warranty .............................5 Safety ............................6 Ready2Lift Operations Safety Instructions ................6 Ready2Lift Hardware and Project Safety Instructions ..............6 Overview .............................8 General – Ready2Lift .......................8 Touch Plate..........................9 Traveling Beyond the Mechanical Extents ................9 Ready2Lift Assembly Instructions ....................10 Ready2Lift Checkout and Jog ....................14... - Page 6 Touch Plate Height ........................43 Exe Touch Plate ........................43 About ............................49 Maintenance ..........................50 Routine ..........................50 Repair Parts and Upgrades ....................50 Ready2Lift Specifications ......................51 General ..........................51 Rates and Accuracy ........................51 Height Travel .........................51 R2Lv1.0 – October 6, 2014 2014 Ready2Lift | 4...
-
Page 7: Warranty
This warranty is void if the Ready2Lift machine or any portion of the Ready2Lift machine is modified without the prior written permission of Next Wave Innovation, LLC, or if the Ready2Lift machine is located or has been used outside the country of residence of the authorized Ready2Lift machine distributor from whom the Ready2Lift machine was purchased. -
Page 8: Safety
Safety Ready2Lift Operations Safety Instructions 1. Read and follow all safety and operating instructions before using the Ready2Lift (R2L). This includes reading the manual(s) for the router and router table that you’ll be using the Ready2Lift with. Take the time to orient yourself to the R2L and the workflow steps. - Page 9 You may also want to use a dedicated electrical circuit for the Ready2Lift. Turning on a shopvac or other power tool on the same leg may cause a momentary change in the power supplied to the Ready2Lift.
-
Page 10: Overview
Overview General – Ready2Lift The Ready2Lift brings the speed and precision of computer controlled machinery to your router table. The R2L uses a tight-tolerance worm drive to precisely move the router in relation to the table. Once the R2L is ‘zeroed’ to the bit, you can save up to eight positions in the R2L’s memory in case you want to come back later and do another run of specific parts. -
Page 11: Touch Plate
When this occurs, the digital readout on the LCD Control Panel will continue to register even though the Lift is ‘stuck’. At this point, you will have to reset the Zero/Home position as it is no longer known to the R2L unit. R2Lv1.0 – October 6, 2014 2014 Ready2Lift | 9... -
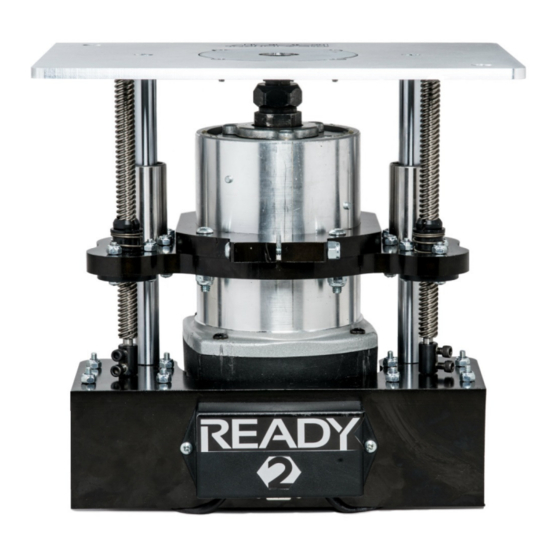
Page 12: Ready2Lift Assembly Instructions
Ready2Lift Assembly Instructions IMPORTANT: When connecting the Ready2lift to either the interface controller or the Ready2 Rout Fence, make sure they are powered down. Failure to do so can result in a short that can damage the control board. Your Ready 2 Lift will be delivered without the top plate installed and will look like the Lift in the picture below. - Page 13 NOTE: The Ready2Lift is designed to fit a Porter Cable 7518 router, if you are using a different router you will need an adapter. Please follow the additional instructions included with your adapter. When installing the router be sure to line up slots with the pins on the router to allow clearance as seen below.
- Page 14 Re-install clamping bolt and tighten to secure router motor. Tighten all four screws of clamping base. R2Lv1.0 – October 6, 2014 2014 Ready2Lift | 12...
- Page 15 Place router plate on top of Ready2Lift posts and secure with bolts supplied. Place completed Ready2Lift into Router table and connect the serial cable into either the R2R or R2 Interface. Connecting to an R2R Fence System Connecting to a R2 Interface R2Lv1.0 –...
-
Page 16: Ready2Lift Checkout And Jog
Ready2Lift Checkout and Jog Power is supplied to the R2L through the serial cable from either the R2R or R2 Interface. Once you turn on power to either the R2R or R2 Interface, press the ‘Continue’ button at the start up screen and the ‘OK’... - Page 17 If this is a new R2R or R2 Interface, you will want to check the Next Wave Innovation downloads page for any updates to the R2 software. Press the ‘About’ button to find the version number of the software currently installed on the R2 Unit. R2Lv1.0 – October 6, 2014 2014 Ready2Lift | 15...
- Page 18 R2R About Panel Installing software updates is covered in a separate section of Ready2Rout or Interface manual or can be found online at www.NextWaveAutomation.com/downloads R2Lv1.0 – October 6, 2014 2014 Ready2Lift | 16...
-
Page 19: Ready2Lift Control Panel
Ready2Lift Control Panel The Ready2Lift Control Panel is used to control the R2L’s operation in conjunction with your router. You use the control panel to zero the R2L, set the cutter size, run an application, and update the R2L. Control Panel Layout The R2L’s Control Panel layout has 4 distinct areas:... -
Page 20: Position And Movement
The speed of movement and distance travelled with each button press are controlled by the middle and lower right buttons in the display and movement behavior area. Position and Movement Buttons R2Lv1.0 – October 6, 2014 2014 Ready2Lift | 18... -
Page 21: Position Calculator Panel
• The ‘Location’ key provides the current location of the R2R fence • The ‘Move’ key moves the fence to the position entered in the fence display You can press the ‘X’ to return to the home menu. R2Lv1.0 – October 6, 2014 2014 Ready2Lift | 19... -
Page 22: Display And Movement Behavior
• inch – display is decimal inches • mm – display is millimeters • 1/# - display is in English fractions You toggle to the desired mode by pressing the button until the desired mode is displayed. R2Lv1.0 – October 6, 2014 2014 Ready2Lift | 20... -
Page 23: Jog Speed Button
R2L is 0.438. Pressing the ‘Lift+’ button will position the bit 0.500 – not 0.938. The next press of ‘Lift’ in this case would position the R2L at 1.000. R2Lv1.0 – October 6, 2014 2014 Ready2Lift | 21... -
Page 24: Bit Zero Reference
Saving and Retrieving a R2L Position You can store up to 10 ‘favorite’ height positions using the ‘Save’ operations and applications button. You can then jog to a ‘favorite’ position by using the ‘Recall’ button. R2Lv1.0 – October 6, 2014 2014 Ready2Lift | 22... -
Page 25: Save Button
Simply touch a location and any current value in the button selected will be over written with the current R2L location. Opening the Save Operations Panel – Lift locations on Left R2Lv1.0 – October 6, 2014 2014 Ready2Lift | 23... - Page 26 If you open the Save Operations Panel and do not want to make a new entry, you can exit the panel by pressing on the ‘X’ in the upper right corner of the panel. R2Lv1.0 – October 6, 2014 2014 Ready2Lift | 24...
-
Page 27: Recall Button
Recall Button You can move the R2L to a ‘favorite’ position by opening the Recall operations panel. This also includes the Zero/Home position. Opening the Recall Operations Panel R2Lv1.0 – October 6, 2014 2014 Ready2Lift | 25... - Page 28 If you open the Recall Operations Panel and do not want to move the fence, you can exit the panel by pressing on the ‘X’ in the upper right corner of the panel. R2Lv1.0 – October 6, 2014 2014 Ready2Lift | 26...
-
Page 29: Setup Operations
You can scroll through the list of choices by pressing the ‘+’ and ‘-‘ buttons at the top and bottom of the Setup parameter list. Setup Menu - Top of List R2Lv1.0 – October 6, 2014 2014 Ready2Lift | 27... - Page 30 ‘inch’ and ‘1/#’ result in the display of decimal inches. ‘mm’ results in the display of millimeters. The Display Units plays no role in the display of the numeric value when the parameter is a metric (a number with no units of measurement). R2Lv1.0 – October 6, 2014 2014 Ready2Lift | 28...
- Page 31 ‘mm’/’inch’ button. • Press the ‘OK’ button to set the entry and close the setup panel in use. Each of the setup parameters is discussed in the following sections. R2Lv1.0 – October 6, 2014 2014 Ready2Lift | 29...
-
Page 32: Bit Diameter
‘Bit Diameter’ from the Setup menu, as well as each Application menu. Users are encouraged to update this parameter with every physical bit change. Users are also encouraged to double check the bit diameter setting before running an application. R2Lv1.0 – October 6, 2014 2014 Ready2Lift | 30... -
Page 33: Reference Bit 0-1
All of the Applications will ‘work’ in either mode. The Applications are based on the center of the bit reference. R2Lv1.0 – October 6, 2014 2014 Ready2Lift | 31... -
Page 34: Global Speed Max 0-13
The Fence Speed Max parameter sets the maximum speed of travel of the R2L. This parameter will override the Jog Speed Fast, Medium and Slow parameter settings. Minimum Maximum Fence Speed Min and Max Parameters Fence Speed Max Parameter Settings R2Lv1.0 – October 6, 2014 2014 Ready2Lift | 32... -
Page 35: Jog Speed Fast
You can in fact enter a value that is less than a value entered for the Jog Speed Medium and/or Jog Speed Slow parameters. Minimum Maximum Jog Speed Fast Min and Max Parameters Jog Speed Fast Parameters Settings R2Lv1.0 – October 6, 2014 2014 Ready2Lift | 33... -
Page 36: Jog Speed Medium
You can in fact enter a value that is more or less than a value entered for the Jog Speed Fast and/or Jog Speed Slow parameters. Minimum Maximum Jog Speed Fast Min and Max Parameters Jog Speed Medium Parameters R2Lv1.0 – October 6, 2014 2014 Ready2Lift | 34... -
Page 37: Jog Speed Slow
You can in fact enter a value that is less than a value entered for the Jog Speed Fast and/or Jog Speed Medium parameters. Minimum Maximum Jog Speed Slow Min and Max Parameters Jog Speed Slow Parameters R2Lv1.0 – October 6, 2014 2014 Ready2Lift | 35... -
Page 38: Lcd Brightness 1-8
LCD Brightness 1-8 The LCD Brightness parameter setting controls the brightness of the R2L’s LCD display. Minimum Maximum LCD Brightness Min and Max Parameters LCD Brightness Parameters R2Lv1.0 – October 6, 2014 2014 Ready2Lift | 36... -
Page 39: Beep Sound 0-4
R2L’s control panel. A setting of ‘0’ will result in no sound emanating from the R2L. Minimum 0 (no sound) Maximum Beep Sound Parameter Min and Max Parameters Beep Sound Parameters R2Lv1.0 – October 6, 2014 2014 Ready2Lift | 37... -
Page 40: R2L Max Height Position
The maximum position of the lift in your configuration is also influenced – typically limited – by the position of the router in the lift. In some cases, the lift Max Position will be less than 4.75” R2Lv1.0 – October 6, 2014 2014 Ready2Lift | 38... -
Page 41: Exceeding R2L Mechanical Height Extent
In most cases, as long as you are not going to the very limit of the mechanical extents, you will not have to change this value. R2Lv1.0 – October 6, 2014 2014 Ready2Lift | 39... -
Page 42: R2L Min Height Position
Slow, and continue movements until you have positioned the R2L to the desired location. Any position of the R2L where the bit is below the insert and not engaging the bit is appropriate. R2Lv1.0 – October 6, 2014 2014 Ready2Lift | 40... -
Page 43: Exceeding R2L Mechanical Min Extent
Position) after setting a new zero/home position. In most cases, as long as you are not going to the very limit of the mechanical extents, you will not have to change this value. R2Lv1.0 – October 6, 2014 2014 Ready2Lift | 41... -
Page 44: Touch Plate Thickness
Touch Plate Fence application. Display Units Minimum Maximum Inch – 1/# 0.000 in 3.000 in 0.000 mm 76.2 mm Touch Plate Thickness - Min and Max Parameters Touch Plate Parameters R2Lv1.0 – October 6, 2014 2014 Ready2Lift | 42... -
Page 45: Applications
Ensure that the touch plate is plugged in (jack is on the external connections panel at the back of the Ready2Rout or Interface). Place the touch plate against the table surface and attach the magnet on the side of the bit or collet. R2Lv1.0 – October 6, 2014 2014 Ready2Lift | 43... - Page 46 Once you’ve completed these steps, press the ‘Press to Run’ button to start the application. The first panel that appears reminds you of the steps that are required to be completed prior to the actual execution of the application. Exe Touch Plate Application Panel 1 R2Lv1.0 – October 6, 2014 2014 Ready2Lift | 44...
- Page 47 Once the conditions are met, press the ‘OK’ button to proceed. During the next step you will confirm that the R2L recognizes when the touch plate comes into contact with the bit. Exe Touch Plate Application Panel 2 R2Lv1.0 – October 6, 2014 2014 Ready2Lift | 45...
- Page 48 Perform the test by moving the touch plate in contact with the bit (which has the magnet attached to it). If the test is successful, you will see the panel below. Exe Touch Plate Application Panel 3 R2Lv1.0 – October 6, 2014 2014 Ready2Lift | 46...
- Page 49 Exe Touch Plate Application Panel 5 The R2L movement will stop once the touch plate comes into contact with the bit. The panel below will be displayed. R2Lv1.0 – October 6, 2014 2014 Ready2Lift | 47...
- Page 50 Press the ‘OK’ button to accept the new Zero/Home position. Press the ‘Cancel’ button to discard the outcome of the application and maintain the current Zero/Home position. Pressing either will return you to the Touch Plate menu. R2Lv1.0 – October 6, 2014 2014 Ready2Lift | 48...
-
Page 51: About
The about panel opens – the information can be compared with information on the latest version information found on the Next Wave Innovation website. About Panel You can close the panel by pressing the ‘OK’ button. R2Lv1.0 – October 6, 2014 2014 Ready2Lift | 49... -
Page 52: Maintenance
Repair Parts and Upgrades Repair parts for the Ready2Lift are available online in the Next Wave Innovation Store at the Next Wave Innovation web site – www.nextwaveautomation.com. Questions about upgrades and other modifications can be made directly to Next Wave Innovation via email or phone. -
Page 53: Ready2Lift Specifications
The maximum distance your setup is capable of is also influenced by the setup of your router and its position must be below the bearings (see setup) for maximum depth travel of the lift. R2Lv1.0 – October 6, 2014 2014 Ready2Lift | 51...
Need help?
Do you have a question about the Ready2Lift and is the answer not in the manual?
Questions and answers