Table of Contents
Advertisement
Quick Links
Advertisement
Table of Contents

Summary of Contents for Fortex S1-01
- Page 1 S1-01 STENCIL PRINTER User manual Version 2.10...
- Page 2 IMPORTANT SAFETY RULES ........................2 Introduction ............................. 2 Setting up the stencil printer ........................2 Placement of the stencil printer ......................3 The S1-01 overview ..........................4 Getting started ............................5 Installing the stencil..........................5 Installing the first PCB ......................... 5 Operating the stencil printer ........................
- Page 3 They are meant to explain the printers’ use and function. The S1-01 stencil printer is designed to put solder paste on PBC’s with a “stencil”. A stencil is a thin metal sheet which has holes matching the position of the pads located on the PCBs.
- Page 4 Rev. 2.1 Manual stencil printer S1-01 July 2019 3 Allen Keys, metric sizes 1 non-permanent fine line marker pen 6 magnetic placeholders for PCBs 2 magnetic points of support for PCBs 1 transparent outline-sheet to define PCB position ...
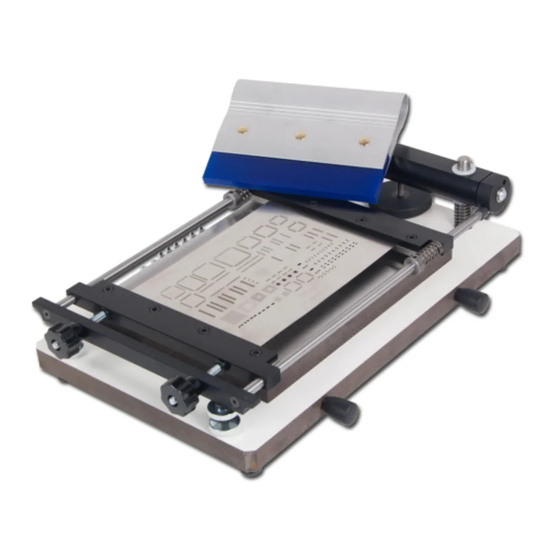
- Page 5 Rev. 2.1 Manual stencil printer S1-01 July 2019 The S1-01 overview 1. Storage place magnetic devices magnetic devices 2. Base plate 3. Stencil frame 4. Stencil 5. Stencil size adjustment 6. Top height adjustment of stencil Top height adjustment of stencil 7.
- Page 6 Rev. 2.1 Manual stencil printer S1-01 July 2019 Getting started Installing the stencil 1. Loosen up the Y-axis alignment or stencil axis alignment or stencil tensioner. (10) 2. Unscrew the eight screws of the stencil frame t screws of the stencil frame. (A) 3.
- Page 7 6. For successive printing repeat from step 1. Maintenance and care Use the S1-01 only in a dry, clean location and strictly avoid aggressive environmental conditions such as etching equipment. After using the machine, clean the machine with a solvent that only removes paste and has no aggressive elements in it that could affect the machine or the stencil.
- Page 8 Rev. 2.1 Manual stencil printer S1-01 July 2019 Cleaning the stencil frame Cleaning the stencil frame For easy cleaning of the stencil frame turn For easy cleaning of the stencil frame turn the top height adjustment knob (A) clockwise until you clockwise until you can lift the frame from the base plate.
Need help?
Do you have a question about the S1-01 and is the answer not in the manual?
Questions and answers