Advertisement
ASSEMBLY
INSTRUCTIONS
Tools
R equired:
P hilips
S crewdriver
S tep
1 :
T ongue
&
B ow
T ube
A ssembly
1.
Slide
a ft
t ongue
t ube
o ver
splice
t ube,
w hich
i s
r iveted
into
t he
f orward
t ongue
t ube,
until
s nap
b utton
i s
e ngaged.
2.
Attach
b oth
c ross
f ittings
t o
t ongue
t ube.
3.
Connect
b ow
t ube
t o
f orward
t ongue
t ube
t hrough
e lbow
f itting.
M ake
s ure
t he
D ynamic
a ddress
l abel
o n
t he
b ow
tube
f aces
a ft.
4.
Attach
h andle
f itting
t o
b ow
t ube.
5.
Slide
h andle
t ube
t hrough
h andle
f itting
until
c entered.
W ith
t he
p alm
o f
y our
hand,
g ently
t ap
b oth
h andle
g rips
o nto
handle
t ube
f rom
b oth
e nds.
S tep
2 :
A xle
T ube
A ssembly
1.
Connect
r ound
s ide
t ubes
t o
a xle
t ube.
2.
Connect
w heel
s hafts
t o
a xle
t ube
t hrough
axle
f ittings.
Step
3 :
C ross
T ube
A ssembly
Connect
r ound
s ide
t ubes
t o
c ross
t ube.
Make
s ure
D ynamic
l abel
o n
c ross
t ube
faces
f orward.
S tep
4 :
F inal
A ssembly
1.
Connect
a xle
t ube
t o
t ongue
t ube
a ssembly
t hrough
the
a ft
c ross
f itting.
M ake
s ure
D ynamic
l abel
o n
axle
t ube
f aces
a ft.
2.
Connect
f orward
c ross
t ube
t o
t ongue
t ube.
3.
For
a
q uick
d olly-‐ b reakdown,
u se
h ex
h ead
b olts
a nd
wing
n uts
a s
s hown
i n
p icture.
4.
Slide
w heels
o nto
w heel
s hafts
w hile
d epressing
snap
b utton.
5.
Wheels
c an
b e
s ecured
o n
t he
d olly
b y
i nserting
t he
enclosed
s hort
f lat
h ead
m achine
s crews
u nder
t he
snap
b uttons.
6.
Tire
p ressure
n ot
t o
e xceed
1 5
p si.
F or
s oft
s and
conditions,
r educe
t ire
p ressure
t o
i ncrease
t ire
footprint.
Contact
u s:
401-‐683-‐0427,
2 75
H igh
P oint
A ve,
P ortsmouth
R I
0 2871
info@dynamicdollies.com
www.dynamicdollies.com
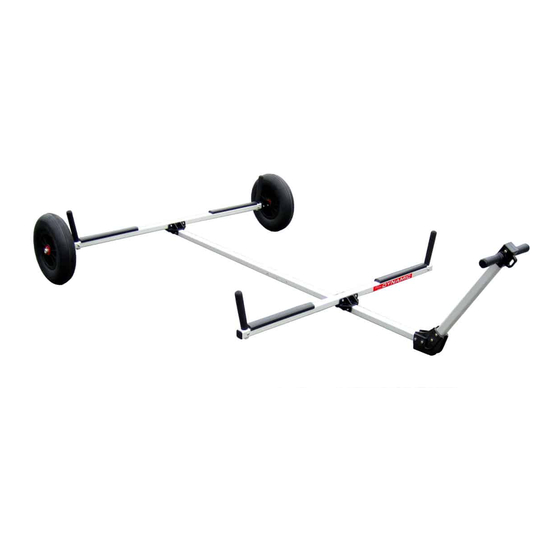
Type 10 dolly
Aft Tongue
Tube
Axle Tube
Axle Fitting
Wing Nuts for Quick Disconnect
Unsecured Snap Button
Fwd. Tongue
Tube
Side Tube
Cross Tube
Cross Fitting
Snap Button Immobilized
© Dynamic Dollies & Racks LLC
Bow Tube
Advertisement
Table of Contents

Subscribe to Our Youtube Channel
Related Manuals for Dynamic Dollies & Racks UFO


Summary of Contents for Dynamic Dollies & Racks UFO
- Page 1 ASSEMBLY INSTRUCTIONS Tools R equired: P hilips S crewdriver Aft Tongue Tube S tep 1 : T ongue & B ow T ube A ssembly Bow Tube Slide ...
Need help?
Do you have a question about the UFO and is the answer not in the manual?
Questions and answers