
Summary of Contents for Rubarth Apparate RUMED 4001
- Page 1 Operating and Maintenance Instructions Climatic Test Cabinets Type 4001 bis 4701 Version E/40-47/02-2001 Firmware X.17...
-
Page 3: Table Of Contents
- 3 - Inhaltsverzeichnis 1 General View 1.1 Control Panel ..............5 1.2 Nameplate . - Page 4 - 4 - 3.9 Programme ..............18 General .
-
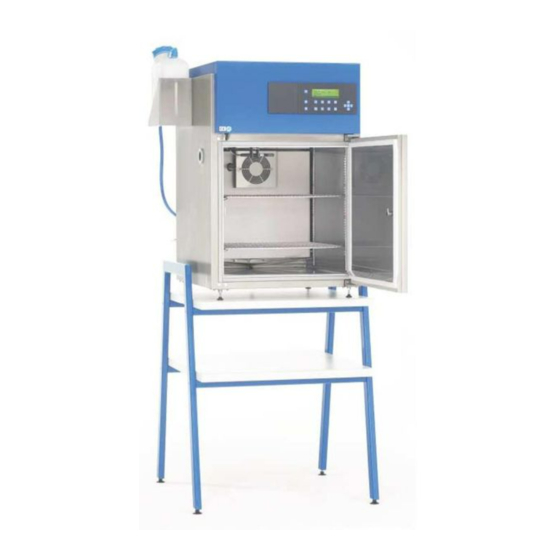
Page 5: General View
- 5 - 1 General View 1.1 Control Panel 1.2 Nameplate The nameplate is located at the right side above the water supply connections. In case of failures or for spare-part orders, please indicate the unit type (1) and the serial no. (2). E/40-47/02-2001... -
Page 6: General
- 6 - 1.3 General RUMED Climatic Test Cabinets are producing ideal thermal conditions for quality control and research as well as development in science and industry. Experiences of more than 50 years stand for a maintenance-free construction and result in longevity. Climatic Test Cabinets are produced in two different temperature ranges, and three unit sizes each can be chosen from. -
Page 7: Safety, Transportation And Installation
- 7 - 2 Safety, Transportation and Installation 2.1 Safety It is recommended to clean the interior of the unit before starting. Refer to the details described in "Defrosting" and "Cleaning" (chapter 7). Open the door widely for removal of the insertion grids. The grids must be charged in such a way that a circulation of the air will not be hindered. -
Page 8: Installation
- 8 - 2.3 Installation Installation places being exposed to direct sunlight, radiators and other thermal sources are to be avoided. Insufficiently ventilated rooms and room temperatures exceeding +25°C are also unsuitable. The distance between the wall and the backside of the unit should be at least 10 cm. Do not cover the ventilation slots;... -
Page 9: Power Supply
- 9 - 2.4 Power Supply Current (A.C.) and voltage at the installation place must coincide with the indications on the name-plate of the unit. The name-plate can be found at the upper part in the door frame on the left side. Connection is to be made to a duly earthed socket (a separately secured socket is recommended). -
Page 10: Start-Up
- 10 - 3 Start-up 3.1 General ... The unit can be switched on and off by means of the softkey ON/OFF Since the connection and disconnection is effected by a software switch, the mains plug is always to be withdrawn in case of maintenance tasks to ensure that the unit is completely disconnected from the mains. -
Page 11: The Keys And Their Functions
- 11 - 3.3 The Keys and Their Functions The General Keys ... Softkey On/Off Special function: Abortion at password entry Enter key in the centre of the cursor key set Cursor to the left Cursor up Cursor down Cursor to the right In case of a screen with several pages, these keys are used to scroll (Page up, Page down) The functions of the control keys are indicated by the lower screen footer (partly... -
Page 12: Passwords
- 12 - Editing is to be finished by pressing the key . Use the key to abort the present input. The old value will appear again. Observe that the abort function is only concerning the present field. When having left a field using the key , the values are stored! Attention: If the programme control is active, the setpoints for single setpoint control cannot be changed during... -
Page 13: Abort Of The Password Entry
- 13 - The numerals are to be entered using that "hidden ten-key keyboard", and they are to be acknowledged using the key . It is not required to enter zero values behind the decimal point, since they will be added automatically. -
Page 14: The Hotkey "Info
- 14 - 3.6 The Hotkey “INFO” 3.6.1 The e-Nameplate of the Unit During operation of the unit, the electronic nameplate can be called by pressing the key The nameplate gives information about the detailed type of the unit, its denomination, the serial number of the unit and of the control, the software version of the control, the temperature range and, if applicable, the humidity range of the unit.. -
Page 15: Test In The Area Service
- 15 - 3.6.4 Test in the Area Service ..is a menu item being meant for the service personnel. It includes functions for specific tests of the individual contactors, valves, relays and other units, if there should really be a problem, once..Use the key return. -
Page 16: Summertime/Wintertime
- 16 - Attent without having pressed the key first will result in “No Synchronisation” ..Return using the key 3.7.3 Summertime/Wintertime ..The clock can be easily changed from summertime to wintertime and vice-versa. Use the keys to set the time by +1 h and -1h. While the time is being increased or reduced by 1 hour, the clock continues running. -
Page 17: Single Setpoint Control
- 17 - 3.8 Single Setpoint Control 3.8.1 Setpoints When being in the actual value screen, the setpoints for the single setpoint control will be displayed on pressing the key for "Setpoints". A menu with illuminated bars offers the control variables, which can be selected for the corresponding unit. Use the keys to move the illuminated bar to the setpoint to be modified and select it by pressing the The cursor will be flashing. -
Page 18: Programme
- 18 - 3.9 Programme 3.9.1 General Press the hotkey to call the menu "Programme". In case of a programme control, 1 to 4 programmes are at choice, depending on the execution. In case of units with single setpoint control with lighting only 1 programme with 1 lighting profile is available. In the overview, programmes being already occupied are marked with +, programmes being not occupied are marked with -. - Page 19 - 19 - programme (Request for acknowledgement: Delete profiles?) The key is used to call the menu Profiles. Each programme consists of several profiles (temperature profile, humidity profile etc.) Occupied profiles are marked with +, and empty profiles are marked with -. Use the cursor keys to move to the desired profile and press the key to confirm the selection.
- Page 20 - 20 - cursor keys. Acknowledge using the key Pressing a second time will activate the setpoint entry. Use the to modify the setpoint and use key for acknowledge. The keys are used to scroll through the rows, and the keys are used to scroll through the pages of the programme.
- Page 21 - 21 - The temperature profile is now marked with +. A visual plausibility check of the edited profile is effected by means of the menu item "Preview". If that day/night profile shall include a constant humidity, the desired humidity setpoint can be entered as setpoint in the setpoint menu, or the humidity profile can be entered in one single step.
-
Page 22: How To Start A Programme
- 22 - 3.9.3 How to Start a Programme The programme is started from the menu "Programme". Starting of a programme is only possible, when no other programme is active. In that case, the menu point "Start" will not be offered. Press the key “Start”... -
Page 23: How To Stop A Programme
- 23 - 3.9.4 How to stop a Programme To abort an active programme press to select “Programme”. If a programme is active the key is used for “Stop” . After pressing once “Programme terminate ?” . Press for “Stop” , Password level 1 will be needed ... After aborting the programme the key „Starten“... -
Page 24: Example: Day/Night Cycle
- 24 - 3.9.5 Example: Day/Night Cycle Day/Night-Cycle Water temperature 120 min 660 min 120 min Temperature Profile 0 Uhr Light Profile 0 Uhr Contact Profile Example: Day/Night Alternation with 11 h and 30 °C, 9 h and 20 °C and two ramps with 2 h, each Programme 3 Temperature profile Time... -
Page 25: Example: Weekly-Cycle
- 25 - Programme 3 Contact profile Zeit Sollwert 11:00 18:00 3.9.6 Example: Weekly-Cycle Programming of a week programme is identical to the programming of the day programme. The essential difference is the column "DAY". While "1" is shown in the day programme, "Mon" (for Monday) is shown in the week programme. -
Page 26: Functions For Advanced Programming
- 26 - 3.9.7 Functions for Advanced Programming When having entered a very complicated week temperature profile, and a light profile shall be entered which is matching to that profile, the functions "Copy" and "Insert" of the menu "Profiles" can be used. Select the time track (master track) to be copied and press to "Copy". -
Page 27: Delete
- 27 - support points. The corresponding setpoint cannot be taken over. A standard value has been assigned to it. The setpoints can now be adapted without thinking of the time track. If only a few values are to be adapted, it is recommendable to use to cursor keys to move to these values and to change them. -
Page 28: Insert
- 28 - 3.9.9 Insert When pressing the key , a "harmless" programme step will be inserted, i. e. the highlighted step will be copied. There are now two identical programme steps. The inserted programme step can now be edited. Observe the following: The time of the programme step can only vary within the time limits: Time programme step n1 <= Time programme step n <= Time programme step n+1. - Page 29 - 29 - Hints, Alarms and Other Messages General Control2000 is equipped with an alarm memory to log up to 20 messages. If at least one message has not been acknowledged, a small "Attention" triangle will be displayed in the actual value screen to indicate an unacknowledged message.
-
Page 30: Temperature Protection
- 30 - 5 Temperature Protection 5.1 Specimen Protection 5.1.1 Integrated Temperature Selector Function "Preliminary Alarm" The control is equipped with an integrated temperature selector function, which gives a warning if only small deviations between actual value and setpoint are occurring for more than 5 minutes. Very often, this warning indicates that the gradients have been chosen such steep that the unit cannot follow them. -
Page 31: How To Set The Temperature Range
- 31 - of the imminent undercooling, as long as there is insufficient temperature in the test chamber. The refrigerating machine will be restarted automatically, as soon as the test chamber temperature exceeds the preset temperature value. The limits of the temperature range being set at the temperature selector should not be chosen closer than necessary. -
Page 32: Unit Protection
- 32 - 5.2 Unit Protection 5.2.1 Dependent Unit Protection - Maximum Alarm Als Schutz gegen Übertemperatur oberhalb der Gerätespezifikationen dient der werksseitig voreingestellte “Regler Maximal Alarm”. Bei Prüfraumtemperaturen 5°C oberhalb der Gerätespezifikationen (gemessen am Regelfühler) sorgt der Maximal Alarm für eine bleibende Abschaltung des Leistungsteiles des Gerätes. 5.2.2 Independent Temperature Fuse for Unit Protection A temperature fuse (TS, according to DIN 12880, class 1) is integrated as independent unit protection if temperatures are exceeding the unit specifications. -
Page 33: Humdification
- 33 - 6 Humdification T [ C] 6.1 Ultrasonic Humdification 6.1.1 General The ultrasonic humidification is generating mist by means of ultrasonic waves acting upon demineralized water, and thus the air is humidified. The temperature/humidity diagram in the margin shows the working range in combination with the function dehumidification. -
Page 34: Replacement Of The Tube Filter In The Ion Exchanger
- 34 - 6.1.4 Replacement of the Tube Filter in the Ion Exchanger When the tube filter of the ion exchanger is spent it must be replaced. Close the stop valve of the water supply of the humidifier and loosen hose from the cock to reduce the overpressure Place vessel or bucket as collecting basin below the ion exchanger, as undetermined water might penetrate when replacing the tube filter... -
Page 35: Service And Maintenance
- 35 - 7 Service and Maintenance 7.1 Defrosting Place a condensate collector below the floor drain which is to be emptied if filled with dew water. Continuous operation with coldest thermostat adjustments might cause icing or hair-frost on the evaporator. - Page 40 Rubarth Prüf- und Simulationsgeräte Apparate GmbH für Forschung, Qualitätskontrolle und Produktion Mergenthalerstraße 8 D-30880 Laatzen Germany Telefon 0511. 82 40 15/16 Fax 0511. 82 40 17 e-mail info@rumed.de...
Need help?
Do you have a question about the RUMED 4001 and is the answer not in the manual?
Questions and answers