Advertisement
Quick Links
Normally
Open
Status
OUTPUT
THANK YOU
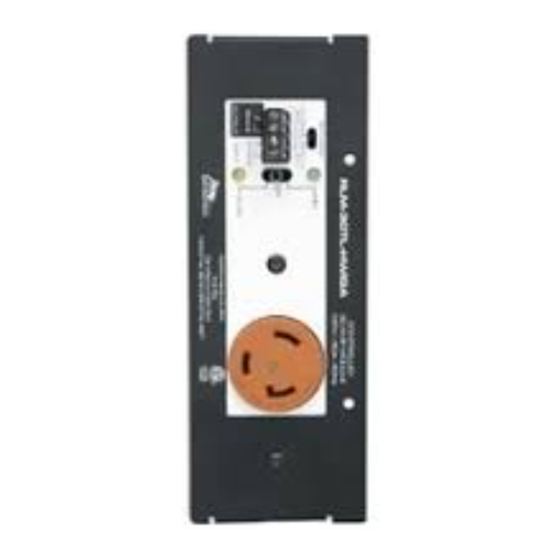
Thank you for purchasing the RLM-30TL-HWIGA Module. Please read these instructions thoroughly
before installing this product.
Instruction Sheet
MPR-A SERIES
RLM-30TL-HWIGA
RLM-30TL-HWIGA
Activation
ON
Normally
Closed
OFF
Control
AUTO
INPUT
C22.2 No. 62 & C22.2 No. 62. 1
CONTROLLED
30 AMP MODULE
120V - 30A - 60Hz
Conforms to UL Std
5 & 5A
Certified to CSA Std
I-00599
Rev A
Advertisement

Summary of Contents for Intertec Data Systems MPR-A Series
- Page 1 Instruction Sheet MPR-A SERIES RLM-30TL-HWIGA CONTROLLED RLM-30TL-HWIGA 30 AMP MODULE 120V - 30A - 60Hz Activation Normally Normally Open Closed Status Control AUTO OUTPUT INPUT Conforms to UL Std 5 & 5A Certified to CSA Std C22.2 No. 62 & C22.2 No. 62. 1 THANK YOU Thank you for purchasing the RLM-30TL-HWIGA Module.
- Page 2 IMPORTANT SAFETY INSTRUCTIONS DANGER HAZARDOUS VOLTAGE/DANGER HAUTE READ AND SAVE THESE INSTRUCTIONS! TENSION CONSERVER CES INSTRUCTIONS! The lightning flash with the arrowhead symbol, within an equilateral triangle is intended to alert the user to the • To reduce risk of shock , disconnect the device from the power source before presence of uninsulated dangerous voltage within the servicing any connected equipment product’s enclosure that may be of sufficient magnitude to...
- Page 3 CONNECTIONS, CONTROLS AND INDICATORS CONTROLLED RLM-30TL-HWIGA 30 AMP MODULE 120V - 30A - 60Hz Activation Normally Normally Open Closed Status Control AUTO OUTPUT INPUT Conforms to UL Std 5 & 5A Certified to CSA Std C22.2 No. 62 & C22.2 No. 62. 1 CONTACT CONTROL SELECTOR SWITCH: Allows the customer to choose to control the module using either a 'normally open' or 'normally closed' dry contact.
- Page 4 INSTALLATION OF MODULE TO RACEWAY 1) Insert module straight down into the raceway (FIGURE B). 2) Slide the module into raceway (FIGURE C). (FIGURE B) (FIGURE C) 3) Screw the module to the raceway (FIGURE D). USE A HAND-HELD SCREWDRIVER AND DO NOT OVERTIGHTEN! (FIGURE D) WARRANTY Middle Atlantic Products (the "Company") warrants the RLM-30TL-HWIGA to be free from defects in material or workmanship under normal use and conditions for a period of three (3) years from the date of...
Need help?
Do you have a question about the MPR-A Series and is the answer not in the manual?
Questions and answers