Advertisement
Available languages
Available languages
Quick Links
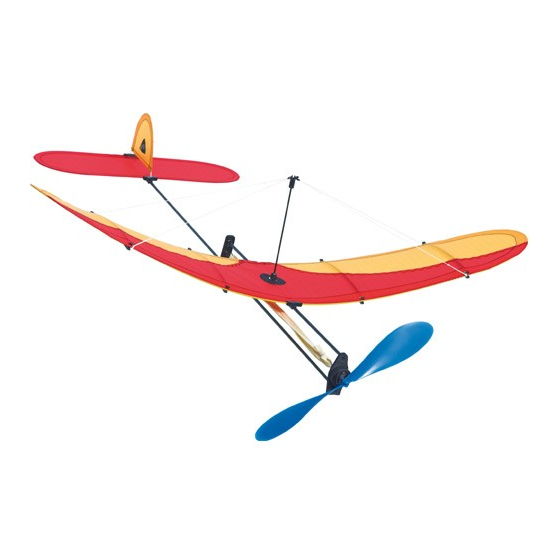
AIRGLIDER
Power-Prop
Produktinformation • Owners Manual
Mode d´ emploi • Información de Producto
© In Vento GmbH
D-26180 Rastede
www.invento-hq.com
service@invento-hq.com
Service: +49 (44 02) 92 62 44
www.invento-hq.com
www.invento-hq.com
Contents
Fuselage Horizontal tail unit Rudder unit Wing
1
2
3
5
Mast Propeller Drive rubberband
6
7
6
3
7
5
Assembly
The Airglider Power-Prop is fast and easy to assemble due to the
new plug-in components. It is recommended that these
instructions be followed carefully to ensure best results. You will
need quick-drying glue for a successful assembly.
Please be careful when working with quick-drying glue!
For accuracy and safety, children should not assemble the Airglider
without the help of an adult. Prepare the package contents. The
individual figures may help during assembly.
First secure the wing on the fuselage. To do this, loosen the ribs
that have been taped to the fuselage. Hook the wings with the
opening on the rear edge into the hooks on the fuselage (Fig. 1a)
and clip the front edge tight (Fig. 1b). Then carefully mount the
ribs on the bottom of the support surface. The tackle is already
secured to both ribs. Ensure it does not become tangled or
twisted (Fig. 1c).
Insert the mast from the top through the opening in the wing and
through the small holes in the fuselage (Fig. 2a). Tighten the
tackle using a small loop over the cam on the tip of the mast (Fig.
2b). Ensure that the individual lines of the tackle are not twisted.
Figure 2c provides an overview.
Tail unit: The horizontal tail unit (HTU) is pushed onto the end of
the fuselage and clipped there as shown in Fig. 3a. Align the HTU
parallel to the wing and secure it with a small amount of quick-dry
glue. Stick the rudder unit into the small holes in the connectors.
The tail unit can be adjusted to the flight curve via adjustment
holes in the rear connector (Fig. 3b).
Stick the propeller unit in the opening in the tip of the fuselage.
Remove the splint on the rear receptacle for the drive rubberband.
This is then setup as a six-fold loop. In the front, hang it on the
wire hooks on the propeller and in the back in the receptacles. Re-
US Distribution by:
secure the rubberband with the splint (Fig. 4a + b).
Nova Design Group
West Hurley, NY 12491
Flying: Fly your Power-Prop when there is no wind or only a very
Phone: (845)331-0977
light wind. First throw it without having the rubberband taut. Trim
www.novadesigngroup.com
the model by pushing the nuts on the fuselage tip forward or
sales@novadesigngroup.com
backward (Fig. 5). It should be able to complete a short gliding
flight. Then twist the rubberband on. First start with approx. 150
rotations and increase it gradually to about 300 rotations.
GB
The Power-Prop should turn in wide upward curves as long as the
propeller is turning. When the power from the rubberband is used
4
up, the model slowly glides to the ground. You can preset a curve
using the adjustable side rudder.
2
1
Technical changes subject to alteration
a a
4
a a
c c
b b
b b
c c
a a
a a
Problem solving:
If the model branches off during the
climb phase and falls back, push the
weight forward.
Tip:
You can significantly increase the
useful life of the rubberband by
lubricating it with a glycerin and liquid
soap mixture (approx. 6:4) prior to the
first flight. You can purchase glycerin
at a pharmacy. You can obtain replacement rubberbands,
propellers, and axles at a hobby shop or at
www.flicflac-shop.com.
b b
b b
Advertisement

Subscribe to Our Youtube Channel
Related Manuals for In Vento Airglider Power-Prop

Summary of Contents for In Vento Airglider Power-Prop
- Page 1 Technical changes subject to alteration Assembly The Airglider Power-Prop is fast and easy to assemble due to the new plug-in components. It is recommended that these instructions be followed carefully to ensure best results. You will need quick-drying glue for a successful assembly.
- Page 2 Seitenruder können Sie eine Kurve voreinstellen. Technische Änderungen vorbehalten. Zusammenbau Der Zusammenbau des Airglider Power-Prop ist einfach und geht, durch die weitgehende Vorfertigung, recht schnell vonstatten. Bitte gehen Sie dennoch sehr sorgfältig vor und lesen Sie diese Anleitung gründlich durch, denn ein Fehler oder grobe Ungenauigkeit wirkt sich auf die Flugeigenschaften des Modells aus.
- Page 3 Changements techniques sujet au changement Montage Le montage d'un Airglider Power-Prop est simple et l'assemblage des pièces préfabriquées relativement rapide. Veuillez cependant l'exécuter avec soin et lire attentivement cette notice, car toute erreur ou manque de précision se répercute sur les qualités de vol du modèle.
- Page 4 Cambios técnicos conforme a la alteración Montage El montaje del Airglider Power-Prop es muy fácil y rápido gracias a que se suministra premontado en gran parte. Proceda con mucho cuidado y lea a fondo estas instrucciones, ya que los errores o imprecisiones importantes influirían negativamente en las...
Need help?
Do you have a question about the Airglider Power-Prop and is the answer not in the manual?
Questions and answers