Advertisement
Quick Links
Advertisement

Related Manuals for Mayku FormBox

Summary of Contents for Mayku FormBox
- Page 1 FormBox Starter Book...
- Page 3 Welcome to a world of making.
- Page 4 Contents...
- Page 5 Setup Make Design Tips...
- Page 6 PART 1 Setup First things first, let’s get you plugged in and ready to start making.
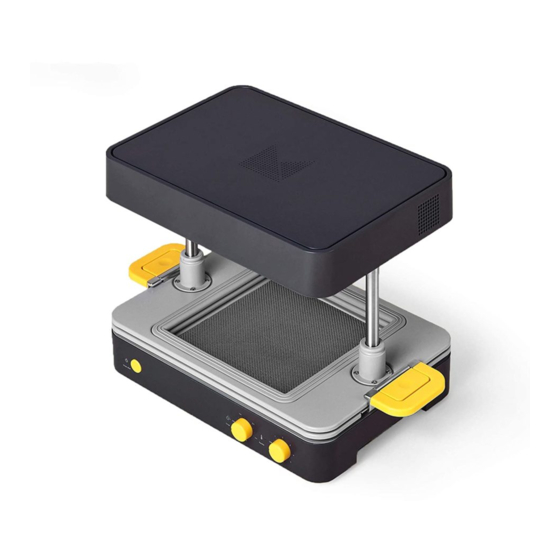
- Page 8 Front Heater Trays Handles Timer Timer Heater Light Dial Dial Timer Heater Start Button Light...
- Page 9 Back CLICK CLICK Vacuum Plate Vacuum Port AC Power Vacuum Cleaner Power Socket...
- Page 10 Things Things You’ll You’ll Need Need ( Not included ) Mayku FormBox Suction Tube Vacuum Cleaner ( 2000W max ) Clear Working Area...
- Page 11 Plug everything in Plug your FormBox into the mains using the Plug your vacuum cleaner’s power cable power cable already attached to the back into the back of the FormBox and switch of the machine. your vacuum cleaner on.
- Page 12 Connect your vacuum cleaner’s hose into vacuum tube into the port on the back of the other end of the vacuum tube. The the FormBox. Make sure it’s pushed in all connector has been designed to fit any the way.
- Page 13 To turn your FormBox heater on, select a You’re now ready to use your Mayku temperature setting on the heater dial. The FormBox. Read on to learn how to make your fans will turn on to keep the machine cool. first creation.
- Page 14 PART 2 Make In your first recipe, we’ll be learning how to use your FormBox to make a hologram viewer. We’ll also be covering one of the fundamental rules of designing for the FormBox: Remove all undercuts.
- Page 16 Things You’ll Need Mayku FormBox Mayku Cast Sheet Hologram Template Part 1 & 2 ( Not included ) Scissors / Knife Smartphone Vacuum Cleaner ( 2000W max )
- Page 17 Make sure everything is plugged in and switched on Make sure your vaccum cleaner is plugged Check that your vacuum cleaner hose is into the FormBox and switched on. connected to the FormBox vacuum tube.
- Page 18 Choose your material and check settings Choose a Mayku Cast Sheet from the pack included. (they are the transparent ones)
- Page 19 Set the time and temperature dials Mayku sheet materials have different At first, set your time dial to the top of the temperature and time ranges. You will range indicated. For example, if the range is always find these on the instructions that 1-2 minutes, set the time dial to 2 minutes.
- Page 20 Mayku Sheets can heat quicker or slower depending on your environment and air temperature. As you test out your FormBox, you’ll become familiar with the settings that work for you. Don’t be afraid to try small adjustments.
- Page 21 Wait for your heater to warm up The light will flash orange as it heats up and go green when it’s at the correct temperature. 1 min. 2 min. While you’re waiting you can move onto the next 3 min. section to prepare 4 min.
- Page 22 Prepare your template Get part 1 and part 2 of your hologram Notice how part one of your hologram template from the starter kit where you template has a ledge around the outside found this book. edge. This is called an undercut.
- Page 23 This creates a smooth edge on the outside with no undercuts. own FormBox templates. We’re now ready to use this template in the FormBox to create a hologram viewer for your phone.
- Page 24 Removing undercuts is one of the three rules of vacuum forming. You’ll find a summary of them on page 34 of this guide. No Undercut...
- Page 25 Insert your material Unclamp the tray handles by lifting the outer Lift the top tray up until it clicks into place ring of each handle. near the heater. CL ICK CL ICK...
- Page 26 Peel the protective film from the Mayku Cast Place your sheet on the seals of the bottom sheet. You can put this film into household tray. Line up the edges of the sheet to the recycling. Always check to make sure you edges of the seals.
- Page 27 Get ready to form Press the timer start button after you lift the Place your template in the centre of the trays. The light will start to flash orange and vacuum plate. you will hear a soft, slow ticking sound. 1 min.
- Page 28 Watch your material When using Mayku Form and Cast sheets, you can tell when the plastic is ready to form as they become soft and elastic across the whole sheet. Mayku Cast sheets will also ripple around the edges when they’re ready.
- Page 29 Form your Shape When you hear the ticking sound get faster, When the signs are showing, pull down on check to see if your sheet is ready to form. the handles to bring both trays over your Look out for signs of elasticity on template.
- Page 30 Leave the newly created form to cool for Unclamp the top tray and move it back to 5 –10 seconds. the top of the FormBox. Your first ever form is now ready! Switch off the heater by turning the heater The FormBox will also turn off by itself if left dial to off.
- Page 31 Make your hologram viewer Flex the form in and out with your hands You can now cut out the hologram viewer. and push from above to release the Use a large pair of scissors or a sharp craft template from the mold. Notice how the knife to neatly cut around the base of the template didn’t get stuck? Looks like form and remove the excess sheet.
- Page 32 Congratulations! You’ve now made a hologram viewer. To get a video to view, visit: mayku.me/hologram For more hologram videos, search ‘3D phone hologram video’ on YouTube.
- Page 33 Next Project? make.mayku.me Visit for video guides of how to make the egg cup and phone holder projects included with your FormBox.
- Page 34 PART 3 Design Now that you’re a master maker, it’s time to start designing your own templates. There are a few simple rules to follow to get the most out of your Mayku FormBox.
- Page 36 med. Make sure your design doesn ’t have any ledg s that could s top a template from being removed. s that could s top a template from being removed. Undercuts make it difficult to remove Rule #1 templates once they have been formed. Make sure your design doesn’t have any ledges or indents that could stop a template Remove all...
- Page 37 Draft angles are slopes on the edges of your Rule #2 Rule #2 templates. They help you remove templates from the vacuum form very easily. The slopes on the edges of your forms should point Add draft angles Add draft angles outwards not inwards, so templates come out with little effort.
- Page 38 This will help your Mayku et get into the tiniest of spaces. Adding air holes will allow air to flow freely Rule #3 through your design to the vacuum plate. This will help your Mayku Sheet get into the tiniest of spaces.
- Page 39 Stuck? help.mayku.me Visit get help from the Mayku community or one of our expert maker coaches.
- Page 40 PART 4 Tips Here are some additional tips to help you make the best possible forms with the FormBox.
- Page 42 Texture Tips Your FormBox is great at picking up texture. Try experimenting with different template materials for unique finishes. Space Packing Ensure that your objects are as If you are placing multiple objects on the close to the center of the vacuum plate, ensure that you leave at least 3cm plate as possible.
- Page 43 Mute Vacuum Shut Off Vacuum Shut Off If you would like to turn off the FormBox To turn the vacuum off in the middle of To turn the vacuum off in the middle of sounds, turn on the heater to any setting...
- Page 44 Trophy Congratulations! You are now ready to design and make amazing creations with the Mayku FormBox.
- Page 45 More Making? make.mayku.me Visit to find more recipes, templates, and talk to other makers about what they are creating.
- Page 46 ©2018 Mayku LTD. All Rights Reserved. The Mayku logo and FormBox™ are trademarks of Mayku LTD. Designed in London. Made in China.
Need help?
Do you have a question about the FormBox and is the answer not in the manual?
Questions and answers