
Related Manuals for Sherwood Scientific M860

Summary of Contents for Sherwood Scientific M860
- Page 1 Model 860 Autosampler Operating Manual Copyright ©2017 Sherwood Scientific Ltd 860 91 001 Issue 11 December 2017 ECN 3146...
-
Page 2: Table Of Contents
Sherwood M860 Autosampler Table of Contents 1.0 - Introduction ......................4 Contacting Sherwood Scientific ................. 4 Safety Precautions ....................4 Caution and Warning Statements ................5 Impaired Safety Protection ..................5 Warranty ........................5 2.0 - Installation ......................6 Working Environment ....................6 Unpacking ........................ - Page 3 Sherwood M860 Autosampler Table of Contents 7.0 – Replacement Procedures ................ 24 Autosampler Probe Replacement ................24 8.0 – Appendix A - 1:50 Dilution ............... 25 Operating the Model 860 with 86009001 tube ............25 9.0 – Appendix B - Updating Firmware ............
-
Page 4: Introduction
Sherwood M860 Autosampler 1.0 – Introduction Contacting Sherwood Scientific Postal address for letters and orders: Sherwood Scientific Ltd 1 The Paddocks Cherry Hinton Road Cambridge CB1 8DH Telephone +44 1223 243444 +44 1223 243300 Email info@sherwood-scientific.com For Certificates of Analysis and Material Safety Data Sheet downloads,... -
Page 5: Caution And Warning Statements
Sherwood M860 Autosampler 1.0 – Introduction continued Caution and Warning Statements 1.3.1 CAUTION: Is used to indicate correct operating or maintenance procedures that prevent damage to or destruction of the equipment or other property. 1.3.2 WARNING: Is used to indicate a potential danger that requires correct procedures or practices to prevent personal injury. -
Page 6: Installation
Supplier and no further unpacking undertaken without their permission. Working Environment The M860 Autosampler is designed to be used with Sherwood 420 Series Flame Photometers, i.e. the M420, M420Cs and M425 and can also be used in conjunction with the Model 805 Diluter. -
Page 7: Installation And Connection
2.0 - Installation continued Installation and Connection The M860 Autosampler is designed to be installable by the end user. 2.3.1 Layout of Autosampler System The main components of the Model 860 system are shown in the diagram below. The positions of the Diluter and adapter plate, which is necessary if the Diluter is to be used, are also shown. -
Page 8: Fitting The Autosampler To The Model 805 Diluter (If Required)
Sherwood M860 Autosampler 2.0 - Installation continued 2.3.2 Fitting the Autosampler to the Model 805 Diluter (if required) Ensure that the unit is powered off and that the Diluter is positioned on a level surface. Locate the fixing lug of the Adapter Plate into the hole at the top left corner at the back of the Diluter, see below. -
Page 9: Connecting The Sample Tubing From The Autosampler To A Flame Photometer
Sherwood M860 Autosampler 2.0 - Installation continued Lift the Autosampler and locate the feet on its base into the holes in the Adapter Plate. 2.3.3 Connecting the Sample Tubing from the Autosampler to the Flame Photometer The Sampling Tube (part number 800 09 006) is connected to the Nebuliser of the Flame Photometer with the other end is connected directly through the plastic cover to the Autosampler Probe. -
Page 10: Connecting The Sample Tubing From The Autosampler To The Diluter
Sherwood M860 Autosampler 2.0 - Installation continued 2.3.4 Connecting the Sample Tubing from the Autosampler to the Diluter 1:200 Dilution The short end of the Sampling Tube (part number 800 09 006) is connected to the Manifold of the Diluter as described in the Diluter manual. -
Page 11: Connecting The Power Supply
Sherwood M860 Autosampler 2.0 - Installation continued 2.3.6 Connecting the Power Supply Please ensure that you have the Autosampler connected correctly to the M420 Series Instrument before connecting it to the power supply. The electrical connection to the external power supply is made at rear of the instrument, see Figure 3.2.1. -
Page 12: Instrument Principles Of Operation
Model 860 with Model 425 and Model 805 Diluter Principles of Operation The Model 860 Autosampler has been designed to work primarily with the Sherwood Scientific Model 420 Series of Flame Photometers, but can also be BlueNotes used with the M410 Flame Photometer when using the for 410 Software. -
Page 13: Use Without A Diluter
Sherwood M860 Autosampler 3.0 – Instrument Principles of Operation continued Use without a Diluter (DIP switch 7 ON – see section 6.1) When used without a Diluter, the Model 860 positions the Autosampler Probe into each Blank, Calibration and Measurement Sample and the M420 Series Flame Photometer itself draws the liquid into the Nebuliser for aspiration into the flame. -
Page 14: Technical Specification
Sherwood M860 Autosampler 4.0 - Technical Specification Sampling Tray The Autosampler carousel will handle 40 samples plus Blank and Calibration Standard vial. Vial Volumes Sample Vials: 2ml Blank and Standard Vial: 14ml Sample Volumes Without Diluter Minimum 1.5ml With Diluter Minimum 200µl... -
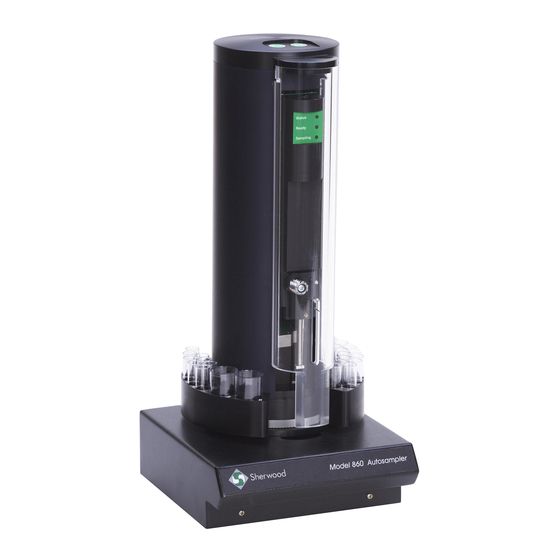
Page 15: Instrument Description
Sherwood M860 Autosampler 5.0 - Instrument Description Familiarisation 5.1.1 Rear of main module: Connectors and DIP switches Power Power I/O for Method On/Off Model socket Used Used switch 420 Series switches Figure 5.1.1(a) Rear view of connectors and dip switches 5.1.2 Top View: Run / Stop keys... -
Page 16: Front View: Status Leds
Sherwood M860 Autosampler 5.0 - Instrument Description continued 5.1.3 Front View: Status LEDs Indicates Fault when flashing Indicates Ready or waiting for Flame Photometer when flashing Indicates Sampling Figure 5.1.3 Status LEDs 5.1.4 Front View: Autosampler Probe Autosampler Probe Plastic Safety Cover Figure 5.1.4 Autosampler Probe and Safety Cover... -
Page 17: Operating Instructions
Section 1.2 – SAFETY, must be carefully read before operating the instrument and/or its accessories. Setting the Sampling Method The sampling method is determined by the Flame Photometer and the M860. The M860 takes signals in sequence during the Blanking and Calibration phase of the M420 Series Flame Photometer start-up. -
Page 18: Loading The Sample Tray
Sherwood M860 Autosampler 6.0 – Operating Instructions continued Loading the Sample Tray. The first sample vial position is on the right of the sample tray cut-out, and vial positions are numbered anticlockwise looking from the top (figure 4.2.1). The sample tray holds up to 40 sample vials plus one Blank Vial and one Standard Vial. -
Page 19: Switching On The Instrument
Sherwood M860 Autosampler 6.0 – Operating Instructions continued Switching on the Instrument The instrument will only operate when the plastic Safety Cover is fitted. Having set-up the sampling method and loaded the sampling tray as described in sections 6.1 and 6.2, switch on the instrument with the on/off switch located at the left-hand side of the rear panel. -
Page 20: Blanking Without The Diluter (Dip Switch 7 On - Lower Position)
Sherwood M860 Autosampler 6.0 – Operating Instructions continued 6.4.2 Blanking without the Diluter (DIP switch 7 On – lower position) Press the ‘RUN’ key on the top of the unit. The ‘READY’ LED will flash showing that the instrument is waiting for the signals from the Flame Photometer for the ‘Blanking’... -
Page 21: Calibration Without The Diluter (Dip Switch 7 On - Lower Position)
10 seconds the Autosampler Probe automatically enters the next sample*. Sample is drawn through the tube by the Diluter. Again the M860 waits until that sample just enters the Diluter before the ‘Measure’ protocol is initiated. These actions are repeated automatically for each sample in turn until the M860 Sample Detection Probe senses that there are no more samples. -
Page 22: Without The Diluter (Dip Switch 7 On - Lower Position)
(This could be at the end of the entire carousel of 40 samples or before). The M860 Autosampler Probe and Carousel then return to their initial position and the M860 sounds a buzzer to signify the completion of the analysis. Press the ‘STOP/CLEAR’ button on top of the Autosampler tower to switch off the signal. -
Page 23: Fault Conditions
Sherwood M860 Autosampler 6.0 – Operating Instructions continued Fault Conditions If an instrument fault occurs or the safety cover is removed during operation, all movements will stop immediately and the ‘FAULT’ led will flash. The ‘READY’, ‘STATUS’ and ‘SAMPLING’ LED will light according to the... -
Page 24: Replacement Procedures
Sherwood M860 Autosampler 7.0 – Replacement Procedures Autosampler Probe Replacement 860 91 001 Issue 11 December 2017 ECN 3146 - 24 -... -
Page 25: Appendix A - 1:50 Dilution
Sherwood M860 Autosampler 8.0 – Appendix A – 1:50 Dilution The Model 860 Autosampler is supplied as standard with two packs of three tubes: 800 09 006 Tube, Manifold, Internal Reference, pack of three 800 09 001 Tube, Manifold, Red, Long, pack of three... - Page 26 Sherwood M860 Autosampler 8.0 – Appendix A – 1:50 Dilution continued The 1:50 tube must be pushed onto the Autosampler Probe so that it goes over the outer (thicker) metal probe sheath. This is achieved most easily by twisting the tube around between thumb and finger whilst pushing the tube onto the probe.
-
Page 27: Appendix B - Updating Firmware
Connect the M860 to the RS232 port of your computer using the Null Modem Cable (001 09 003) supplied with the M860. Move the two DIP switches located at the bottom right-hand side on the front of the M860 to the down position and switch on the instrument. -
Page 28: Product Warranty Statement
_________________________________________________________________________________________ Warranty Term: 12 Months Sherwood Scientific Ltd (Sherwood) warrants, subject to the conditions itemised within this document, through either Sherwood personnel or personnel of its authorised distributors, to repair or replace free of all charges, including labour, any part of this product which fails within the warranty time specified above, appertaining to this particular product. - Page 29 (including but not limited to the limitations of the liability of Sherwood as set forth above), shall not be binding upon Sherwood unless reduced to writing and approved by an officer of Sherwood Scientific Ltd.
Need help?
Do you have a question about the M860 and is the answer not in the manual?
Questions and answers