
Summary of Contents for Sterling Power Products PMP1
- Page 1 PMP1 TERLING POWER PRODUCTS Power Management Panel PMP1 English Deutsch technology RoHS www.sterling-power.com compliant ProDigital www.Busse-Yachtshop.de - info@busse-yachtshop.de...
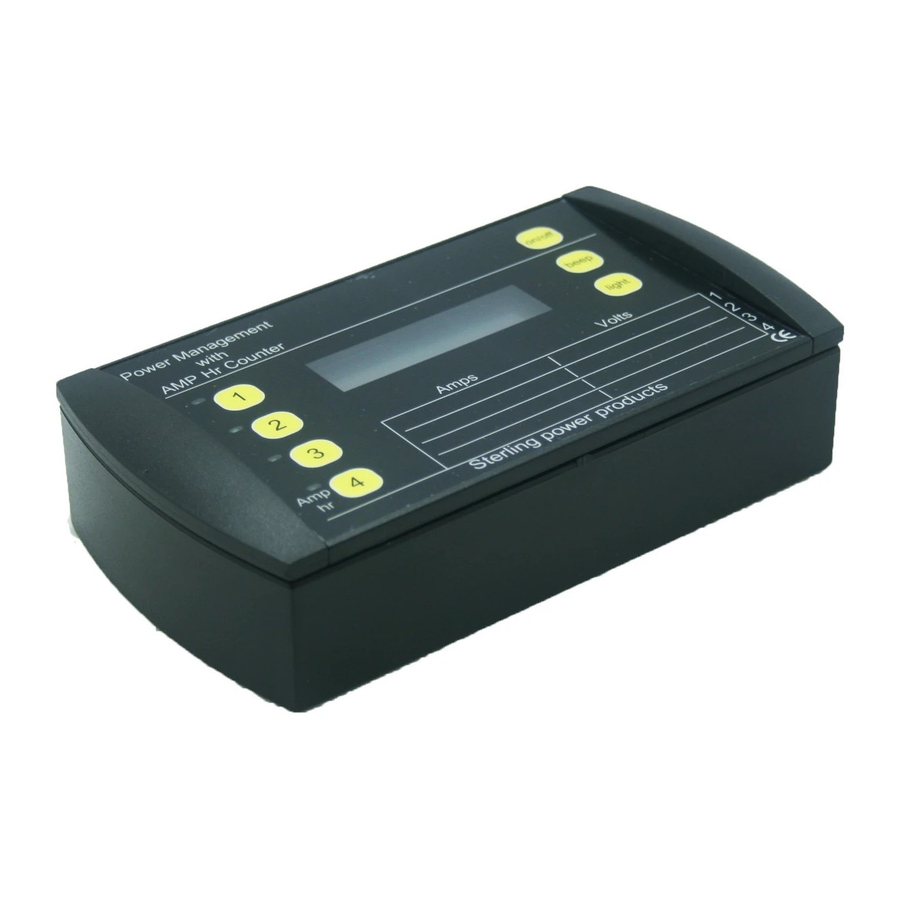
- Page 2 OWER ANAGEMENT ANEL NSTRUCTIONS Thank you for purchasing the Sterling Power Management Panel, a sophisticated product which will help you to monitor and control your entire electrical system on board. Before starting to install the unit, read and understand these instructions carefully and completely, in order to avoid any possible safety risks and to avoid any danger of damaging the unit or your boat or vehicle.
- Page 3 First of all, decide which currents you want to measure. A practical suggestion for a typical system is given in Fig. 2. In any case, one shunt should be used to measure the amps going in and out of the domestic battery bank. From this, the Power Management Panel will calculate the amp hours taken from or put back into the batteries.
-
Page 4: First-Time Operation
Channel 4: This is the most important channel as it monitors the domestic battery bank and counts the amp hours. In order for this function to work properly, shunt 4 must be positioned in such a way that all the current going in and out of the domestic battery must flow through this shunt. - Page 5 Slide parts A to expose screw holes. For flush mount, remove part B. For surface mount, keep part B. After installation, replace parts A. www.Busse-Yachtshop.de - info@busse-yachtshop.de...
- Page 6 www.Busse-Yachtshop.de - info@busse-yachtshop.de...
- Page 7 www.Busse-Yachtshop.de - info@busse-yachtshop.de...
- Page 8 ATTERIE ANAGEMENT ONTROLLER INBAU EDIENUNGSANLEITUNG Vielen Dank für den Kauf des Sterling Batterie Management Controllers. Der Batterie Management Controller ist ein äußerst fortschrittliches Produkt, das Ihnen bei der Überwachung und Steuerung Ihres elektrischen Bordnetzes von großem Nutzen sein wird. Bevor Sie mit der Installation des Gerätes beginnen, lesen Sie diese Anleitung bitte aufmerksam und vollständig durch, um mögliche Sicherheitsrisiken und Schäden am Gerät oder an Bord Ihrer Yacht oder Ihres Fahrzeugs auszuschließen.
- Page 9 NSTALLATION DER HUNTS Mit Hilfe der Shunts wird der Strom gemessen, mit dem die Batterien geladen werden bzw. der aus ihnen entnommen wird. Wie bereits erwähnt, können diese entweder auf der negativen oder auf der positiven Seite Ihres Bordnetzes eingebaut werden. Aus praktischen Gründen empfehlen wir den Einbau der Shunts auf der positiven Seite.
- Page 10 Der Batterie-Management-Controller ist werkseitig für den Betrieb an 12V-Bordnetzen eingestellt. Wenn das Gerät an 24V-Bordnetzen betrieben werden soll, dann muss der für die Eingangsspannung zuständige Jumper umgesteckt werden. (Siehe Fig. 2.) Um den Jumper umzustecken, müssen Sie die Rückwand des Gerätes öffnen. YPISCHE NSTALLATION (siehe Fig.
-
Page 11: Technische Daten
EDIENELEMENTE (siehe Fig. 3) Drücken Sie “on/off” (3), um die Anzeige ein- bzw. auszuschalten. Beachten Sie, dass der Amperestundenzähler dennoch weiter arbeitet, selbst wenn die Anzeige ausgeschaltet ist. Drücken Sie “light” (5), um die Hintergrundbeleuchtung der Anzeige ein- bzw. auszuschalten. Drücken Sie “beep”... - Page 12 TERLING POWER PRODUCTS LTD Website: www.sterling-power.com E-mail: help@sterling-power.com Copyright 2006 by Sterling Power Products Ltd. Copying and reprinting not allowed. Changes and errors excepted. www.Busse-Yachtshop.de - info@busse-yachtshop.de...
Need help?
Do you have a question about the PMP1 and is the answer not in the manual?
Questions and answers