Table of Contents
Advertisement
Quick Links
INSTRUCTIONS FOR USE
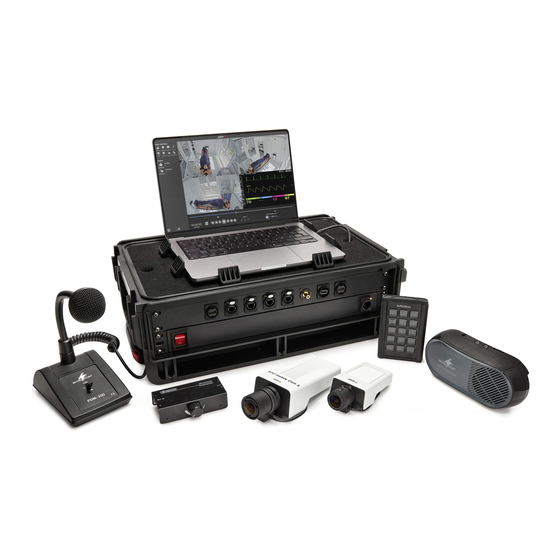
qubeAVpro Debriefing System
IMPORTANT!
READ BEFORE USE
RETAIN FOR FUTURE REFERENCE
Safety information:
The AV Debriefing System should only be set up
and operated by trained personnel.
Manufacturer:
SKILLQUBE GmbH
Untergheit 1531
Alte Spinnerei
8877 Murg
These instructions for use
are in accordance with the specifications of the EU Product Safety Act (ProdSG).
Version 1.0 - ENGLISH
Advertisement
Table of Contents

Related Manuals for SKILLQUBE qubeAVpro

Summary of Contents for SKILLQUBE qubeAVpro
- Page 1 INSTRUCTIONS FOR USE qubeAVpro Debriefing System IMPORTANT! READ BEFORE USE RETAIN FOR FUTURE REFERENCE Safety information: The AV Debriefing System should only be set up and operated by trained personnel. Manufacturer: SKILLQUBE GmbH Untergheit 1531 Alte Spinnerei 8877 Murg These instructions for use are in accordance with the specifications of the EU Product Safety Act (ProdSG).
-
Page 2: Table Of Contents
...................................... 1 8 ECORDING ................................. 1 9 LAYING BACK RECORDING .................................. 2 0 SING THE TILE VIEW .................................... 2 2 AVE RECORDING ................................ 2 2 PENING A SAVED RECORDING ................................ 2 2 LOSING THE APPLICATION SHORTCUTS FOR THE QUBEAV SOFTWARE ......................24 ................................... 2 5 ARKER SHORTCUTS .............................. 2 8 EBRIEFING MARKER SHORTCUTS DISPOSING OF THE QUBEAV SYSTEM ........................29 www.skillqube.com I info@skillqube.com... -
Page 3: Introduction
Sustainable Quality Management The Skillqube “Mission360” strategy focusses on integrated solutions for simulations and training sessions in pre-clinical and clinical patient care. For Skillqube, “Mission360” means providing sustained support with significant input in all areas of learning. From pure knowledge acquisition, learning skills, training in how to make the right decisions and team simulations and training through to sharing pre- clinical and clinical experiences. -
Page 4: Important Safety Measures
Important safety measures Safety comes first for SKILLQUBE GmbH! At Skillqube, we are very safety-conscious and we always bear the safety of our customers in mind when building and assembling our products. Safety measures for your qubeAV system ● Never leave the qubeAV system running unattended. -
Page 5: Qubeav Assembly Instructions
2. USB 1-3: Logitec USB camera 3. HDMI in: external media stream (Apple TV, optional) 4. LAN 1: external service (Wi-Fi) 5. LAN 2: external service (ThunderBolt Dock) 6. Power on / off: mains plug for 230V power supply www.skillqube.com I info@skillqube.com... - Page 6 1. Connect the microphone (6.3 mm jack) to the preamp – “Mic in” (set to mono). 2. Connect the preamp (red/white phono connectors) with the speaker – 3.5mm “Mic in” jack. 3. Connect the preamp to the power supply. www.skillqube.com I info@skillqube.com...
-
Page 7: Activating The Licence Key - Qubeav
2. After opening the application, you’ll see the following screen. To activate your licence, press the “Open Settings” button. 3. Open the lock symbol in the bottom left. After that, you can enter the licence key sent to you. www.skillqube.com I info@skillqube.com... - Page 8 4. The application starts itself, you don’t have to carry out any confirmation after the correct licence key has been entered. After entering the key, close the lock symbol and then press “Close”. www.skillqube.com I info@skillqube.com...
-
Page 9: Running The Qubeav Application
If all the cameras are connected, press the “Settings” button. If you only want to use the software to load a video, press the “Later” button. 3. The “Settings” button opens the camera settings. www.skillqube.com I info@skillqube.com... - Page 10 You will be shown all available devices. If using a qube Patient Monitor, you can also connect that to the system here. This will happen so long as they are located and started up in the same network as the debriefing system. www.skillqube.com I info@skillqube.com...
- Page 11 That way you can make sure that the best position can still be set by adjusting the camera. 6. If you are using the supplied USB cameras (Logitec C920), use the following resolution. 1024 x 576 www.skillqube.com I info@skillqube.com...
- Page 12 If the microphone is working, R and L will light up. Tip: the selected camera will be surrounded by a blue frame which is only visible in settings. After making your adjustments, press the “Close” button www.skillqube.com I info@skillqube.com...
-
Page 13: Connect External Media (Media Stream)
You can activate BlackMagic using the BlackMagic software, or by restarting the qubeAV system. SKILLQUBE recommends the use of AppleTV for media streaming. Adjusting the preroll Preroll offers the option of influencing the time at which a marker is placed. Without preroll, the marker will be placed at the exact moment you click. -
Page 14: Adjusting Marker Sets
You have three marker sets in your software which are predefined in colour. This was set up that way by SKILLQUBE and coordinated with the supplied marker console. For this reason, we recommend that you do not change the colour settings. That’s because every change also needs to be adjusted on the programmable console. - Page 15 1. Press the “Definitions” button below “Edit”. 2. To be able to describe the marker colours, click on the lock in the bottom-left area, and open the option of editing the colours. www.skillqube.com I info@skillqube.com...
- Page 16 3. Confirm by pressing the “OK” button. 4. Proceed as follows to change the name of the marker. Select the colour you want to change. As an example here, “Blue”. www.skillqube.com I info@skillqube.com...
- Page 17 5. Change the name of the marker in the field “Name” 6. You can also add a description for your marker. www.skillqube.com I info@skillqube.com...
- Page 18 Press the “Export Definitions” button, and define the file name and file location. Then press the button “Save” 8. Your marker set will now adjust automatically, and will be displayed in the same way that you saved it every time you open the application. www.skillqube.com I info@skillqube.com...
-
Page 19: Recording
2. Press the red record button to start recording. The button changes when you start recording. 3. To stop recording, press the red button again. The screen immediately changes to playback mode so you can start with your debriefing. www.skillqube.com I info@skillqube.com... -
Page 20: Playing Back Recording
Next marker 3. Go to – enter time in the recording 4. Volume control 5. Time of the current place in the recording and the length of the whole recording 6. Marker description for the marker used www.skillqube.com I info@skillqube.com... -
Page 21: Using The Tile View
If you need the current image, click once on the display and the filter will be removed. Using the tile view You have the option of enlarging individual windows during the recording. To do this, click on the desired camera angle (mouse or touchpad). www.skillqube.com I info@skillqube.com... - Page 22 In recording mode, only the controller can swap between camera angles, the observers will continue to see the tile view. If you’re in a debriefing, you can use this method to show the observers individual images and zoom on them. www.skillqube.com I info@skillqube.com...
-
Page 23: Save Recording
Regardless of which phase your work with the qubeAV application is in, you will always be asked whether you really want to quit the application when you try to close it. To close, you can either use the shortcut x, or press the red button in the top left. www.skillqube.com I info@skillqube.com... - Page 24 I info@skillqube.com...
-
Page 25: Shortcuts For The Qubeav Software
Fast forward 5 seconds ► Option + in playback mode Rewind 5 seconds ◄ Option + held down in Scan forwards 5 seconds ► playback mode Option + Scan backwards 5 seconds ◄ held down www.skillqube.com I info@skillqube.com... -
Page 26: Marker Shortcuts
⌘ + 3 + + RED marker negative ⌘ + 3 + - RED marker question mark ⌘ + 3 + n PURPLE marker positive ⌘ + 4 + + PURPLE marker negative ⌘ + 4 + - www.skillqube.com I info@skillqube.com... - Page 27 ⌘ + 10 + - LIGHT GREEN marker question mark ⌘ + 10 + n GREY marker positive ⌘ + 11 + + GREY marker negative ⌘ + 11 + - GREY marker question mark ⌘ + 11 + n www.skillqube.com I info@skillqube.com...
- Page 28 YELLOW marker positive ⌘ + 12 + + YELLOW marker negative ⌘ + 12 + - YELLOW marker question mark ⌘ + 12 + n www.skillqube.com I info@skillqube.com...
-
Page 29: Debriefing Marker Shortcuts
⌘ + 9 + f CYAN marker backwards ⌘ + 9 + b LIGHT GREEN marker forwards ⌘ + 10 + f LIGHT GREEN marker backwards ⌘ + 10 + b GREY marker forwards ⌘ + 11 + f www.skillqube.com I info@skillqube.com... -
Page 30: Disposing Of The Qubeav System
At the same time, hazardous substances contained in the equipment are to be removed so that neither people nor the environment are affected. SKILLQUBE guarantees that all Debriefing Systems which are sent to us for disposal shall be recycled and disposed of in an environmentally-friendly way.
Need help?
Do you have a question about the qubeAVpro and is the answer not in the manual?
Questions and answers