
Summary of Contents for Schulte-Schlagbaum SAFE-O-TRONIC access LS101
- Page 1 English Manual ® SAFE-O-TRONIC access LS101 / LSW101 Cabinet Lock D&E Architectural Hardware Ltd 17 Royce Road, Carr Road Ind. Est. Peterborough, Cambs. PE1 5YB www.DandE.co.uk...
- Page 2 The information in this document has been compiled in good faith and to the best of our knowledge. Schulte-Schlagbaum AG extends no guarantee for the correctness or completeness of information in this document. In particular, Schulte-Schlagbaum AG cannot be held liable for consequential damage due to erroneous or incomplete information. Mistakes can never be prevented entirely despite all the effort taken, and so we appreciate when mistakes are pointed out to us.
-
Page 3: Table Of Contents
Installation instructions for the LSW101 ......................33 LSW101 dimensions ............................. 34 LSW101 technical data ..........................35 Maintenance and care ............................36 Identification plate replacement ........................36 Appendix ................................37 Intended use ..............................39 Schulte-Schlagbaum AG Page 3 of 39 LS(W)101_6-703-2 30R1 4_EN.DOCX... -
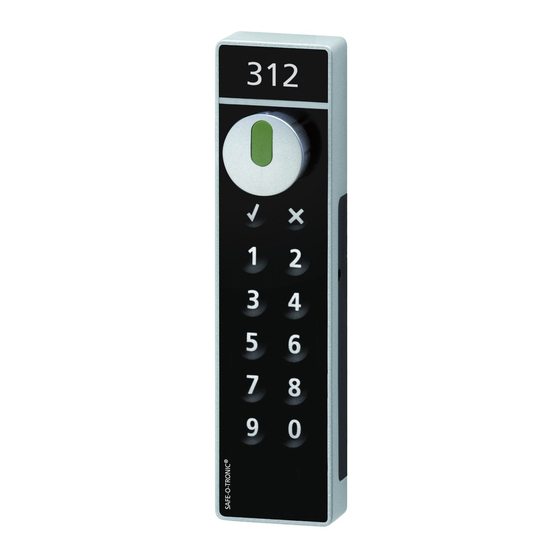
Page 4: Controls
Keys 1, 2, 3, 4, 5, 6, 7, 8, 9, 0: Number keys for PIN code entry Note Programming is initiated with the following key combination: & = Press the OK and Abort keys at the same time Schulte-Schlagbaum AG Page 4 of 39 LS(W)101_6-703-2 30R1 4_EN.DOCX... -
Page 5: General Information
Information about this guide The furniture locking system can be locked. LS101 = Rotary knob LSW101 = Motorised bolt The furniture locking system can be unlocked. LS101 = Rotary knob LSW101 = Motorised bolt Schulte-Schlagbaum AG Page 5 of 39 LS(W)101_6-703-2 30R1 4_EN.DOCX... -
Page 6: Test Code
The rotary knob can be actuated for locking ► LS101 Locking and unlocking using the Test Code Press the 0 key ► Then press the OK key ► The motorised bolt locks automatically ► LSW101 Schulte-Schlagbaum AG Page 6 of 39 LS(W)101_6-703-2 30R1 4_EN.DOCX... -
Page 7: Commissioning
Please always use your own PIN codes for your locking system. Note After successfully programming your Master Code, the Test Code is automatically disabled and can no longer be used for locking. Schulte-Schlagbaum AG Page 7 of 39 LS(W)101_6-703-2 30R1 4_EN.DOCX... -
Page 8: Master Code
Note This guide only uses example PIN codes. Please use your own PIN codes for your locking system. Note Please ensure that unauthorised persons do not obtain your programmed Master Code! Schulte-Schlagbaum AG Page 8 of 39 LS(W)101_6-703-2 30R1 4_EN.DOCX... -
Page 9: Changing The Master Code
You can choose any Master Code for your system. The following Master Code guidelines must be followed: At least 5 digits Minimum ‘User PIN length’ +1 Maximum of 9 digits Always complete your Master Code input by pressing the OK key Schulte-Schlagbaum AG Page 9 of 39 LS(W)101_6-703-2 30R1 4_EN.DOCX... -
Page 10: Modes
4-digit User PIN > Master Code min. 5 digits, max. 9 digits 5-digit User PIN > Master Code min. 6 digits, max. 9 digits 6-digit User PIN > Master Code min. 7 digits, max. 9 digits Schulte-Schlagbaum AG Page 10 of 39 LS(W)101_6-703-2 30R1 4_EN.DOCX... -
Page 11: Mode Overview
X X X Lock with OK key (without pin) Note After initially programming the furniture locking system, mode 147. (free cabinet selection, 4- digit, with OK key) is set by default. Schulte-Schlagbaum AG Page 11 of 39 LS(W)101_6-703-2 30R1 4_EN.DOCX... -
Page 12: Changing The Mode
Press the OK key ► Note The mode can only be changed when the lock is unlocked. When changing the mode, all User PINs entered in fixed cabinet assignment modes are deleted. Schulte-Schlagbaum AG Page 12 of 39 LS(W)101_6-703-2 30R1 4_EN.DOCX... -
Page 13: Mode Examples
Enter 4-digit PIN Press the OK key Enter 4-digit PIN Press the OK key Mode: 268 Fixed cabinet assignment, 6-digit PIN without OK key, one open Enter 6-digit PIN Enter 6-digit PIN Schulte-Schlagbaum AG Page 13 of 39 LS(W)101_6-703-2 30R1 4_EN.DOCX... - Page 14 Enter 4-digit PIN Note This guide only uses example codes. Please use your own PIN codes for your locking system. Note The mode can only be changed when the lock is unlocked. Schulte-Schlagbaum AG Page 14 of 39 LS(W)101_6-703-2 30R1 4_EN.DOCX...
-
Page 15: Fixed Cabinet Assignment
In fixed cabinet assignment mode, you can configure which users are permitted to unlock the locked cabinet. In the ‘all open’ setting, all programmed users can unlock the locked cabinet, no matter who locked it. Schulte-Schlagbaum AG Page 15 of 39 LS(W)101_6-703-2 30R1 4_EN.DOCX... -
Page 16: Entering The User Pin
After entering the last User PIN, you can finish by pressing the Abort key. You can add further User PINs to your specified User PINs at any time. You can enter a maximum of ten User PINs per lock. Schulte-Schlagbaum AG Page 16 of 39 LS(W)101_6-703-2 30R1 4_EN.DOCX... -
Page 17: Deleting A User Pin
Enter the delete PIN again ► Press the OK key ► Note All User PINs in your lock are deleted. Afterwards, you can enter up to ten different new User PINs for the lock. Schulte-Schlagbaum AG Page 17 of 39 LS(W)101_6-703-2 30R1 4_EN.DOCX... -
Page 18: Usage Duration
01-99 After the usage duration ends: Block Note The default setting after initial programming is the usage duration 700. The default setting after initial programming is the time unit hour 950. Schulte-Schlagbaum AG Page 18 of 39 LS(W)101_6-703-2 30R1 4_EN.DOCX... -
Page 19: Changing The Usage Duration
► Press the OK key ► Enter the new usage duration again ► Press the OK key ► Note The usage duration can only be changed when the lock is unlocked. Schulte-Schlagbaum AG Page 19 of 39 LS(W)101_6-703-2 30R1 4_EN.DOCX... -
Page 20: Ls(W)101 Functions
Buzzer: off Buzzer: on Note The LSW default settings following initial programming are: 910 (LED off); 920 (query off); 930 (alarm off); 941 (buzzer on) Schulte-Schlagbaum AG Page 20 of 39 LS(W)101_6-703-2 30R1 4_EN.DOCX... -
Page 21: Changing The Ls(W)101 Settings
Enter new LSW setting ► Press the OK key ► Enter new LSW setting again ► Press the OK key ► Note The LSW101 settings can only be changed when the lock is unlocked. Schulte-Schlagbaum AG Page 21 of 39 LS(W)101_6-703-2 30R1 4_EN.DOCX... -
Page 22: Information
Warning: Battery should be together three replaced soon times LEDs flash Battery must be replaced alternatively five immediately, LS(W)101 can no times longer be locked LEDs flash three Reset performed times Schulte-Schlagbaum AG Page 22 of 39 LS(W)101_6-703-2 30R1 4_EN.DOCX... -
Page 23: Troubleshooting
Replacing the battery does not delete PIN codes or other settings. The empty battery pack must be disposed of properly in accordance with the applicable environmental regulations! Please take note of the information on batteries in the appendix. Schulte-Schlagbaum AG Page 23 of 39 LS(W)101_6-703-2 30R1 4_EN.DOCX... -
Page 24: Battery Monitoring / Battery Alarm
If the battery is not replaced, a battery alarm is activated after a certain time. This is indicated by three alternative flashes of the red and green LEDs. The battery must now be replaced. In this state, the LSW can only be unlocked, and no longer locked. Schulte-Schlagbaum AG Page 24 of 39 LS(W)101_6-703-2 30R1 4_EN.DOCX... -
Page 25: Ls101 Installation
Note This guide uses installation direction A for its examples. The LS101 furniture locking system must be ordered for the correct installation direction. The installation direction cannot be changed later on. Schulte-Schlagbaum AG Page 25 of 39 LS(W)101_6-703-2 30R1 4_EN.DOCX... -
Page 26: Ls101 Installation Notes
The locking lever (4) must be held secured when tightening the fastening screw (5). The fastening screws (5 and 8) may be tightened with a maximum torque of 3 Nm. Higher torques can damage the coupling mechanism. Schulte-Schlagbaum AG Page 26 of 39 LS(W)101_6-703-2 30R1 4_EN.DOCX... -
Page 27: Preparing The Door For Ls101 Installation
6. Test the function with the door closed. Here, make sure the bolt functions smoothly. Automatic opening can only be ensured if the bolt moves smoothly when the door is closed. Schulte-Schlagbaum AG Page 27 of 39 LS(W)101_6-703-2 30R1 4_EN.DOCX... -
Page 28: Setting The Direction Of Rotation For The Ls101
If you want to turn the rotary knob clockwise (right), insert the washer in the LS101 such that the ‘R’ recess faces downward. Schulte-Schlagbaum AG Page 28 of 39 LS(W)101_6-703-2 30R1 4_EN.DOCX... -
Page 29: Ls101 Dimensions
RAL 9006 (white aluminium) Control panel colour: black or white Door thickness: (20 mm) 1 to 18 mm (20 mm) * Note: Please see the information on battery life in the appendix Schulte-Schlagbaum AG Page 29 of 39 LS(W)101_6-703-2 30R1 4_EN.DOCX... -
Page 30: Lsw101 Installation
Door thickness 16-21 mm 2 x M4x16 Special lengths: Door thickness 22-25 mm 2 x M4x20 Door thickness 26-30 mm 2 x M4x25 Note: Incorrect screw lengths can cause damage of the outer housing. Schulte-Schlagbaum AG Page 30 of 39 LS(W)101_6-703-2 30R1 4_EN.DOCX... -
Page 31: Lsw101 - Installation Of Inner Housing
2-pin battery cable plugged onto the 2-pin connector on the board. The upper and lower covers can then be attached and fastened with the battery screw (TX20). Schulte-Schlagbaum AG Page 31 of 39 LS(W)101_6-703-2 30R1 4_EN.DOCX... -
Page 32: Lsw101 Sensing Slide
The functionality of the sensing slide can be configured. Please refer to the programming software guide for information on configuration options. Schulte-Schlagbaum AG Page 32 of 39 LS(W)101_6-703-2 30R1 4_EN.DOCX... -
Page 33: Installation Instructions For The Lsw101
The outer and inner housing are connected by means of a cable. This connector cable may not be pinched during installation. The battery connector may only be attached once the outer and inner housings have been connected. Schulte-Schlagbaum AG Page 33 of 39 LS(W)101_6-703-2 30R1 4_EN.DOCX... -
Page 34: Lsw101 Dimensions
Manual LS101 / LSW101 LSW101 dimensions Door Inner housing Outer housing LSW inner housing LSW outer housing Schulte-Schlagbaum AG Page 34 of 39 LS(W)101_6-703-2 30R1 4_EN.DOCX... -
Page 35: Lsw101 Technical Data
Inner housing colour black Door thickness: 10 to 30 mm (from 22 mm, special fastening material) * Note: Please see the information on battery life in the appendix Schulte-Schlagbaum AG Page 35 of 39 LS(W)101_6-703-2 30R1 4_EN.DOCX... -
Page 36: Maintenance And Care
A new identification plate can then be clipped back into the LSW. Note Replacing an old identification plate destroys the old identification plate. Schulte-Schlagbaum AG Page 36 of 39 LS(W)101_6-703-2 30R1 4_EN.DOCX... -
Page 37: Appendix
The battery life was determined under practice-oriented laboratory conditions. Positive or negative deviations from these indications are consequently highly likely in practice. The following list includes a number of characteristics and measures that can impact on the battery life indicated. Schulte-Schlagbaum AG Page 37 of 39 LS(W)101_6-703-2 30R1 4_EN.DOCX... - Page 38 Installation and battery replacement must only be performed by trained specialists in accordance with these operating and installation instructions. Only use battery packs sold by Schulte-Schlagbaum. Do not allow the battery to reach temperatures in excess of the recommended storage temperature.
-
Page 39: Intended Use
The LS(W) furniture locking system is intended for indoor use. Safety information No modifications of any type whatsoever to the products of Schulte-Schlagbaum AG (SAG) are permissible, with the exception of those described in corresponding instructions. ...
Need help?
Do you have a question about the SAFE-O-TRONIC access LS101 and is the answer not in the manual?
Questions and answers