Advertisement
Available languages
Available languages
Quick Links
Advertisement

Related Manuals for AsVIVA Red Neck GAL4


Summary of Contents for AsVIVA Red Neck GAL4
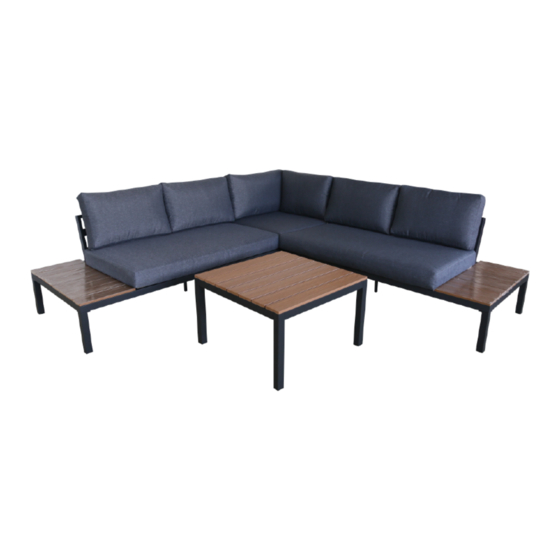
- Page 1 GAL4 VERSION: L-BS...
-
Page 2: Table Of Contents
INHALTSVERZEICHNIS GEWÄHRLEISTUNGSBESTIMMUNGEN ............3 TEILELISTE....................... 4 ZUSAMMENBAU ....................7 GEWÄHRLEISTUNGSRECHT ................. 12 TABLE OF CONTENT WARRANTY TERMS ..................13 PARTLIST ......................14 ASSEMBLY ...................... 17 WARRANTY DEVICE ..................22... -
Page 3: Gewährleistungsbestimmungen
Ersatzteilbestellungen und Reparaturaufträge richten Sie bitte unter Angabe der Kundennummer bzw. Rechnungsnummer an Ihren Händler oder direkt an uns. Unsere Serviceadresse: https://www.asviva.de/kontakt Damit Ihnen unsere Service-Mitarbeiter optimal weiterhelfen können, beachten Sie bitte folgende Vorgehensweise: Ist ein bestimmtes Teil beschädigt? Teilen Sie uns bitte anhand der Teileiste die genaue Teilenummer mit. -
Page 4: Teileliste
TEILELISTE Beschreibung Skizze Menge Ecksofa Sofa rechts Sofa links Sofabein Mittelbein Sitzkissen Sitzkissen... - Page 5 TEILELISTE Beschreibung Skizze Menge Rückenkissen Rückenkissen Rückenkissen Schraube M6*20 Schraube M6*25 Unterlegscheibe Inbusschlüssel...
- Page 6 TEILELISTE Beschreibung Skizze Menge Tischplatte Tischbeine Clip...
-
Page 7: Zusammenbau
ZUSAMMENBAU Achtung! Bitte drehen Sie zunächst sämtliche Schrauben vorsichtig per Hand ein. Drehen Sie 2-3 mal an der Schraube, damit diese sich leicht mit dem Gewinde verbindet. Die Schrauben bitte erst komplett festziehen, wenn sämtliche Schrauben bereits vormontiert wurden, da ansonsten Beschädigungen auftreten können. Zusätzliche Informationen vor dem Aufbau: Bevor Sie die Schrauben komplett festziehen, prüfen Sie vorab die Schrauben und ziehen diese anschließend vorsichtig an. - Page 8 ZUSAMMENBAU Sofa rechts Schritt 1 Montieren Sie die Sofabeine (B) mit den Schrauben (F) und Unterlegscheiben (G) an das Gestell für das rechte Sofa (A1). Montieren Sie das Mittelbein (C) mit den Schrauben (F) und Unterlegscheiben (G) in die dafür vorge- sehene Bohrung an der Unterseite.
- Page 9 ZUSAMMENBAU Sofa links Schritt 2 Montieren Sie die Sofabeine (B) mit den Schrauben (F) und Unterlegscheiben (G) an das Gestell für das linke Sofa (A2). Montieren Sie das Mittelbein (C) mit den Schrauben (F) und Unterlegscheiben (G) in die dafür vorge- sehene Bohrung an der Unterseite.
- Page 10 ZUSAMMENBAU Ecksofa Schritt 3 Montieren Sie die Sofabeine (B) mit den Schrauben (F) und Unterlegscheiben (G) an das Gestell für das Eckofa (A). Verwenden Sie das Sitzkissen (D) und die Rückenkissen (E) und (E1) Schritt 4 Verbinden Sie die einzelnen Sitzkomponenten mit den mitgelieferten Clips (K) um unbeabsichtigtes Verrutschen zu vermeiden.
- Page 11 ZUSAMMENBAU Tisch F-1.G Schritt 5 Montieren Sie die Tischbeine (J) mit den Schrauben (F1) und Unterlegscheiben (G) an die Tischplatte (I) Sie können den Tisch nun aufstellen.
-
Page 12: Gewährleistungsrecht
GEWÄHRLEISTUNGSRECHT Herzlichen Glückwunsch zu Ihrer Entscheidung zum Kauf eines Produkts von RedNeck. Gemäß des zum 01. Januar 2002 geänderten europäischen Gewährleistungsrechts, steht Ihnen eine gesetzliche Gewährleistungsfrist von 2 Jahren zu. Die Gewährleistungsfrist beginnt mit der Übergabe der Ware durch den Fachhändler. Zum Nachweis des Kauf- bzw. -
Page 13: Warranty Terms
Four our equipment we provide the leagal warranty of 2 years. For spare parts and repair orders, please contact your dealer or directly to AsVIVA, indictating the customer number or invoice number. Our service is available 24 hours. -
Page 14: Partlist
PARTLIST Description Picture Quantity Corner Sofa Right Sofa Left Sofa Sofa leg Middle leg Seat Cushion Seat Cushion... - Page 15 PARTLIST Description Picture Quantity Back Cushion Back Cushion Back Cushion Screw M6*20 Screw M6*25 Washer Wrench...
- Page 16 PARTLIST Description Picture Quantity Table Top Table Leg Clip...
-
Page 17: Assembly
ASSEMBLY Caution! Please first screw in all screws carefully by hand. Turn the screw 2-3 times so that it easily connects to the thread. Please do not fully tighten the screws until all screws have already been pre-assembled, otherwise damage may occur. Additional information before setting up: Before you tighten the screws completely, check the screws beforehand and then tighten them careful- ly. - Page 18 ASSEMBLY Sofa right Step 1 Mount the sofa legs (B) with the screws (F) and washers (G) on the frame for the right sofa (A1). Mount the middle leg (C) with the screws (F) and washers (G) in the hole provided on the underside. Use the seat cushion (D1) and the back cushion (E2)
- Page 19 ASSEMBLY Sofa left Step 2 Mount the sofa legs (B) with the screws (F) and washers (G) on the frame for the left sofa (A2). Mount the middle leg (C) with the screws (F) and washers (G) in the hole provided on the underside. Use the seat cushion (D1) and the back cushion (E2)
- Page 20 ASSEMBLY Corner Sofa Step 3 Mount the sofa legs (B) with the screws (F) and washers (G) on the frame for the corner sofa (A). Use the seat cushion (D) and the back cushion (E) and (E1) Step 4 Connect the individual seat components with the supplied clips (K) to prevent them from accidentally slipping.
- Page 21 ASSEMBLY Table F-1.G Step 5 Mount the table legs (J) with the screws (F1) and washers (G) on the table top (I) You can now set up the table.
-
Page 22: Warranty Device
WARRANTY DEVICE Congratulations on your decision to purchase a device from RedNeck. According to the European guarantee law, amended as of January 1, 2002, You have a legal warranty period of 2 years. The guarantee period begins with the handover of the device by the specialist dealer. In order to prove the date of purchase or handing over, please keep the purchase documents such as the invoice and the cash note for the duration of the warranty period.
Need help?
Do you have a question about the Red Neck GAL4 and is the answer not in the manual?
Questions and answers