
Summary of Contents for Proactive Medical PROTEKT 32500
- Page 1 PROTEKT DASH ® STANDING TRANSFER MODEL: 32500 OWNER’S MANUAL 270 Washington Street Mount Vernon, NY 10553 855-237-7622 www.proactivemedical.com...
- Page 2 Refuse delivery if the packaging appears to be badly damaged. If the merchandise is received damaged or is missing components, contact the shipping company immediately and file a claim. For further assistance, contact your local dealer or Proactive Medical at the following: Proactive Medical Products...
- Page 3 WARNING: Do not operate the Protekt® Dash Standing Transfer 32500 without first reading and understanding this manual. If you do not understand the warnings, cautions, and instructions provided herein, contact your professional medical advisors, authorized distributor, or technical representative before proceeding with the use of this product;...
-
Page 4: Intended Use
1. INTRODUCTION Important safety, operating, and maintenance instructions that warrant your attention are included in this manual. Read the entire manual carefully before operating your new Protekt® Dash Standing Transfer 32500, keep it handy for future reference, and refer to it as often as necessary to help maintain good performance standards. -
Page 5: Safety Precautions
WARNING: Do not leave a patient unattended during any part of the transport. WARNING: If components are damaged or missing, contact your Proactive Medical authorized distributor immediately. DO NOT use substitute parts. Use only Proactive Medical replacement parts. The use of non-Proactive replacement parts... -
Page 6: Handling Procedures
Check for any obvious damage to the carton or its contents. If damage is evident, notify the carrier or your Proactive Medical Products authorized distributor. Remove all loose packing from the carton. -
Page 7: Fasteners And Tools
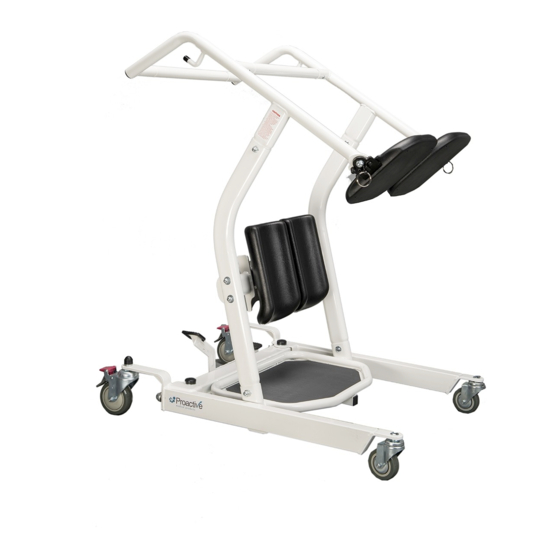
4. FEATURES COMPONENTS Item Description Quantity Base preassembled with footplate and casters Side support arm unit Kneepad assembly Seat pad and handle bar support unit with cross bar tube FASTENERS AND TOOLS Photo Description Quantity Carriage bolt Button socket head cap screw Flat washer Lock washer Acorn nut... - Page 8 5. ASSEMBLY INSTRUCTIONS Tools required: provided wrench, provided hex key back casters base assembly Place the base assembly on the floor and lock the back casters for ease of assembly, as shown above. Kneepad Support tube kneepad hex bolt flat washer assembly screw...
- Page 9 Button socket head cap screw Tubular cross bar Seat pad and handle Seat and cross bar bar support unit assembly Insert the two tubular cross bars into the holes on the seat pad and handle bar support units as shown above. Align the small holes on the cross bar undersides with the holes in the support units.
- Page 10 Seat and cross bar assembly Carriage bolt Flat washer Kneepad side Lock washer support assembly Acorn nut Base assembly Fasten the seat and cross bar assembly, kneepad side support assembly, and base assembly together with carriage bolts: a. Attach the kneepad side support assembly to the base assembly. Fit the square shoulder of each carriage bolt in the square hole at inside of base bracket, installing each carriage bolt through the base and kneepad side support assembly as shown above.
-
Page 11: Operation
6. OPERATION The split seat units can be rotated upward to allow for patient loading. Then, once the patient is in an upward standing position, lower to form a complete two-sided seat. WARNING: Ensure that both seat units are fully lowered and form a complete seat before having the patient sit down on the Standing Transfer. - Page 12 Lower both of the split seat units down into position to form a complete seat, as shown at right. WARNING: Ensure that both seat units are lowered and form a complete seat before having the patient sit down on the Standing Transfer.
-
Page 13: Maintenance
Check the casters to make sure they are securely positioned in the Standing Transfer. Replace any worn or damaged casters before using the Standing Transfer. If any maintenance procedure is not clear, ask your Proactive Medical Products authorized distributor for assistance. - Page 14 you purchased is guaranteed to be free from defects in material and A detailed description of the problem and its symptoms on a note. This warranty shall not apply to any product which has been repaired or altered in any way so as, in our judgment, to affect its functionality and durability, nor to any product subject to abuse, misuse, negligence or accident, improper maintenance, improper installation, nor to any product used with other parts, components and/or accessories with quality and/or specifications...
Need help?
Do you have a question about the PROTEKT 32500 and is the answer not in the manual?
Questions and answers