Advertisement
Thank you for purchasing a SSM product. Manufactured to a high standard this product will, if used according to these instructions and properly maintained, give you
years of trouble free performance
IMPORTANT: PLEASE READ THESE INSTRUCTIONS CAREFULLY. NOTE THE SAFE OPERATIONAL REQUIREMENTS, WARNINGS & CAUTIONS. USE THE
PRODUCT CORRECTLY AND WITH CARE FOR THE PURPOSE FOR WHICH IT WAS INTENDED. FAILURE TO DO SO MAY CAUSE DAMAGE OR PERSONAL
INJURY, AND WILL INVALIDATE THE WARRANTY.
PLEASE KEEP INSTRUCTIONS SAFE FOR FUTURE USE. ONLY LIFT OR MOVE THE NEMESIS CUTTER RAIL USING THE CIRCULAR GRIP ON THE TOP OF THE
RAIL. IF YOU NEED TO HANDLE THE CUTTER IN ANY OTHER WAY OR IF YOU NEED TO MOVE IT AWAY FROM ITS CUTTING TABLE, THE BLADE MUST BE
REMOVED FIRST.
1.
DO NOT REMOVE THE PACKAGING BANDS UNTIL INSTRUCTED (See A below)
2.
CONTENTS
After unpacking the NEMESIS Cutting system, check to make sure that you have all the parts and that there is no damage to the machine.
2.1
NEMESIS Cutting system components:
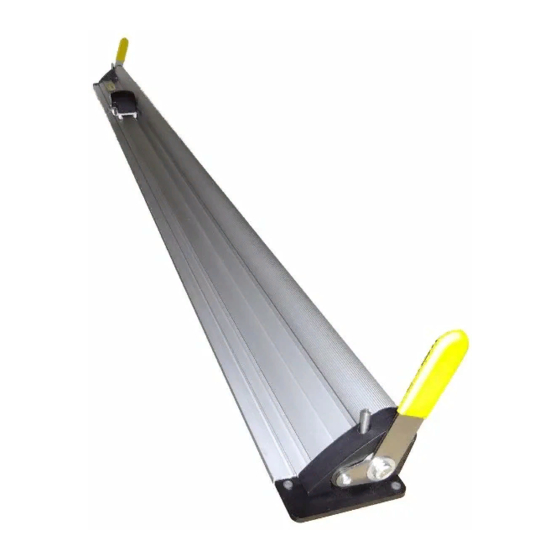
Cutter rail, base and end plates assembly
Box of 100 utility blades
One (1) textile blades
3.
ASSEMBLY
3.1
Position the cutter on the table in its operating position, cut the packing bands and remove them from underneath the cutter. (See B below)
3.2
Using a 17mm wrench, fit a lifting handle to each end. Once tightened, the handles should move freely without any sideways movement. (See C
below)
3.3
Check that the cutter is in the correct position on the table and check that the base plate and end plates are in line. (See D below)
3.4
Attach the two end plates to the table using the pan head screws provided. (See E below)
3.5
Check that each lifting handle operates correctly.
3.6
Remove the cutter from both guide rods by lifting vertically.
3.7
Using the countersink head screws provided, fix the base plate to the table. (See F below)
3.8
Check the grip of the Nemesis cutter rail by using an A4 piece of paper (this instruction sheet is ideal). Place the paper under one end of the Cutter
rail and try to pull the paper free. The weight of the Cutter rail should be enough to grip the paper. Repeat this test along the entire length of the
Cutter rail and if necessary use paper, plastic or card spacers under the full width of the base to make it level.
3.9
If you want to make the table top flush with the aluminium base plate, build up the table using 6mm MDF or similar.
RH & LH Handle assemblies
One (1) scoring blades
One (1) allen key (2mm)
D.
E.
INSTRUCTIONS FOR:
NEMESIS Cutting system
Models: 4110,11,12,13,14,15,16,17,18,19
One (1) blade cartridge
One (1) textile blade cartridge
C.
F.
Advertisement
Table of Contents

Summary of Contents for SSM NEMESIS 4110
- Page 1 NEMESIS Cutting system Models: 4110,11,12,13,14,15,16,17,18,19 Thank you for purchasing a SSM product. Manufactured to a high standard this product will, if used according to these instructions and properly maintained, give you years of trouble free performance IMPORTANT: PLEASE READ THESE INSTRUCTIONS CAREFULLY. NOTE THE SAFE OPERATIONAL REQUIREMENTS, WARNINGS & CAUTIONS. USE THE PRODUCT CORRECTLY AND WITH CARE FOR THE PURPOSE FOR WHICH IT WAS INTENDED.
- Page 2 OPERATION Loosen the BLADE CLAMP THUMB SCREW (See 1 below) and insert a cartridge. The utility blade and scoring blade cartridges are inserted from the rear of the holder (See 2 below), the textile blade cartridge is inserted from the front (See 3 below). UTILITY BLADE - The utility blade can be located in any one of 4 positions depending on the thickness of material being cut (See 4 below).
Need help?
Do you have a question about the NEMESIS 4110 and is the answer not in the manual?
Questions and answers