Table of Contents
Advertisement
Quick Links
Advertisement
Table of Contents

Related Manuals for ATEN StreamLIVE PRO UC9040

Summary of Contents for ATEN StreamLIVE PRO UC9040
- Page 1 UC9040 StreamLIVE™ PRO Multi-Channel AV Mixer User Manual www.aten.com...
-
Page 2: Emc Information
StreamLIVE™ PRO User Manual EMC Information FEDERAL COMMUNICATIONS COMMISSION INTERFERENCE STATEMENT: This equipment has been tested and found to comply with the limits for a Class A digital device, pursuant to Part 15 of the FCC Rules. These limits are designed to provide reasonable protection against harmful interference when the equipment is operated in a commercial environment. -
Page 3: User Information
Japan 81-3-5615-5811 Korea 82-2-467-6789 North America 1-888-999-ATEN ext 4988 1-949-428-1111 User Notice All information, documentation, and specifications contained in this manual are subject to change without prior notification by the manufacturer. The manufacturer makes no representations or warranties, either expressed or implied, with respect to the contents hereof and specifically disclaims any warranties as to merchantability or fitness for any particular purpose. -
Page 4: Package Contents
StreamLIVE™ PRO User Manual Package Contents 1 UC9040 StreamLIVE™ PRO Multi-Channel AV Mixer 1 USB Type-C to USB Type-C Cable 1 USB Type-C to USB Type-A Cable 1 Power Adapter 1 User Instructions Note: Make sure that all of the components are present and in good order. If anything is missing or was damaged in shipping, contact your dealer. -
Page 5: Table Of Contents
3. ATEN OnAir PRO App & Side Menu ATEN OnAir PRO Application ........13 Page Components . - Page 6 Re-order the Overlays ........39 5. ATEN OnAir PRO App & Audio Mixer Audio Mixer.
- Page 7 StreamLIVE™ PRO User Manual Create a Live Stream with Youtube......76 What is CDN Service?........76 RTMP/RTMPS and RTSP Protocols .
-
Page 8: About This Manual
Chapter 2, Hardware Setup describes the steps that are necessary to quickly and safely set up your installation. Chapter 3, ATEN OnAir PRO App & Side Menu explains the functions in the OnAir App and its side menu. Chapter 4, ATEN OnAir PRO App & Video Mixer explains the functions in the Video Mixer deck in the OnAir App, including scene editing, media resizing/ cropping and text and image overlays. -
Page 9: Conventions
Indicates critical information. Product Information For information about all ATEN products and how they can help you connect without limits, visit ATEN on the Web or contact an ATEN Authorized Reseller. Visit ATEN on the Web for a list of locations and telephone numbers: International http://www.aten.com... - Page 10 StreamLIVE™ PRO User Manual This Page Intentionally Left Blank...
-
Page 11: Introduction
To get started, simply connect video/audio sources, and an Ethernet with an ATEN app-installed iPad, and you are ready to roll. Whether you're capturing, editing or streaming, the StreamLIVE™ PRO with its ergonomic and practical design, it is flexible enough to fit all independent live streaming broadcasting environments. -
Page 12: Features
StreamLIVE™ PRO User Manual Features All-in-one design to simplify streaming workflow – integrates 1080p video capture, video recorder, video switch, streaming encoder, video converter, video splitter, and audio mixer Professional-quality live streaming everywhere – compatible with every major platform and can livestream to two platforms at the same time from virtually anywhere ... -
Page 13: Requirements
Chapter 1. Introduction Requirements Ethernet connection The following iPad with iOS 11 or later iPad Pro (1st gen, 12.9”) iPad Pro (1st gen, 9.7”) iPad Pro (2nd gen, 12.9”) iPad Pro (2nd gen, 10.5”) ... -
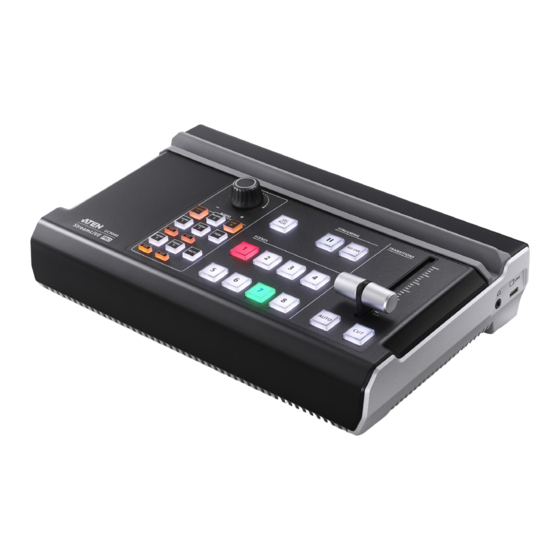
Page 14: Components
StreamLIVE™ PRO User Manual Components Top View 14 15 Component Description Audio Section (Controls the audio settings of the system) Audio Level Control Controls the volume of the selected audio source. Volume Meter The LED reflects the controlled volume. During firmware upgrade, the LED behavior is changed. Refer to Upgrading the Unit on page 67 for the LED behavior during firmware upgrade. - Page 15 Chapter 1. Introduction Component Description HDMI 2 Audio Switches to the HDMI 2 Audio Source. Source The button will light up when switched to this source. HDMI 1 Audio Switches to the HDMI 1 Audio Source. Source The button will light up when switched to this source. Audio-Follows-Video: Pressing the AFV button will light up.
- Page 16 StreamLIVE™ PRO User Manual Component Description T-Bar (transition) Slide the T-Bar to start the transition. The scene transition speed depends on how fast you slide the bar. Sliding the T-bar all the way to one end will complete the transition. You can create different effects by sliding it slowly, quickly or even hold it half way.
-
Page 17: Rear View
Chapter 1. Introduction Rear View 6 7 8 Component Description SRC / PGM Output Programmed (PGM) Video output. Port 4K HDMI Loop Out An 4K HDMI 1 Input source and a 4K HDMI Loop Out. Port/4K HDMI 1 Input Port FHD HDMI 2 Input HDMI 1080P Video Input that can take HDMI 1080P Port/HDMI 3 Input... -
Page 18: Side View
StreamLIVE™ PRO User Manual Side View Component Description iPad Link Port (Data Connects to the iPad for ATEN OnAir app. only) 3.5mm Audio Sound output for the preview scene (the greenly lit Monitor Jack scene). -
Page 19: Hardware Setup
Chapter 2 Hardware Setup Please review the safety information regarding the placement of this device in Safety Instructions, page 71. Connecting the StreamLIVE™ PRO Unit Follow the steps below to connect the StreamLIVE™ PRO to an HDMI source and the host. HDMI Video Source (Unencrypted) MIC/ iPad... - Page 20 StreamLIVE™ PRO User Manual 5. (Optional) Connect the SRC/PGM Output Port and the 4K HDMI Loop Out Port if necessary: a) Connect an HDMI display to the SRC/PGM Output Port. b) Connect an HDMI display to the 4K HDMI Loop Out Port. 6.
-
Page 21: Connecting Ipad
Chapter 2. Hardware Setup Connecting iPad Lightning Connector on iPad For iPads having lightning connectors, simply connect the Apple Lightning USB 3 Adapter (not included, may need additional purchase) and the USB-C to USB-A cable (included in the package) serially between the StreamLIVE™ PRO and your iPad. - Page 22 StreamLIVE™ PRO User Manual This Page Intentionally Left Blank...
-
Page 23: Aten Onair Pro App & Side Menu
Download the ATEN OnAir PRO app from App Store and install it on your iPad. The icon looks like the one below: Tap to open the ATEN OnAir PRO application and the tutorial will start for the first time you open it. - Page 24 StreamLIVE™ PRO User Manual Follow the on-screen instruction as it guides you through the basics of using the ATEN OnAir PRO app with UC9040. When finished, a message will be shown: To run the tutorial again, tap the icon on the top left corner for the side menu...
-
Page 25: Page Components
Chapter 3. ATEN OnAir PRO App & Side Page Components Component Description Side Menu Tap the icon for the side menu. Refer to Side Menu on page 16 for more details. Deck Selector Tap to select the desired configuration deck. -
Page 26: Side Menu
StreamLIVE™ PRO User Manual Side Menu A side menu is available for project management, tutorial, app information and self-diagnostic function. For the side menu, tap the icon on the top left corner. -
Page 27: Current Project
Chapter 3. ATEN OnAir PRO App & Side Current Project Tap the icon to edit the name of your project:... -
Page 28: Create Project
StreamLIVE™ PRO User Manual Create Project 1. Tap Create New Project. 2. Enter a name for the project. 3. (Optional) Select a template. Templates are project settings pre-configured for you if you are unsure how your new project should be. 4. -
Page 29: Copy As New Project
Chapter 3. ATEN OnAir PRO App & Side Copy as New Project If you like the settings of your current project when you are to create a new one, you can use this function copy the settings. 1. Tap Create New Project. -
Page 30: Open Project
StreamLIVE™ PRO User Manual Open Project Tap Open Project for a list of available projects. An example is shown: Tap to select the project you wish to use. -
Page 31: Import Project
Chapter 3. ATEN OnAir PRO App & Side Import Project Tap Import Project to import a project to the ATEN OnAir PRO app. Please select a bin file as highlighted below, ATEN OnAir PRO app cannot import image file. -
Page 32: Export Project
StreamLIVE™ PRO User Manual Export Project Tap Export Project to export and share your projects. -
Page 33: All Projects
Chapter 3. ATEN OnAir PRO App & Side All Projects For information of the available projects, tap All Projects. An example is shown: You can also open or delete the projects here. To open a project, tap to select a project and tap Open. An example is shown:... -
Page 34: Tutorial
StreamLIVE™ PRO User Manual To delete a project, tap the garbage can icon corresponding the project. An example is shown: Tutorial Tap Tutorial to go through the tutorial again. -
Page 35: About
Chapter 3. ATEN OnAir PRO App & Side About Tap About for information of the ATEN OnAir PRO app. An example is shown below:... -
Page 36: Reset The Device
StreamLIVE™ PRO User Manual Reset the Device Tap Reset the Device to reset the StreamLIVE™ PRO to its factory default settings. A warning message below appears and tap OK. -
Page 37: Self-Diagnostic
Chapter 3. ATEN OnAir PRO App & Side Self-Diagnostic Tap Self-Diagnostic to self-diagnose for a report. An example is shown: You can tap the icon to share the report. - Page 38 StreamLIVE™ PRO User Manual This Page Intentionally Left Blank...
-
Page 39: Aten Onair Pro App & Video Mixer
Chapter 4 ATEN OnAir PRO App & Video Mixer Video Mixer The video mixer page allows you to preview videos of PRV and PGM, adjust MIC and PGM volume, scene selection and editing, and transition control. The components of the page is shown below:... - Page 40 StreamLIVE™ PRO User Manual Component Description The program scene, or the on-air video output of the system. Preview You can tap on the bottom right-hand corner or tap on the scene twice to view the video source in full screen mode. An example is shown below: Tap the icon on the top left-hand corner or tap the...
-
Page 41: Transition Control
Chapter 4. ATEN OnAir PRO App & Video Component Description Scene You can configure each individual scenes by tapping this icon. Editor Refer to Scene Editor on page 33 on how to edit each scene. Transition Controls the switching between the current stream (PGM) Control scene and the preview (PRV) stream. -
Page 42: Transition Control When The Quick Mode Is Disabled
StreamLIVE™ PRO User Manual Transition Control when the Quick Mode is Disabled Component Description Tapping the Auto button will begin the transition after a specified time (0.3-3.0 seconds). Go to the Setting Deck and refer to page 46 on how to modify this specified time. Tapping the Cut button and the transition happens immediately. -
Page 43: Scene Editor
Chapter 4. ATEN OnAir PRO App & Video Scene Editor When you tap the icon under a scene in the scene selector region, you can start editing the scene’s display. An example is shown below: Component Description Scene Display This region is how this scene will be displayed. You can configure the components within the region. - Page 44 StreamLIVE™ PRO User Manual Component Description Media Select the source(s) and how the source(s) are laid out for the scene. 1. HDMI-A: Display an input source between HDMI 1, HDMI 2, HDMI 3, and HDMI 4 input sources. 2. HDMI-B: Display an input source between HDMI 1, HDMI 2, HDMI 3, and HDMI 4 input sources.
- Page 45 Chapter 4. ATEN OnAir PRO App & Video Component Description Scene This region displays the scene name and background. Information Tap the Name field to edit. Tap the Background field to select between Color or Picture. Media Layout Tap to select the preferred dual-view (Picture-in-Picture or Picture-by-Picture) layout.
-
Page 46: Resize/Crop Tool
StreamLIVE™ PRO User Manual Resize/Crop Tool This section describes how to resize or crop any of the components in the “Scene Display” region. Resize To resize any component, tap the component (overlay or media) and a resize tool will be visible on the “Scene Display” region. Examples are shown below: Tap and hold to drag the resize tool to resize the component. -
Page 47: Crop (Media Only)
Chapter 4. ATEN OnAir PRO App & Video Crop (Media Only) To resize a media, tap the media. An example is shown: Tap the Resize/Crop Tool to start the tool. Pinch your finger inward or outward to crop. A small box is on the left of the “Scene Display”... -
Page 48: Add/Edit Text Overlay
StreamLIVE™ PRO User Manual Add/Edit Text Overlay Tapping allows you to add a Text Overlay to the scene. A pop-up configuration page and its description is shown below: When completed, tap OK to save the configuration and return to the previous screen. -
Page 49: Re-Order The Overlays
Chapter 4. ATEN OnAir PRO App & Video Re-order the Overlays To re-order the overlays, tap and hold the overlay you wish to re-order. The overlay can then be dragged. You can drag the overlay to the place you wish it... - Page 50 StreamLIVE™ PRO User Manual...
-
Page 51: Aten Onair Pro App & Audio Mixer
Chapter 5 ATEN OnAir PRO App & Audio Mixer Audio Mixer The components of the Audio Mixer deck page is shown below: Component Description Audio Level Slide the volume slider to control the volume of each audio Control source. : The audio is turned off (muted) : The audio is turned on (unmuted) Tap On to turn on/off the sound for the source. - Page 52 StreamLIVE™ PRO User Manual Component Description HDMI 1, 2, 3, Audio-Follows-Video ON: Broadcasting the and 4 Audio source’s video will also play the source’s audio. Control ON: The audio is turned on (unmuted). OFF: The audio is turned off (muted). MIC Gain You can adjust the MIC Gain settings here: Control...
- Page 53 Chapter 5. ATEN OnAir PRO App & Audio Component Description Earphone You can adjust the Earphone Compressor here: Compressor to enable/disable the compressor function and drag the dial to adjust the threshold.
- Page 54 StreamLIVE™ PRO User Manual This Page Intentionally Left Blank...
-
Page 55: Aten Onair Pro App & Settings
Chapter 6 ATEN OnAir PRO App & Settings Settings The Setting deck page is shown below: If you have configured a settings, Apply button will light up. Click it to apply the settings. -
Page 56: General
StreamLIVE™ PRO User Manual General Component Description Pause Pause picture is the display when the streaming is paused. You can Picture select black, the pause logos, or upload your own custom logo. Transition This is the scene transitioning delay for the Auto button (on the app or Period on the unit). - Page 57 Chapter 6. ATEN OnAir PRO App & Set- Component Description Network Choose your preferred network configuration methods. Settings Mode: DHCP: The network automatically assigns IP address and the corresponding fields. Manual: If you are in a place where you are unable to utilize the DHCP method, you will need to get the settings, possibly from IT, and input them into each field here manually.
-
Page 58: Stream
StreamLIVE™ PRO User Manual Stream... - Page 59 Chapter 6. ATEN OnAir PRO App & Set- Component Description Stream Configure live-stream and external recording information here: Connection Server 1 & 2: Settings : disable stream. : enable stream. You can stream to two platforms simultaneously* if you enable both Server 1 &...
-
Page 60: Output
StreamLIVE™ PRO User Manual Output... - Page 61 Chapter 6. ATEN OnAir PRO App & Set- Component Description Video Streaming Resolution: Select your stream resolution from one of the Output following: Streaming Quality: Select the quality from one of the following. If manual is selected, the quality slider will light up and you can tap and drag the slider to a desired stream quality.
-
Page 62: Reset Settings
StreamLIVE™ PRO User Manual Reset Settings Tap to reset the configurations you have made to this device’s settings page. -
Page 63: Example Live-Stream Url And Stream Key (Facebook)
Chapter 6. ATEN OnAir PRO App & Set- Example Live-stream URL and Stream Key (Facebook) Example Live-stream URL and Stream Key (Youtube) -
Page 64: Recording Live-Stream Video (External Storage)
When you first connect the storage device, the ATEN OnAir PRO app will verify its format and USB spec. If the format is not desirable, the ATEN OnAir PRO app will ask if you would like to format it. Make sure the files in the storage device are backed up before you format it. - Page 65 Chapter 6. ATEN OnAir PRO App & Set- A warning message appears if the storage device plugged into the StreamLIVE™ PRO is not a USB3.0 or later storage device.
- Page 66 StreamLIVE™ PRO User Manual A confirmation message appears when a USB3.0 or later storage device is plugged into the StreamLIVE™ PRO. Now you may configure the storage device’s record settings or format the device manually. Tap the File Name field to adjust the file name of the recording(s).
- Page 67 Chapter 6. ATEN OnAir PRO App & Set- Tap the Split By Time drop-down menu to select how long a recording is before splitting into the next recording. The drop-down menu is shown: to manually go through the format process. A warning...
-
Page 68: Video Information For Live-Stream Recording
StreamLIVE™ PRO User Manual Video Information for Live-stream Recording Video Format: 1080p30 Video Compression: H. 264 Audio Compression: AAC Video Container Format: MP4 Does not support uncompressed recording. Record Media: USB 3.0 hard drive or USB 3.0 flash drive Does not support SD card. -
Page 69: Quick Live-Stream Setup
Server URL and Stream Key. This section will therefore take you through obtaining the Server URL and Stream Key, input them into the ATEN OnAir PRO app, synchronize the ATEN OnAir PRO app with the UC9040 and start streaming using your iPad. - Page 70 2. It is highly recommended to check the “Use a persistent stream key” checkbox to keep this stream key. 7. Connect the iPad to your UC9040. The ATEN OnAir PRO app will ask you about the synchronization option. Tap Start.
- Page 71 Chapter 7. Quick Live-Stream Setup 8. Configure other settings on the ATEN OnAir PRO app and press the GO LIVE button on the unit or on the ATEN OnAir PRO app: 9. Disconnect iPad from the unit and go to the Facebook Connect page.
- Page 72 (scope not part of this manual) before you start broadcasting your stream. 11. Connect your iPad to the unit to control the stream using the ATEN OnAir PRO app. Note: Streaming on other streaming platforms using the unit requires the same information (Server URL and Stream Key), refer to their websites for more information.
-
Page 73: During The Live-Stream / Live-Stream Recording
Chapter 7. Quick Live-Stream Setup During the Live-Stream / Live-Stream Recording During the live-stream or the live-stream video recording, you can: Use the transition function (T-bar, Auto button or Cut button) to switch PRV preview image to the PRG preview. ... - Page 74 StreamLIVE™ PRO User Manual Edit the video scenes in scene editor, tune audio settings in the audio mixer deck, adjusting audio delays in the settings deck, etc. Tap Apply to apply the changes.
-
Page 75: Firmware Upgrade
Chapter 8 Firmware Upgrade Download Requirements A computer connected to the Internet. An empty external storage device or a USB flash drive with at least 1.1GB of free space. Preparing the Firmware 1. On the external storage device, create a folder named “uc9040_img”. 2. - Page 76 StreamLIVE™ PRO User Manual x = 1-9 y = 0-9 The unit will upgrade using the newest firmware. For example, if the folder has a “uc9040_V1.0.080” file and a “uc9040_V1.1.102” file, the unit will upgrade using the “uc9040_V1.1.102” file.
-
Page 77: Upgrading The Unit
Chapter 8. Firmware Upgrade Upgrading the Unit Follow the steps below to upgrade the unit. Note: Make sure the prepared USB storage device is plugged into the rear USB port (USB 3.1 Gen1 Type-A Port) of the unit. For Firmware Upgrade 1. -
Page 78: Upgrade Assessment Fail
StreamLIVE™ PRO User Manual 4. If the firmware upgrade was successful, the first LED of the Volume Meter LEDs will blink every 0.3 seconds. The unit will reboot after some time to complete the process. 0.3s 0.3s Note: If the firmware upgrade fails, the last LED of Volume Meter LEDs will blink every 0.3 seconds. -
Page 79: Upgrade Fail
Chapter 8. Firmware Upgrade Upgrade Fail If firmware upgrade fails during the firmware upgrade (e.g. disconnected USB storage device or power, etc.), the last LED of Volume Meter LEDs will blink every 0.3 seconds. 0.3s 0.3s The unit will reboot after some time and try to upgrade the firmware again. If it fails again, it will reboot and try again. - Page 80 StreamLIVE™ PRO User Manual This Page Intentionally Left Blank...
-
Page 81: Appendix
Appendix Safety Instructions General This product is for indoor use only. Read all of these instructions. Save them for future reference. Follow all warnings and instructions marked on the device. Do not place the device on any unstable surface (cart, stand, table, etc.). If the device falls, serious damage will result. - Page 82 StreamLIVE™ PRO User Manual extension cord ampere rating. Make sure that the total of all products plugged into the wall outlet does not exceed 15 amperes. To help protect your system from sudden, transient increases and decreases in electrical power, use a surge suppressor, line conditioner, or uninterruptible power supply (UPS).
-
Page 83: Technical Support
Support Documentation Software Updates Telephone Support 1-888-999-ATEN ext 4988 1-949-428-1111 When you contact us, please have the following information ready beforehand: Product model number, serial number, and date of purchase Your computer configuration, including operating system, revision level, expansion cards, and software ... -
Page 84: Specifications
StreamLIVE™ PRO User Manual Specifications Function StreamLIVE™ PRO Video Input 1 x 4K HDMI Type A Female (up to 2160@60, no HDCP support) 3 x HDMI Type-A Female (up to 1080p@60, switcher, no HDCP support Video Output 1 x 4K Loop-Thru HDMI Type-A Female (up to 2160@60, no HDCP support) 1 x PGM HDMI Type-A Female (up to 1080p@60, no HDCP support) - Page 85 Appendix Function StreamLIVE™ PRO Network Protocol Dual-stream encoder supports direct live streaming to CDN server over Ethernet using Real Time Messaging Protocol (RTMP/RTMPS) Video Encoding Format: H.264 Bit rate: 512Kbps-10Mbps Color Format: YUV420 Resolution: 1080p: 30/25, 720p: 60/50/30/25, 480p: 60/50/ 30/25 Audio Encoding Format: AAC...
-
Page 86: Live-Streaming Information
StreamLIVE™ PRO User Manual Live-Streaming Information Create a Live Stream with Youtube You can learn more from Youtube for “Encoder Streaming” https://support.google.com/youtube/answer/ 9227510?hl=en&ref_topic=9257984 Or from “Set up your live streaming encoder” https://support.google.com/youtube/answer/2907883 What is CDN Service? A content delivery network or content distribution network (CDN) is a geographically distributed network of proxy servers and their data centers. - Page 87 What is covered by the Limited Hardware Warranty ATEN will provide a repair service, without charge, during the Warranty Period. If a product is detective, ATEN will, at its discretion, have the option to (1) repair said product with new or repaired components, or (2) replace the entire product with an identical product or with a similar product which fulfills the same function as the defective product.
- Page 88 All other brand names and trademarks are the registered property of their respective owners. ATEN International Co., Ltd., 3F, No. 125, Sec. 2, Datung Rd., Sijhih District, New Taipei City 221, Taiwan Phone: 886-2-8692-6789 Fax: 886-2-8692-6767 TECHNICAL SUPPORT CENTER: 886-2-8692-6959...
Need help?
Do you have a question about the StreamLIVE PRO UC9040 and is the answer not in the manual?
Questions and answers