Table of Contents
Advertisement
Quick Links
Advertisement
Table of Contents

Related Manuals for KiSS Classic EXPLORER

Summary of Contents for KiSS Classic EXPLORER
- Page 1 Classic KISS, EXPLORER DURABLE RELIABLE FLEXIBLE MSL 72.140 Jetsam/Explorer R.1...
- Page 2 READ THIS MANUAL & THE CLASSIC MANUAL!!!! KISS EXPLORER DIVERS MUST READ BOTH THE EXPLORER MANUAL AND THE CLASSIC MANUAL. THEY GO TOGETHER. THE EXPLORER MANUAL ONLY COVERS THE FEATURES WHICH DIRECTLY RELATE TO THE EXPLORER. IN ORDER TO FULLY UNDERSTAND YOUR NEW REBREATHER, THE COMPONENTS, HOW THEY WORK, HOW TO HANDLE AND TREAT THEM, YOU MUST READ THE MANUAL IN FULL, FOR YOUR REBREATHER. SPORT KISS OWNERS SHOULD READ THE SPORT KISS MANUAL. CLASSIC KISS OWNERS SHOULD READ THE CLASSIC KISS MANUAL. EXPLORER OWNERS SHOULD READ BOTH THE EXPLORER AND CLASSIC MANUALS. CLASSIC OWNERS WHO HAVE UPGRADED TO SOME OF THE EXPLORER COMPONENTS SHOULD READ BOTH THE CLASSIC AND EXPLORER MANUALS. THIS SHOULD BE DONE PRIOR TO DIVING OR SERVICING THIS UNIT!!! SPECIAL AT- TENTION SHOULD BE PAID TO ALL NOTES &/OR WARNINGS; THEY MUST BE READ AND UNDERSTOOD!!!! FAILURE TO DO SO, MAY CAUSE SERIOUS INJURY OR DEATH!!!! THE KISS EXPLORER GIVES DIVERS OPTIONS ON HOW TO RIG THEIR UNIT. THIS MANUAL IN NO WAY REPLACES THE TRAINING REQUIRED FOR EXPLORATION DIV- ING &/OR TECHNICAL DIVING. PROPER TRAINING IS EXTREMELY IMPORTANT AS IS GATHERING PROPER EXPERIENCE PRIOR TO ATTEMPTING ADVANCED DIVING. YOU MUST BE A LEGAL ADULT IN THE AREA IN WHICH YOU LIVE IN ORDER TO PURCHASE AND DIVE A KISS REBREATHER. ...
- Page 3 THIS IS NOT A JOKE!! Participation in rebreather diving can result in serious in- jury or death to you, the diver! The warning on the Classic KISS rebreather is not a joke. Before beginning your dive, you must consider the risks involved. The Classic KISS consists of many parts. All of these components will eventually fail. Careful maintenance, assembly, and testing will not prevent this from happening. At best, it will delay the failure. The Classic KISS is not automatic in any way. It requires constant monitoring, a complete awareness of the potential problems likely to be encountered, and full knowledge of how to deal with whatever problems may occur. If you do not have adequate training, equipment, physical conditioning, and a proper mindset, do not get in the water. The diver, YOU, has the final responsibility for his or her own safety and actions while using this rebreather. All components of the Classic KISS must be in good working order and be properly assembled and tested to reduce the risk of failure. Regardless of the training and experience of the diver and the reliability of the re- breather the risk of serious injury and/or death can never be reduced to zero. This manual is not a complete text on the maintenance and operation of the Classic KISS Explorer. The diver must complete a proper training course covering the maintenance, testing and operation of the rebreather before diving this equip- ment. The rebreather can malfunction while diving even when properly assem- bled and having passed all pre-dive tests. Only carrying adequate bailout gas and ...
-
Page 4: Table Of Contents
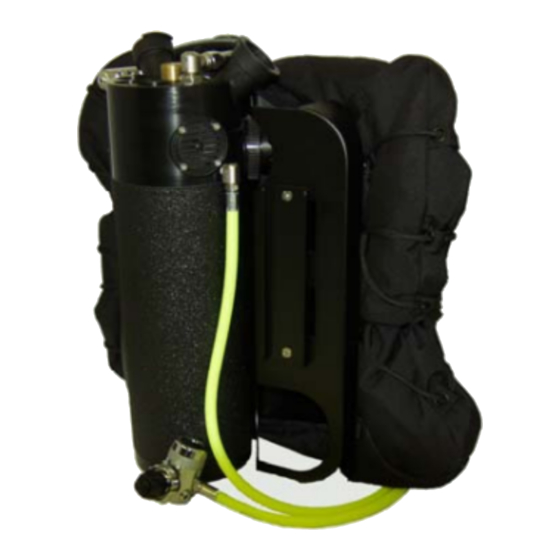
CLASSIC KISS, EXPLORER THE ORIGINAL KISS REBREATHER, MECHANICALLY CONTROLLED, MANUALLY ASSISTED, IS NOW AVAILABLE IN AN ENHANCED PACKAGE! DURABLE, RELIABLE FLEXIBLE. The Classic KISS rebreather has always been known to be and With the Explorer, we take the original version and add the features that divers have been asking for: a unit better equipped for exploration but which does not compromise on quality and keeps to the KISS philosophy. Also desired by divers is the ability to modify the rigging of the unit to better work with the environment at hand, the planned dive, or gear available at the destination. And, they would like to be able to do this quickly and easily! The Explorer does all this; it can be rigged several different ways! TABLE OF CONTENTS EXPLORER parts list Page 5... -
Page 5: Explorer Parts List
1 Explorer counterlung case with detachable front plate and webbing harness. Also included are 2 attachment screws for securing front plate to case; screw sets for securing the cover plate, if the KISS wing is not used; de- tachable manifold; spine; detachable tank rails •... - Page 6 DISPLAY OPTIONS, IF ORDERED: • Jetsam triple wrist display with attachment plate, 2 wrist straps and jewelers screw driver set • Jetsam dual wrist display with VR3 cable, 2 wrist straps and jewelers screw driver set (cable will read one sen- sor) • VR pendent display with dual fischer attachment plate •...
-
Page 7: Set-Up Options And Components
SET-UP OPTIONS & COMPONENTS This section of the manual discusses the various options for rigging the KISS Explorer. Explorer owners should read carefully the sections below to determine which rigging methods are appealing. There are some compo- nents which are not included in the Explorer package, which are required for some of these methods. We chose not to include all the parts for every rigging style, as not every diver will require them. - Page 8 (the quick disconnect fittings are an optional product and not included with the EXPLORER package.) 1. QD fittings not attached to the manual gas addition valves: Unless the KISS Explorer is set up for the no on-board cylinder/travel version, these fittings are not required. While they can be used, divers should remember that the more fittings on the rebreather, the more failure points it has.
-
Page 9: Counterlung Case And Kiss Wing
COUNTERLUNG CASE & KISS WING The new Explorer counterlung case ships with the front plate attached, and the wing NOT attached. You will notice that without the wing attached, the plate is secured in the four outer corners with screw sets. Also, the top centre screw has a spacer in between the spine and the back of the front plate. This spacer and the 4 screw sets are NOT required when diving with the KISS wing. As the KISS wing sits between the front plate and back box, the plate will sit snugly and their will be no gapping in between the parts. The corner screw sets are used to take up the gapping if the case is dived without the wing. Those diving without the wing, may choose not to use the corner screw sets, but add a third spine screw at the bottom. Or as your wing attaches with a screw in this area anyway, it would also be sufficient. The choice is really the divers; the screw sets are included for those who wish to use them. Please see the next page for more information on the corner screw sets. The spacer (black plastic washer) which is located in between the spine and the plate, at the top is also optional. It is there to remind you to NOT over tighten that top (or bottom screw, if used) all the way down, if the KISS wing is not used. If you choose to not use this washer, or if you lose it, just don’t tighten the screw down all the way. Leave a small gap. If the screw is tightened down all the way, it will put stress on the case. The KISS Explorer counterlung case attaches to the scrubber head in the same manner of the Classic KISS; with two, 2-inch flat head screws. For those upgrading older Classic KISS units, the existing screws can be used. If for some reason, new screws are required to complete the upgrade, they should be or- dered with the case. When swapping cases, do not forget to insert the spacer between the head and the case. New units ship with everything in place. After attaching the back part of the counterlung case to the scrubber head, the various fittings can be reattached to the head. Again, those buying a new Explorer will find everything attached. At this point, the counterlungs can be attached to the unit. Please see the Classic KISS manual for proper CL insertion instructions. The next step would be to attach the custom KISS wing and front plate. The wing is situated between the back part of the counter- lung case and the front plate, This positioning keeps the Explorer very tight to the divers back and provides a low profile. As this wing was designed for the KISS Explorer, it best provides lift where re- quired and has excellent trim. It has a 360 degree donut style blad- der assembly and maximum lift is approximately 40 lb. Tightening ... - Page 10 With the wing properly positioned, it can now be attached using the 4 barrel nuts. The wing attaches to the four corners of the counterlung case. On the back side of the wing, there are loops in each corner which have a large stainless steel grommet. Push the female piece through the loop so that the open side is facing the case. Then push the male piece through the hole in the corner of the case, so that the threaded end is facing the wing. Secure them, finger tight. The barrel nuts are meant to be hand tightened only. Do this for each of the four corners. To secure the barrel nut by the manifold mount, first push the male piece through the hole in the case, then line it up with its mating piece. When the wing is attached at all four corners, you will notice that it seems loose. This is normal. When the top plate is fitted, every- thing will be positioned properly and will be snug. Position the top plate as shown in the right hand photo, with the crotch strap slot at the bottom.
- Page 11 The Explorer counterlung case can be dived without the KISS wing. To do this 4 screws/4 washers/4 nuts which are included with the kit, can be used. As mentioned on the previous page, this is up to you, as a third spine screw at the bottom will also help secure the plate.
-
Page 12: Harness
KISS WING HARNESS The KISS Explorer front plate is designed to work as a back plate; slots have been cut for a standard webbing harness. The harness is shipped with a SS buckle, 2 D-rings/slides per shoulder strap, 1 D-ring/slide per waist strap (1 on each hip), adjustable crotch strap with scooter ring and D-ring/slide, 11 feet of webbing, and 4 web- bing protectors. Should any more rings or accessories be desired, they can easily be added. While the Explorer ships with our webbing harness, you may decide to thread your own harness into the Explorer’s front plate, or alternatively, to attach a standard harness system using the threaded holes on the plate. (similar to the Classic KISS). The bolts for this application are included. THREADING THE HARNESS: 1. Thread the webbing through the shoulder strap slots. Position the webbing so that the grommet is positioned to the right or left of the center. If the grommet is in the center, you will not be able to tighten the top screw properly. As there is plenty of webbing this shouldn’t be an issue. See the photo to the right. Before you slide the webbing through the slots, push two of the webbing protec- tors over the webbing. The protectors should sit so that they cover the webbing which goes through the slots. This will help prevent wear & tear on the harness. 2. Position 2 D-rings/slides on each shoulder. See the top photo for po- sitioning. Note that the top ring should sit fairly high; approximately 3” to 5” from the top of the plate. Remember, the rebreather needs to sit as high on your back as possible for the best work of breathing. THIS IS VERY IMPORTANT!! 3. Next, thread the end of the webbing through the waist slot. Push the end through the front of the plate towards the back, and then forward through the next slot. See photo to the right. Repeat this step with the 2nd piece. Again, two of the webbing protectors should be used to protect the harness. 4. Position 1 D-ring/slide on each waist strap. See top photo. 5. Install the crotch strap. Major adjustments should be done on the back part of the webbing. Minor adjustments should be done on the front part of the webbing. The front loop will be threaded over the waist webbing on the right side. 6. Attach the waist buckle to the webbing on the right side. ... -
Page 13: Cylinder Straps
CYLINDER STRAPS The KISS Explorer is shipped with 2 sets (4 straps) of the webbing straps. They are a standard feature for the Explorer. These straps can be locked under the tank mount brackets on the case. Loosen the tank mount brackets, and instead of sliding the straps through the slots on the case, slide them under the tank mount bracket instead. -
Page 14: Off Board Accessory
OFF-BOARD ACCESSORY The KISS Explorer package includes one full set of the off-board accessory. This accessory is used to plumb the side mount gas into the KISS Explorer through the manifold. The kit includes the rebreather side whip and the side mount cylinder side kit. Some divers choose to dive with two complete off-board accessories. Using two sets means that if two side mount cylinders are hooked up, the diver does not need to detach the quick connects from one cylinder to another. This version, while practical does add extra O-rings to the rig. Alternatively, the diver can choose to purchase only additional cylinder side whips. If the diver has this whip on each side mount cylinder, then in order to bring the gas into the rebreather loop, the diver must connect his re- breather side whip to that particular cylinder. This version cuts down on the number of O-rings on the rig and also is cleaner. The off-board accessory rebreather side includes: 1 swivel elbow, 1 30inch LP hose, 1 shut-off valve, 1 check valve with quick disconnect male. The off-board accessory cylinder side includes: 1 swivel elbow, 1 6inch LP hose, 1 quick disconnect female. The shut off valve is open when it is pushed up, following the direction of the arrow or pushing it towards the LP hose. It is closed when it is pushed down or away from the LP hose. The valve has been designed this way so the diver must make a conscious decision to open the valve. When doing your positive & negative pres- sure tests, remember to close this valve or your tests will fail!! Prior to connecting the rebreather side whip to the off board cylinder, you must open the rebreathers on- board diluent cylinder to pressurize the whip. Ensure that the shut off valve is open, with the arrow pushed up towards diver. This confirms that the one way check valve has seated. No gas should exit the ... - Page 15 AS WITH ANY NEW DIVING EQUIPMENT, USING THIS ACCESSORY WILL REQUIRE THE DIVER TO LEARN NEW SKILLS AND CREATE NEW MUSCLE MEMORY. WITH ANY TYPE OF DIVING, REBEATHER OR OPEN CIRCUIT, THERE IS RISK. WHEN USING NEW EQUIPMENT SUCH AS THE OFF-BOARD ACCESSORY ON A KISS REBREATHER, THE DIVER MUST ACCEPT THIS RISK AND THAT THE ABOVE MENTIONED NEW SKILLS WILL NEED TO BE LEARNED. FAILURE TO LEARN THE PROPER USE OF THE OFF-BOARD ACCESSORY CAN CAUSE THE DIVER SERIOUS INJURY OR DEATH. MSL 72.140 Jetsam/Explorer R.1...
-
Page 16: Left Side Gas Addition Valve & Miflex Hoses
LEFT SIDE GAS ADDITION VALVE & MIFLEX HOSES The KISS Explorer ships standard with a left side gas addition valve. Either an oxygen valve or a diluent valve can be used. One valve is included with the Explorer. Additional valves can be purchased, if desired. This means that we now have 3 gas additional valves. - Page 17 The best tool to tighten the elbow is a 5/8 wrench. Use it to cup the bottom of the elbow to help turn it into position. You should only need the wrench on the last turn. The first few turns can be done by hand. *NOTE: The right and left side elbows, which attach to the rebreather head, are NPT or pipe thread. This is a tapered thread, NOT a straight thread. If you screw a fitting with a straight thread, such as a swivel elbow, into this port it will damage the rebreather head! If this hap- pens, it is NOT repairable. Prior to modifying your rebreather, please be certain that you un- derstand what fittings are required. *NOTE: See the Classic KISS manual for instructions on disassembling and servicing the gas addition valves. *NOTE: Remember, when attaching the gas addition valve to the hoses or other fittings, al- ways put one wrench on the fitting which attaches to the plastic valve. Use this wrench to ensure that this fitting does not spin while you are either attaching or removing the valve from other fittings or hoses. If you need to remove or attach any fittings which go directly into the plastic, be careful to not over tighten. Use only two fingers on the wrench! ...
-
Page 18: Left Side Gas Addition Valve Trouble Shooting
• The spring is broken or weakened and is not holding the valve closed. The regulator should be serviced regularly and maintained in an oxygen clean condition. *WARNING: It is very important that this valve is in good working order, with good O-rings. Ensure that you rinse your gear after diving in salt water, and if you flood your rebreather, and you think water has gotten into the valve, service it!! If you pay attention to how often you usually add oxygen to your rebreather during a typical dive, it will be easier for you to notice a problem. *NOTE: The Miflex hoses are rated for oxygen use. As they have standard regulator hose fit- tings, they can be replaced with other rubber LP hoses. If you do so, please ensure that the hoses you use are rated for oxygen use! Also, all low pressure hoses on the KISS Explorer should be inspected periodically to ensure that they are not damaged and in good working order. This includes the oxygen hoses, dilu- ent hoses, mouthpiece 2nd stage regulator hose and ADV hose. ... -
Page 19: Explorer With On Board Oxygen Only
Having two on-board oxygen cylinders means that divers need to pay special attention to The ADV and the their PPO2’s!! The PPO2 will creep up if no diluent is being added! mouthpiece/open-circuit will not work until the off-board accessory is connected! The KISS Explorer was meant to be used with the off-board accessory in place. Diving without it means that not all the components will work!! If you are planning on diving this configuration, ensure that you have the proper training and skills. This is not meant for beginner rebreather divers! It is for experience rebreather divers with proper training and experience! Those that wish to dive this configuration should choose the left side oxygen gas addition valve with no flow. It is oxygen clean. The diluent valve should not be used as the flow is high for oxygen! This valve is similar to the right side oxygen manual add valve, but it DOES NOT HAVE AN ORIFICE. -
Page 20: Explorer With On Board Oxygen & Diluent
This system is for divers who wish to have both on board diluent and side mount diluent/bail out gas. These divers prefer to dive the rebreather in a similar manner as the Classic KISS, with a breathable on-board gas in the diluent cylinder. -
Page 21: Explorer For Travel
Travellers also like this configuration. The simple changes for this configuration convert KISS Explorer into a light weight travel unit. It is different only due to it using off-board cylinders only. This configuration allows divers to rent cylinders at their destina- tion. - Page 22 This means that it shouldn’t be used for a diluent flush as it will take too long. If this valve is used, do the diluent flush using the Classic KISS method of mouthpiece and ADV. ...
-
Page 23: 21" Manifold To Diluent First Stage Hose
21” LP MANIFOLD TO DILUENT FIRST STAGE HOSE This hose is standard on the Classic KISS as it is required to bring the diluent on-board gas through the rebreather using the ADV. It is attached to the diluent first stage and then to the manifold. See the photo on the right for placement. *Warning: Some divers may feel that this hose is redundant and wish to remove it. These divers should be aware that if it is removed, the ADV and the open circuit mode of the mouthpiece will not work until a cylinder is attached to the rebreather via the off-board ac- cessory!!! This hose should not be used if the diver is using pure oxygen in the left side cylinder. The ADV system is not meant for high oxygen mixtures. MSL 72.140 Jetsam/Explorer R.1... -
Page 24: Add Valve Quick Connect System
ADD VALVE QUICK CONNECT SYSTEM We recommend that the quick connect system is at- tached to the add valve, on the out flow side. This en- sures that the small amount of water which sits in the front of the check valve, will get atomized into the low pressure hose. The amount of water is very slight, and it does get atomized. Even still, it should be after the add valve and filter set up. What this means is that when the quick connect sys- tem is apart, the add valve will be attached to the side mount cylinder. Care should be taken to secure the valve to the side of the cylinder with bungees and/or clips, to ensure that it does not get damaged. Treat it as you would a second stage regulator, with care and respect. When attaching the fittings to the add valve, remember to put one wrench on the add valve fitting and one on the quick connect. Do not allow the fitting, which is directly attached to the valve, to spin. It could strip the threads of the housing. See page 17 for more information on this subject and wrench placement photos. When your Explorer is rigged for travel mode, you must still do a full positive and negative test. This must be done with the complete loop intact. This means that the first stages must be secured to the side mount cylinders, and the quick connects pushed together. This is the only way to ensure that the positive and negative tests pass. Don’t forget to push the shut-off valve closed, on the off-board acces- sory. If you don’t, it will leak and the test will fail. While the entire loop is together, take the time to pressurize the off-board whip. Simply open up the off- board cylinder, while the off-board accessory is connected to it. This will pressurize the whip, and will confirm that the one way check valve has seated. Ensure that the shut-off valve is open, while you do this. This should be done prior to entering the water. See the off-board section for full details. ... - Page 25 KISS REBREATHERS www.kissrebreathers.com info@jetsam.ca 1 604 469 9176 SKYPE: KISSCCR MSL 72.140 Jetsam/Explorer R.1...
Need help?
Do you have a question about the Classic EXPLORER and is the answer not in the manual?
Questions and answers