Table of Contents
Advertisement
Quick Links
PM110-CE0-2105_Gmate On_user guide_20170621.indd 2
Obelis SA
Boulevard Général
Wahis 53 1030
Brussels, Belgium
Tel +(32) 2 732-59-54
Fax +(32) 2 732-60-03
email
mail@obelis.net
PM110-CE0-2105
philosys Co., Ltd.
28-5, Gwangwol-gil,
Okgu-eup, Gunsan-si,
Jeollabuk-do, 54172, Korea
Tel +82-63-453-1421
Fax +82-63-453-1423
email
help@philosys.com
Date 2017-06
Printed in Korea
2017-08-03 �� 9:41:30
Advertisement
Table of Contents

Related Manuals for philosys Gmate On

Summary of Contents for philosys Gmate On
- Page 1 Co., Ltd. Obelis SA Boulevard Général 28-5, Gwangwol-gil, Wahis 53 1030 Okgu-eup, Gunsan-si, Brussels, Belgium Jeollabuk-do, 54172, Korea Tel +(32) 2 732-59-54 Tel +82-63-453-1421 Fax +(32) 2 732-60-03 Fax +82-63-453-1423 email mail@obelis.net email help@philosys.com PM110-CE0-2105 Date 2017-06 Printed in Korea PM110-CE0-2105_Gmate On_user guide_20170621.indd 2...
- Page 2 User Guide PM110-CE0-2105_Gmate On_user guide_20170621.indd 3 2017-08-03 �� 9:41:30...
- Page 3 PM110-CE0-2105_Gmate On_user guide_20170621.indd 4 2017-08-03 �� 9:41:30...
-
Page 4: Table Of Contents
Contents Introduction Precautionary Information What’s Inside Identifying Parts and Functions Running the App Performing the Test Alternate Site Testing Control Solution Testing Reviewing Past Results Troubleshooting Care and Maintenance System Specifications Meaning of Symbols 2017-08-03 �� 9:41:30 PM110-CE0-2105_Gmate On_user guide_20170621.indd 3... -
Page 5: Introduction
Introduction Welcome to Gmate™ On Blood Glucose Monitoring System Thank you for purchasing the Gmate™ On Blood Glucose Monitoring System. Please read this User Guide thoroughly before operating the system as it provides important information on the proper use of the system. - Page 6 Introduction Features of Gmate™ On Blood Glucose Monitoring System Small, cutting-edge design with a convenient hand grip Transportable anywhere with your mobile device The meter does not require batteries nor prior settings The app is easy and intuitive use Sound support provides clear instructions and readings All test results automatically saved into your mobile device...
- Page 7 Introduction Intended Use The Gmate™ On Blood Glucose Monitoring System is intended for the following uses: Quantitative measurement of glucose in fresh capillary whole blood samples drawn from the fingertips, forearms, upperarms, hands, thighs, and calves as an aid in monitoring the effectiveness of diabetes management at home by patients with diabetes.
- Page 8 Introduction The Gmate™ On Blood Glucose Monitoring System is compatible with the following Android mobile devices: Samsung Galaxy S2, Galaxy S3, Galaxy S4, Galaxy S5, Galaxy Note, Galaxy Note 2, and Galaxy Note 3. The Gmate™ On Blood Glucose Monitoring System should not be used for the diagnosis or screening of diabetes.
-
Page 9: Precautionary Information
Precautionary Information For safety reasons, please read the following instruc- tions prior to using Gmate™On Blood Glucose Mon- itoring System. Do not use the Gmate™On Blood Glucose Monitoring System for any purposes other than testing your blood glucose level with fresh capillary whole blood. - Page 10 If you have received a Gmate™ meter with the glucose unit different from the method you use to measure your glucose levels, do not perform any tests, and contact your local Philosys distributor for assistance. 2017-08-03 �� 9:41:30 PM110-CE0-2105_Gmate On_user guide_20170621.indd 9...
-
Page 11: What's Inside
What’s Inside Contained in your package: 1. Gmate™ On Meter 2. Gmate™ Lancing Device 3. Gmate™ Lancets 4. Gmate™ Blood Glucose Test Strips 5. Carrying Case Documents in your package include this User Guide. 2017-08-03 �� 9:41:30 PM110-CE0-2105_Gmate On_user guide_20170621.indd 10... - Page 12 What’s Inside Note: Please call your local distributor if any items are missing. Gmate™ On Control Solutions are available separately. Mobile devices are not included. Gmate™ On Meter is compatible with Android 4.0 or higher version platform based mobile devices: Samsung Galaxy S2, Galaxy S3, Galaxy S4, Galaxy S5, Galaxy Note, Galaxy Note 2, and Galaxy Note 3.
-
Page 13: Identifying Parts And Functions
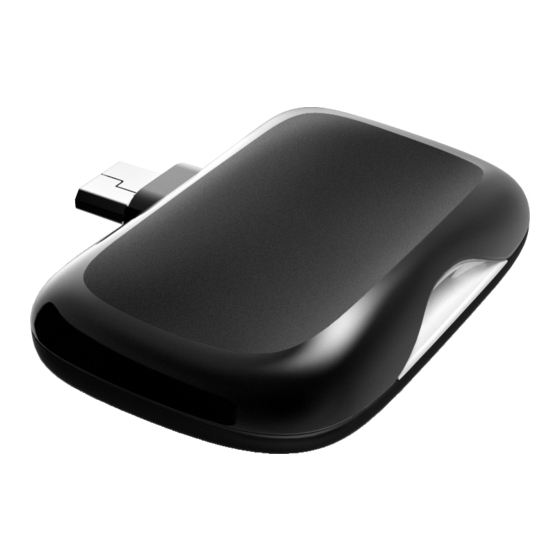
Identifying Parts & Functions Gmate™ On meter Test Strip Port Insert the end of a Gmate™ Test Strip here. Power Indicator Insert the test strip when the light flashes here. Micro USB Connector Plug this end to the USB jack of your mobile device. - Page 14 Identifying Parts & Functions Gmate™ Test Strip Test Strip Port Apply your blood sample on the edge of the absorbent. Hold the test strip with your fingers here. Electrodes The end of the test strip is inserted into the test strip port of the meter with the end facing up.
- Page 15 Identifying Parts & Functions Lancing Device Adjustable Clear AST cap Lancet holder Lancet ejector Release button Sliding barrel * Clear AST cap is an optional accessory. Please contact your local distributor for availability. 2017-08-03 �� 9:41:30 PM110-CE0-2105_Gmate On_user guide_20170621.indd 14...
- Page 16 Identifying Parts & Functions Lancet Lancet Cap Twist off here when placed in the lancet holder. * Lancet and Lancing Device are subject to change without notice. Test Principle Performing a test using Gmate™On Blood Glucose Monitoring System involves the measurement of electrical currents caused by the reaction of glucose with the reagent of the test strip.
-
Page 17: Running The App
Running the App Step 1 - Downloading the app From your Android mobile device, enter Play store by tapping Play Store icon. Type in “gmate on” in the search bar, locate the app, then download it. Step 2 - Installing the app Follow the instructions through the installation process. -
Page 18: Performing The Test
Performing the Test Step 1 - Preparing the app and the meter Start the app and plug your meter to the USB jack of your mobile device. When the meter’s power indicator is on, insert the test strip into the test strip port of the meter. - Page 19 Performing the Test Step 2 - Preparing the lancing device Wash your hands thoroughly with warm water to increase blood circulation into the fingers. Then dry your hands completely including your puncture site. Unscrew the lancing device cap. 2017-08-03 �� 9:41:31 PM110-CE0-2105_Gmate On_user guide_20170621.indd 18...
- Page 20 Performing the Test Insert a new sterile lancet into the lancet holder and fix it in firmly. Hold the lancet in one hand and twist off the protective cap with the other hand. Place the cap back on the lancing device. Cock the lancing device by drawing the sliding barrel.
- Page 21 Performing the Test Set your desired depth level by twisting the adjustable cap. The puncture will be deeper as the number increases. The smaller numbers are for shallower puncture that is more suitable for softer skin and deeper puncture is more suitable for thick- er or calloused skin.
- Page 22 Performing the Test Step 4 -Applying blood to the test strip Touch the end of the yellow absorbent gently to the edge of your blood drop. The yellow absorbent will automatically draw your blood. IMPORTANT The blood sample volume must be at least 0.5 2017-08-03 ��...
- Page 23 Performing the Test Step 5 - Reading the test result Along with the recognition sound, the display of your mobile device will show the progress bar for five seconds. Then your blood glucose result will be announced as it appears on the screen along with the date and time.
- Page 24 Performing the Test Tap “SAVE” button on the top right corner to save your customized test result. Step 7 - Removing and discarding used test strip and lancet Remove the test strip from the meter, and the lancet from the lancing device. Dispose of them in accordance with your local regulations.
- Page 25 Performing the Test IMPORTANT Repeat the test if your test result is displayed as one of the following: Below 50mg/dL(2.8mmol/L) Above 250mg/dL(13.9mmol/L) “LOW” “HIGH” If you continue to get unusual test results, call your healthcare professional. Check your system with control solution if you have purchased it with the system.
- Page 26 Performing the Test Range of expected test results Blood glucose levels will vary depending on food intake, medication dosage, health, level of stress, or exercise. Consult your healthcare professional for the target range that is appropriate for you. Following is the expected blood glucose level for a non-pregnant patient with diabetes: After fasting: Less than 110mg/dL (6.0mmol/L) Two hours after a meal: Less than 140mg/dL...
-
Page 27: Alternate Site Testing
Alternate Site Testing The Gmate™ On allows blood glucose testing using other regions of your body besides your fingertips. These parts are your hand, forearm, upper arm, thigh and calf. The purpose of this alternate site testing is to use your fingertips less to avoid calluses and pain from repeated lancing in the same spot. - Page 28 Alternate Site Testing Perform an AST in the following circumstances: two or more hours after meals physical exercises, or any other activities that may affect blood glucose levels two hours after a rapid-acting insulin injection or insulin pump bolus Avoid an AST under following situations: during or within two hours after a meal, physi- cal exercises or other activities that may affect blood glucose levels...
- Page 29 Alternate Site Testing Sampling Blood from Alternate Sites Unlike with fingertips, the method for sampling blood from alternate sites is different. After inserting a new ster- ile lancet firmly into the lancet carrier, place the clear AST cap on top. Hold the lancing device against the site you have chosen to lance.
-
Page 30: Control Solution Testing
Control Solution Testing The control solution is used to ensure your meter and test strips are working properly. It contains a known amount of glucose, and in this test, the control solution will replace the role of your blood sample. Control solutions are available to purchase separately. - Page 31 Control Solution Testing Performing the Control Solution Test Step 1 - Preparing the app and the meter Tap the Gmate™ On app to enter. (If not installed, please see page 16.) Plug your meter to the USB jack of your mobile device.
- Page 32 Control Solution Testing Step 3 - Reading control solution test result Along with the recognition sound, the display of your mobile device will show the progress bar for about five seconds. Then the control solution result will be announced as it appears on the screen along with the date and time.
- Page 33 Control Solution Testing Control Test Range 80- 120mg/dL Step 4 - Verifying the result Compare the result with the control solution range printed on the test strip vial. If the result is within range, your meter and test strips are proven to work properly.
- Page 34 Control Solution Testing Out-of-range results may occur due to following reasons: error in following the test steps not used the control solution level you intended expired or contaminated control solution expired or damaged test strip defective meter the test not performed within temperature range of 20°C to 25°C(68°F to 77°F) If you continue to get control solution results that do not fall within the range printed on the test strip vial,...
-
Page 35: Reviewing Past Results
Reviewing Past Results All test results are automatically saved in your mo- bile device along with the date and time. You can check your results from the app without connecting the meter to your mobile device. The test results are displayed as a list with the most recent result displayed on the top. - Page 36 Reviewing Past Results Above you can see how your test results will be listed, and what will show when you tap on one of the results. 2017-08-03 �� 9:41:32 PM110-CE0-2105_Gmate On_user guide_20170621.indd 35...
-
Page 37: Troubleshooting
Troubleshooting There is no response after you connect the meter to your mobile device. To do Probable cause The meter is not properly Connect the meter again connected to the mobile properly. Contact your local device. distributor if recognition fails again. The meter will not connect Remove the phone case to the mobile device with... - Page 38 Troubleshooting There is no response after the blood sam- ple is applied to the test strip. To do Probable cause The meter or test strips are Redo the test with a new defective. test strip. Contact your local distributor if it still does not work.
-
Page 39: Care And Maintenance
Care and Maintenance Keeping Your System Keep your meter, test strips, and control solu- tion in the carrying case after use. Store all parts of the system in a cool, dry place between 2 and 32ºC(36 and 90ºF). If your meter has been exposed to extreme temperatures, perform the test after you have kept it in room temperature for at least 20 minutes. - Page 40 Care and Maintenance Cleaning Your System Keeping your meter and lancing device clean is essential for avoiding malfunction (such as foreign objects contaminating the meter causing it to fail) and spreading of infection. Use soft cloth dampened with mild soap and water to wipe the exterior of your meter, lancing device and clear AST cap.
-
Page 41: System Specifications
System Specifications Clinical accuracy The Gmate™ System is calibrated to yield results equivalent to plasma glucose concentrations and is traceable to a NIST standard. The accuracy of the Gmate™ On System was assessed by comparing blood glucose results obtained by patients with those obtained using a YSI 2300 Glucose Analyzer. - Page 42 System Specifications Within run precision(100 venous blood tests per glucose level) Mean glucose Coefficient of Standard deviation variation (%) 48 mg/dL 2.0 mg/dL (2.7 mmol/L) (0.1 mmol/L) 93 mg/dL 3.4 mg/dL (5.2 mmol/L) (0.2 mmol/L) 137 mg/dL 4.4 mg/dL (0.2 mmol/L) (7.6 mmol/L) 240 mg/dL 6.4 mg/dL...
- Page 43 System Specifications Specifications (Gmate™ On Blood Glucose PG-110 Model Monitoring System) Electrochemical sensor Test Method Plasma equivalent Calibration Method Sample Whole blood capillary Sample Size 0.5 µL Test Time 5 seconds Memory No limit Resuit Range 10 - 600 mg/dL (0.6 - 33.3 mmol/L) Hematocrit Level 20 - 60% Operating...
-
Page 44: Meaning Of Symbols
Meaning of Symbols Meaning of Symbols Caution, see instructions for use Single use only Expiration date Serial number Lot number In Vitro Diagnostic medical device Manufacturer Authorised representative of European Community Symbol for temperature limitation Consult instructions for use Biological risks Contains sufficient for <n>... - Page 45 (EMC) as specified in IEC 61326-1 and IEC 61326-2-6. Warranty Philosys warrants that the Gmate™ On Meter alone should be free of defects in materials and workmanship under regular use without damage for a period of five years since the date of purchase.
- Page 46 PM110-CE0-2105_Gmate On_user guide_20170621.indd 45 2017-08-03 �� 9:41:33...
- Page 47 Gmate On User guide size : 65x115mm (펼침면130x115mm) 총4도 CMYK 무선제본 표지 : 아트지150 속지 : 모조지 (미색)70 코팅 : 없음 연구개발본부 정은지 2017.06.20 PM110-CE0-2105_Gmate On_user guide_20170621.indd 46 2017-08-03 �� 9:41:33...
Need help?
Do you have a question about the Gmate On and is the answer not in the manual?
Questions and answers