Advertisement
Quick Links
Instructions
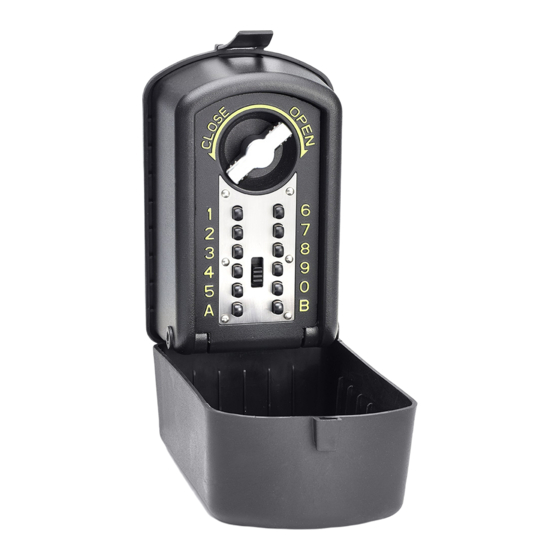
OPENING YOUR KEYGUARD
XL FOR THE FIRST TIME.
• Remove unit from the box and place it
on its back
• Pull the rubber cover open
• Make sure that the dial is in the vertical
position
• Press and slide the 'clear' button (the
ridged black button pictured below)
down. Release the clear button.
• Turn the dial clockwise 360 degrees,
until it clicks
• Pull the door open
SETTING YOUR CODE.
• With the door open, turn the dial anti-
clockwise, until it clicks. Make sure the
locking bar is in the locked position
• Stand the Keyguard XL upright,
keeping the door open
• Using a screwdriver, remove the
central screw securing the black plastic
plate
• Choose a personal code which must
be between 3 and 8 digits. NOTE: You
may only use each number/letter once
• Using a flathead screwdriver, rotate
each button in your code 180 degrees,
so that the arrow on each one faces the
SET position
• Re-secure the black plastic plate with
the small screw, make sure you leave the
door open to check your code
CHECKING YOUR CODE.
• With the door still open, make sure
the Keyguard XL is locked by rotating
the dial anti-clockwise 360 degrees, until
it clicks
• Make sure the dial is in the vertical
position
• Press and slide the clear button down
and then release the button
• Use the keypad to input your chosen
code
• Turn the dial clockwise until it clicks
• If it opens, Keyguard XL is ready to use
CHANGING YOUR CODE.
• Open your Keyguard XL as normal
• Remove the screw securing the black
plastic plate with a small flat-headed
screwdriver
• You will need to turn the disk of each
number in your previous code until the
arrow faces the NOT SET position
• You can now repeat all of the steps in
the section marked 'SETTING YOUR
CODE' and 'CHECKING YOUR CODE'
OPENING YOUR KEYGUARD
NORMALLY.
• Ensure that the dial is in the vertical
position (shown in the image below)
• Enter your code
• If you enter your code wrong, press
and slide the clear button down and then
release the button. You can now re-type
your code
• Rotate the dial clockwise 360 degrees,
until it clicks
• Pull the door open
LOCKING YOUR KEYGUARD
NORMALLY.
• Close the door and lock it by turning
the dial anti-clockwaise 360 degrees. It
should click at least once
• Ensure that it has locked properly by
turning the dial clockwise 360 degrees
until it clicks. Try and open the door, if it
does not open your Keyguard XL is now
fully secure
• Close the lid of the rubber cover
TROUBLE SHOOTING.
• The dial must be in the vertical
position to use the code buttons
• If your code hasn't worked, ensure you
press the 'CLEAR' button before
entering the code again
• Ensure that the arrow on the dial of
each button is in the SET positon when
setting your code
• Ensure that all numbers not in your
code have their dials facing the NOT SET
positon
• Ensure that the black plastic plate is
properly and securely refastened
• You may find that when you turn the
dial you feel some resistance, do not
worry, this is normal.
25/02/2019 V.1 Page 1 of 2
Advertisement

Related Manuals for Burtonsafes Keyguard XL Digital


Summary of Contents for Burtonsafes Keyguard XL Digital
- Page 1 • Choose a personal code which must OPENING YOUR KEYGUARD be between 3 and 8 digits. NOTE: You NORMALLY. may only use each number/letter once • Ensure that the dial is in the vertical • Using a flathead screwdriver, rotate Instructions position (shown in the image below) each button in your code 180 degrees,...
- Page 2 FITTING YOUR KEYGUARD. TROUBLESHOOTING. To fit your Keyguard XL you will need • Once the fitting is complete if the door the following tools: closes but does not lock, test locking it • Power Drill when the door is in the open positon. If •...