
Subscribe to Our Youtube Channel
Related Manuals for VITACLAY VM7900-6


Summary of Contents for VITACLAY VM7900-6
- Page 1 ® VitaClay Smart Organic Multi-Cooker Operating and Care Instructions For models VM7900-6 & VM7900-8 READ ALL INSTRUCTIONS BEFORE INITIAL USE HOUSEHOLD USE ONLY © 2008 Essenergy, Inc. All rights reserved...
- Page 2 Enjoy! Clay is the most traditional cooking material there is, used in every culture for thousands of years. At VitaClay, we care about your health and the health of the environment. That’s why we set out to create cookware that not only...
-
Page 3: Table Of Contents
Table of Contents Important Safety Information ..........3 Grounding Information and Instructions ......6 Caring for your Clay Pot ............7 Parts and Assembly Illustration ........... 9 How to read your Control Panel Display ......10 Let’s Get Started! ............. 11 Smart Organic Multi-Cooker Basics ...... -
Page 4: Important Safety Information
Important Safety Information When using your VitaClay Smart Organic Multi-Cooker or ® any electrical appliances, basic electrical precautions should always be followed to reduce the risk of fire, electric shock and injury, including but not limited to the following: Read all instructions before using your Smart Organic Multi-Cooker. - Page 5 • Do NOT immerse the heating unit of the appliance in water or any other liquid. To prevent electrical shock, Do NOT place the cord, plug or cooking unit near water or other liquids. Keep power cord plug and socket dry and clean.
- Page 6 becomes very hot. Do NOT put your face near the steam cap, as scalding or burning can occur; Do NOT place any object that is heat sensitive close to, nearby or above the Cooker; Do NOT use a cloth to cover the steam cap, as this may damage the Cooker.
-
Page 7: Grounding Information And Instructions
Grounding Information and Instructions This appliance must be grounded. It is equipped with a 3-wire detachable cord with grounded plug. The plug must be plugged into an outlet that is properly installed and grounded. WARNING: Improper use of the grounded wire can result in a risk of electric shock. -
Page 8: Caring For Your Clay Pot
Caring for your Clay Pot Unglazed natural clay promotes health by preserving all essential nutrients and vitamins in your foods. It creates excellent texture and intensifies flavors of food. In order to preserve the quality and lifespan of your clay pot, here are a few helpful tips and instructions to follow: •... - Page 9 cord, allowing the Cooker to cool down naturally. During cooling, DO NOT add water or remove your pot from the Cooker Housing. o DO NOT cook easy to burn foods like milk, cheese, tomatoes, instant or quick oatmeal without enough liquid or for too long. Use the proper settings, see the Cooking Chart for details.
-
Page 10: Parts And Assembly Illustration
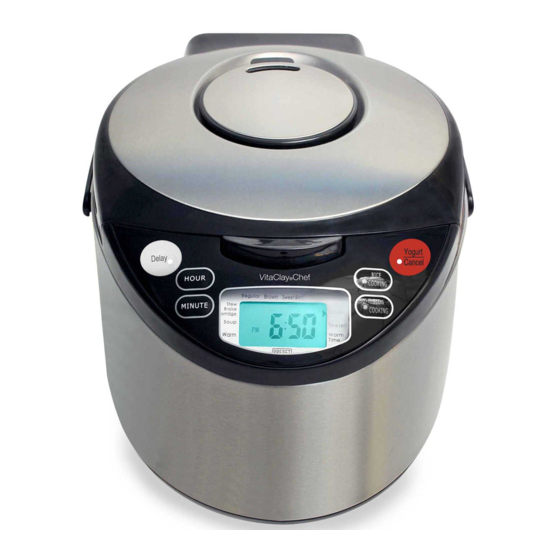
Parts and Assembly Illustration Key to Parts (1) Cooker Cover (2) Steam Cap (3) Clay Lid (4) Clay Pot (5) Control Panel, see below (6) Handle (7) Main Housing (8) Power Cord (9) Measuring Cup (10) Rice Spoon (11) Stainless Metal Hook (not shown, for lifting the hot clay lid off the clay pot) -
Page 11: How To Read Your Control Panel Display
How to read your Control Panel Display (1) “Delay” Start Key – Function key to turn on delay start mode. Function is on when Indicator Light glows red. (2) “Hour” & “Minute” Timer Keys – Use for setting Soup, Stew and Yogurt mode cooking time, and Delay Start time. -
Page 12: Let's Get Started
Let’s Get Started! Remove all packaging from your VitaClay Smart Organic ® Multi-Cooker and its accessories prior to use. Make sure all parts are accounted for (see Parts & Assembly Illustration), undamaged and free of debris. IMPORTANT: CLEAN UNIT THOROUGHLY BEFORE FIRST USE: •... - Page 13 The minimum food and liquid volume should be ¼ of the pot. DO NOT dry heat, fry or cook ANY foods dry -- without liquid in pot. Dry heating can shorten the life of the clay pot and Cooker. DO NOT dry heat to bake or to stir fry foods.
-
Page 14: How To Use Your Function Keys
See Tips, Shortcuts & FAQ section for additional guidance. Use the “VitaClay Cooking Charts for VM7900 & VF7700” for first-time cooking. After that, reduce or add liquid amount and cooking time as needed based on your results and preferences. - Page 15 Slow Cooking Key (#6 on diagram) • Press the “Slow Cooking” key to select one of the 3 Slow Cooking modes: “stew”, “soup” or “yogurt”. The black indicator arrow will show which mode is active. Start/Cancel Key (#4 on diagram) •...
-
Page 16: How To Choose A Cooking Mode
How to set the Delay Start Timer • Press the desired cooking mode using the “Rice Cooking” or “Slow Cooking” function keys. If “Slow Cooking” set cooking time using the “Hour” and “Minute” Timer keys. (Rice cooking times are pre- programmed.) •... -
Page 17: How To Cook With Each Mode
• Yogurt mode is for home-made yogurt. For a detailed quick reference guide consult the “VitaClay Cooking Charts for VM7900 & VF7700” that come with your Cooker. How to cook with each Mode Regular, Brown &... -
Page 18: Rice Or Grain To Water Ratios
Rice or grain to water ratios Rice and grains are natural products and the amount of water needed for cooking will depend on the age and size of the product as well as personal taste. The following ratios are suggested and based on rinsed rice*. Ratio of Water, Type of... -
Page 19: Rinsing The Rice
Rinsing the rice To make great rice, we highly recommend that you rinse the plain raw rice before cooking. Simply place desired amount of rice in a strainer or bowl and rinse under water, stirring with your hand, until the water runs clear. Note: if you are using a flavored or enriched rice product, or the package instructions specifically state not to rinse the rice, you should skip this step. - Page 20 the regular mode -- less time is needed for small amounts and more time for larger amounts. “1:00” on the clock and the indicator arrow on the right side will be positioned at “time left” if the brown mode was selected. This means your Cooker will cook for approximately 60 minutes in the brown mode -- less time is needed for small amounts and more time for larger amounts.
-
Page 21: Basic Grain Cooking Directions
Note: If you plan to hold the rice in the Warm mode for longer than 1 hour, add an extra ¼ cup of liquid at the beginning of cooking. How to set a Delayed Start for Rice Cooking You simply need to add 2 steps to delay the start of the cooking time: •... -
Page 22: A General Guide To Flavoring Rice And Grains
• For all of the above, after the cooking cycle is complete, allow to rest in the Warm mode for 10-20 minutes before serving. How to use the Reheat mode for cold rice Previously cooked rice can be reheated in the Cooker. If the clay pot has been in the refrigerator, be sure to allow it to return to room temperature. -
Page 23: One-Pot Rice Or Grain Meal
Let simmer until cooking cycle completes. You may let your food continue to simmer in the Warm mode for additional 10-20 minutes or until your fish is cooked through. Note: See the “VitaClay Cooking Charts for VM7900 & VF7700” for additional guidance. Slow Cooking Modes VitaClay Cookers preserves nutrients allowing food to cook in its natural juices. -
Page 24: Basic Soup Or Stew Cooking Directions
It is highly recommended that you refer to the recipe booklet provided for the first few recipes you make in the Slow Cooking mode. See also the “VitaClay Cooking Charts for VM7900 & VF7700” that came with the Cooker for guidance on ingredient proportions. -
Page 25: How To Delay Start For Slow Cooking
o Press the “Hour” key to set cooking time from 1 to 4 hours. o Press the “Minute” key to set cooking time in 10- minute increments from 10-50 minutes. • Press the “Start/Cancel” key to start the soup or stew cooking mode. -
Page 26: A General Guide To Soups, Broths And Porridge
A general guide to Soups, Broths and Porridge All are best made in the soup mode. Please refer to the recipe booklet and the “VitaClay Cooking Charts for VM7900 & VF7700” that came with the Cooker. Additionally, here are some basic guidelines: •... - Page 27 less water and to check at 30-minute intervals. Lastly, it is a myth that salt will make your beans and lentils tough. Salt them at the beginning of cooking to ensure they obtain a full, rich flavor. Note: Remember to allow time for pre-soaking the beans for up to 12 hours and lentils for up to 4 hours.
-
Page 28: Cooking Oatmeal
Use the “VitaClay Cooking Charts for VM7900 & VF7700” for first-time cooking. After that, reduce or add liquid amount and cooking time as needed based on your results and preferences. -
Page 29: Steaming Fish
depends on the amount of food and size of the pieces. o Broccoli, cauliflower and firmer vegetables will take a little longer. Whole potatoes, yams or whole beets will take about 1 hour and if chopped approximately 30 minutes. A general guide to Steaming Fish •... -
Page 30: Yogurt Cooking Mode
Use the “VitaClay Cooking Charts for VM7900 & VF7700” for first-time cooking. After that, reduce or add liquid amount and cooking time as needed based on your results and preferences. Yogurt Cooking Mode Basic Yogurt Cooking Directions • Place at least 48 oz (6 cups) of fresh milk into a... - Page 31 outlet. The Cooker will beep and “Start/Cancel” indicator light will start blinking. • Use the “Slow Cooking” key to select the yogurt cooking mode. The black indicator arrow on the LCD display will show which mode is active. • The LCD display will show “8:00” as the default setting;...
- Page 32 • Once the yogurt is done, dispense the yogurt into your own containers or leave in the clay pot to refrigerate at least 4 hours before using. The yogurt will thicken as it cools. • Store in the refrigerator and enjoy within 7 days. NOTE: You cannot change the cooking time once the Cooker enters a cooking mode.
- Page 33 Check out this video: https://www.everythingkitchens.com/how-to-make-yogurt- at-home-vitaclay.html# How to choose a culture and how much to use • Culture may either be purchased freeze-dried or you can use plain yogurt with live cultures from the store or a previous homemade batch. The type of culture, the amount of time you give it to culture the milk and even the temperature all affect the end result.
- Page 34 • Consider bringing the milk to a full boil (212ºF, 100ºC) instead of 180 ºF which will also create a thicker yogurt. • For an even thick yogurt or to make yogurt cheese, drain the yogurt in cheesecloth. How to make flavored yogurt The yogurt can be flavored with jam, jelly, honey or fresh fruit.
-
Page 35: Care, Cleaning And Proper Maintenance
Care, Cleaning and Proper Maintenance The Clay Pot and Lid • Like any ceramic material, the removable clay pot will be damaged by sudden temperature changes. • For general washing, wait until the clay pot cools. Then wash it in warm water with a very small amount of dishwashing liquid and rinse thoroughly. - Page 36 holes of the clay lid or around the lip of the lid. To clean, remove any residue from the venting holes and wash with warm water. • Store your Cooker in a dry and clean environment. The Outside of the Cooker Housing •...
-
Page 37: Tips, Shortcuts & Faq
Tips, Shortcuts & Frequently Asked Questions • Please note: For cooking in VitaClay Cookers there must be liquid (water or clear broth) present at all times. No "dry cooking" should be done in any VitaClay pot. Please ensure adequate liquids throughout the cooking cycle, as burning or "going... - Page 38 • How can I start the cooking in the morning to have dinner ready when I get home? This VitaClay Cooker cooks at a rate 4 times faster than a conventional slow cooker. Once the cooking is complete, the Cooker will automatically switch to the Warm for up to 12 hours.
- Page 39 LIMITED ONE-YEAR WARRANTY To register your new product: Go online to vitaclaychef.com scroll down to the bottom of the homepage, under the center “Support” column, click on “Product Registration” Essenergy, Inc. (“Essenergy”) warrants this Product against defects in material or workmanship for a period of one (1) year from the date of original purchase, when utilized for normal household use.
-
Page 40: Warranty
PLEASE REGISTER YOUR PRODUCT WITHIN 10 DAYS OF PURCHASE. Product must be registered in order to claim warranty service. Please visit www.VitaClayChef.com to register your product. This warranty is invalid if the factory applied serial number or production date has been altered or removed from the Product. - Page 41 Visit vitaclaychef.com for recipes, cooking charts & more! Check us out on: YouTube at VitaClayChef Instagram at vitaclay Or join our Facebook family at VitaClay Chef Essenergy, Inc. www.VitaClayChef.com Made in China Revision: 01/2020...
Need help?
Do you have a question about the VM7900-6 and is the answer not in the manual?
Questions and answers