Table of Contents
Advertisement
Quick Links
Advertisement
Table of Contents

Related Manuals for Inngenso IT101


Summary of Contents for Inngenso IT101
- Page 1 Thermostat Manual...
-
Page 3: Important Notes
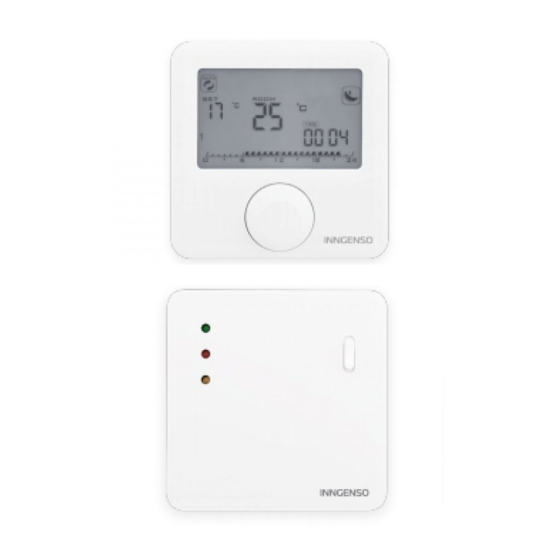
WIRELESS DIGITAL THERMOSTAT IT 101 The IT 101 thermostat is designed to control heating systems. Unlike standard home thermostats, the IT 101 has two separate and wirelessly connected units (thermostat + receiver). The receiver is a switching device used to connect heating systems, and a thermostat is a portable control unit for handling and setting the temperature. -
Page 4: Specifications
Specifications Thermostat Power supply 3 V DC, 2 AA batteries Mounting Wall or portable Schedule 7 days Manual control Full Frost protection 0.5 °C Sensitivity Hysteresis setting 0.2 °C – 5 °C Temperature setting 5 °C – 35 °C Temperature measurement 5 °C –... - Page 5 Safety Risks due to poor handling Due to poor handling, you can harm yourself and cause material damage. • Read the accompanying instructions carefully, especially the chapter on safety and important notes. Danger of malfunctioning • Ensure that the air in the room can circulate freely around the thermostat and that the thermostat is not covered by furniture, curtains and other objects.
- Page 6 In both cases the heating turns off. The communication might be lost due to old batteries in the thermostat or because the thermostat is too far away from the receiver. Keep in mind the connection status (light signal) of the receiver and the thermostat.
- Page 7 Intended use includes: • Following the enclosed instructions for use, installation and maintenance of the device, as well as all other system components. • Compliance with all inspection and maintenance requirements stated in the instructions. Use that is different from the one described in this manual or use that goes beyond the scope of the use described here will be considered as non-intended.
- Page 8 Overview of command elements Room thermostat 1 – Display 2 – Rotary push button (increase/ decrease value or confirm selection) 3 – Side button: backlight, thermostat on/off button, step back Receiver 1 – Receiver ON/OFF Switch 2 – Green light signal (Receiver turned ON) 3 –...
-
Page 9: Display Description
Display description Description of the basic display Heating state Working mode temperature Eco/Comfort temperature Current temperature Time Program Description of the settings display Weekly program Frost protection Eco/Comfort temperature Advanced settings Time setting... - Page 10 Thermostat ON/OFF When the thermostat is off, it extends the battery life. 1. Long press the turn ON/OFF button (on the right) (3-4 seconds). 2. The thermostat is successfully turned ON or OFF. Please note that by turning the thermostat off, only the display is turned off.
-
Page 11: Setting The Working Mode
Setting the working mode Program mode 1. Press and hold the rotary push button for one second. 2. The upper left end of the screen shows the symbol 3. PROGRAM MODE successfully activated. Program mode is active... -
Page 12: Manual Mode
Manual mode 1. Press and hold the rotary push button for one second. 2. The upper left end of the screen shows the symbol 3. MANUAL MODE successfully activated. Manual mode is active... -
Page 13: Setting The Time
Setting the time 1. Open the settings display. 2. Rotate the rotary push button, select the time symbol, and briefly press the rotary push button to enter the clock setting. 3. Rotate the rotary push button, set the current MINUTE, and briefly press the rotary push button. - Page 14 Set temperature setting Set temperature can only be set in manual mode. 1. Rotate the rotary push button to set the desired temperature. 2. Rotating clockwise increases the set temperature. 3. Rotating counterclockwise decreases the set temperature. Setting the economic temperature 1.
-
Page 15: Setting The Comfort Temperature
Setting the comfort temperature 1. Open the settings display. 2. Rotate the rotary push button, select the symbol and press the rotary push button to enter the comfort temperature setting. 3. Rotate the rotary push button and set the desired temperature. 4. -
Page 16: Setting The Weekly Program
Setting the weekly program Program can be set for each day in a week separately. During one day for every half an hour economic temperature is being set. Comfort temperature is set by default in other half-hour intervals. 1. Open the settings display. 2. - Page 17 Overview of screens for setting the weekly program...
-
Page 18: Frost Protection
Frost protection 1. Open the settings display. 2. Rotate the rotary push button and select the frost protection symbol 3. Hold down the rotary push button for 5 - 7 seconds. 4. Release the rotary push button when only the symbol is displayed on the screen. -
Page 19: Advanced Settings
Advanced settings Advanced settings menu consists of three functions: Factory reset, Hysteresis and Temperature sensor calibration. To enter the advanced settings, follow the next steps: 1. Open the settings display. 2. Rotate the rotary push button and select the advanced settings. 3. - Page 20 Setting the hysteresis Hysteresis is the value for which the current temperature must be lower than the set temperature in order to switch the heating on. 1. Open the advanced settings display. 2. Select the symbol HI. 3. Rotate the rotary push button and set the desired value between 0.2 °C and 5 °C.
- Page 21 Factory reset Factory reset sets all values to their initial state. 1. Open the advanced settings display. 2. Select the symbol FR. 3. Hold down the rotary push button 4. Release the rotary push button when all the symbols are displayed. 5.
-
Page 22: Temperature Sensor Calibration
Temperature sensor calibration Temperature sensor calibration adjusts the temperature measured on the thermostat with the device in the room that already has its temperature sensor. 1. Open the advanced settings display. 2. Select the symbol tE. 3. Rotate the rotary push button and set the desired value between 0.2 °C and 5 °C. -
Page 23: Battery Replacement
Battery replacement If the battery symbol appears on the screen, change the batteries: 1. Remove the thermostat from the thermostat mount. 2. Replace the batteries with two Alkaline AA 1.5V batteries. 3. Place the thermostat on the thermostat mount. 4. Set TIME by following the manual: SETTING TIME. - Page 24 Interference detection and correction Conditions: The room thermostat display is off • Make sure the thermostat is on. • Check that the room thermostat batteries are properly inserted into the battery compartment. • Check the correct polarity of the batteries. •...
-
Page 25: Handling And Maintenance
Handling and maintenance The device is designed to operate reliably for many years with appropriate handling. Here are some tips to handle it properly: 1. Before using the product, read the manual carefully. 2. Do not expose the product to the direct sunlight, extreme cold and humidity, and sudden changes in temperature. - Page 26 have been instructed by that person to use the product. Children should be supervised to ensure that they do not play with the device. Do not dispose the device or batteries at the end of their lifetime as unsorted municipal waste; use waste collection centers. By properly disposing the waste, you will avoid a negative impact on human health and the environment.
- Page 28 Innentech GmbH Gubelstrasse 19 6300 Zug Switzerland...
Need help?
Do you have a question about the IT101 and is the answer not in the manual?
Questions and answers