Table of Contents
Advertisement
Quick Links
MPM-4M
Particle Measurement Unit
Original Operating Instructions
BA314001-en
Fehler! Verwenden Sie die Registerkarte 'Start', um Name dem Text zuzuweisen, der hier angezeigt
werden soll.Fehler! Verwenden Sie die Registerkarte 'Start', um Name dem Text zuzuweisen, der hier
angezeigt werden soll.Fehler! Verwenden Sie die Registerkarte 'Start', um Name dem Text
zuzuweisen, der hier angezeigt werden soll.
Advertisement
Table of Contents

Summary of Contents for MAHA Maschinenbau Haldenwang MPM-4M
- Page 1 MPM-4M Particle Measurement Unit Original Operating Instructions BA314001-en Fehler! Verwenden Sie die Registerkarte 'Start', um Name dem Text zuzuweisen, der hier angezeigt werden soll.Fehler! Verwenden Sie die Registerkarte 'Start', um Name dem Text zuzuweisen, der hier angezeigt werden soll.Fehler! Verwenden Sie die Registerkarte 'Start', um Name dem Text...
-
Page 2: Table Of Contents
Contents Safety ........................3 Introduction ............................3 Symbols ..............................3 Intended Use ............................3 Safety Instructions for Operation ......................3 Safety Instructions for Servicing ......................4 Description ......................4 ... -
Page 3: Safety
Safety Introduction Thoroughly read this manual before operating the equipment and comply with the instructions. Always display the manual in a conspicuous location. Personal injury and property damage incurred due to non-compliance with these safety instructions are not covered by the product liability regulations. Symbols Important safety instructions. -
Page 4: Safety Instructions For Servicing
The MPM-4M design ensures that both the laser and the detector are not only readily acces- sible, but importantly are also positively and repeatably aligned upon re-insertion, without affec- ting the instrument calibration. - Page 5 Designed specifically for operation in the harsh environments typically associated with mobile and stationary diesel engines, the instrument incorporates a number of features that enhance its usefulness in "real-world" situations, including: Simple “one button“ operation rugged construction for on-site applications ...
-
Page 6: Initial Operation
Initial Operation Unpacking The MPM-4M instrument and its accessories are shipped from the factory in a single box. The box contents are as follows: MPM-4M instrument high-temperature sample hose sample probe 12 volt power supply (100 -- 240 V, 50/60 Hz) ... -
Page 7: Sample In
Sample In If not already in place, install the supplied 6mm barbed hose fitting on to the threaded hole in the black casing of the water trap (the water trap is the clear bowl assembly on the left side of the rear panel –... -
Page 8: Remote Control (Optional)
Fig. 3: Analog Connections on Rear Panel The output voltages and their values in particle mass concentration (mg/m ) are as follows: 0-25 mg/m 1.0mV = 0.01 mg/m Low Range: 0-800 mg/m 1.0mV = 0.2 mg/m High Range: The voltage versus particle concentration output is linear, as shown on the following charts. Test data in these charts was generated by recording output voltage corresponding to the values displayed on the screen (which accounts for some minor deviations due to continuous minor fluctuations in PM sample concentration). -
Page 9: Operation
Operation Warm up To prepare the instrument for testing, connect a regulated 12V DC supply its connector on the rear panel and turn on the power to switch. Alternatively the instrument may be operated from the integral rechargeable battery. As well as identifying the instrument and its software version, it also provides a warm-up count from 600 down to zero seconds (duration 10 minutes) before automatically switching to normal operating mode with... -
Page 10: Test Selection
Test Selection The MPM 4M is pre-programmed to lead the operator through one of two standardised test procedures; either a stall test for vehicles and plant with a torque converter, and a free acceleration test for other types of equipment, such as vehicles with a manual clutch. This screen appears automatically after the instrument has been zeroed. -
Page 11: Stall Test
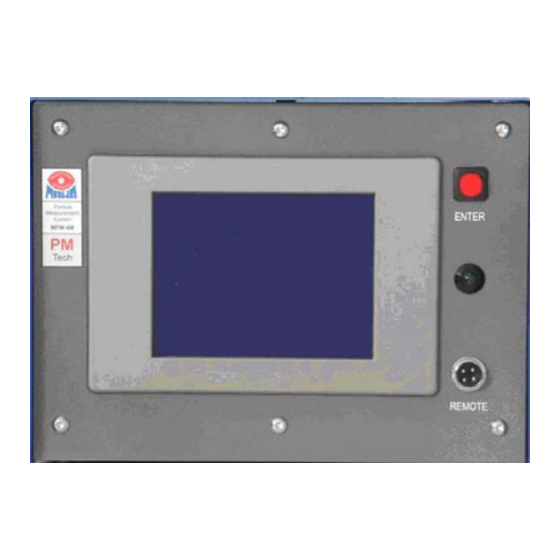
With the test operator at the controls, check for clear line of sight to the MPM-4M screen. When ready, press the ENTER push button. The green LED on the front panel will illuminate... -
Page 12: Free Acceleration Test
If it is desired to store the test data directly on a computer connected to the RS232 port on the MPM-4M, use the supplied “MPM-View” to generate a real-time graph of the PM concentration profile over the complete test, and record the second-by-second test data in an EXCEL compatible file. - Page 13 With the test operator at the controls, check for clear line of sight to the MPM-4M screen. When ready, press the ENTER push button. The green LED on the front panel will illuminate...
- Page 14 Full Power Idle Full Power Idle (12 seconds) BA314001-en...
-
Page 15: Continuous Measurement
(see separate user manual). To initiate the continuous measuring mode, turn the MPM-4M OFF, then, while holding down the ENTER button, switch the MPM-4M back ON. The screen will then prompt you to release the ENTER button. After setting the probe in the tailpipe of the equipment under test, press ENTER once again and continuous measurement will commence, after a 5 second countdown. -
Page 16: Calibration
Calibration The analyzer has been factory calibrated to deliver a linear output directly proportional to the concentration of PM. Given the linearity of response, a simple "Zero and Span" check provides an excellent and rapid confirmation of calibration status. The supplied calibration generates the span response. - Page 17 6 If it is determined that the span value has drifted, remove the top panel of the instrument case. Carefully remove the Detector Head and clean the lens, using the same general procedures as for the calibration plug. When replacing the detector head, ensure that the painted dot on the detector flange is oriented to be adjacent to the dot on the measuring chamber.
-
Page 18: Maintenance
Maintenance Apart from routine zeroing and occasional range calibration, the instrument requires very little maintenance. The only consumable items are the high-efficiency HEPA filters (internal and external) used, respectively, to clean the airflow protecting the optical system lenses and to remove particles from the sample stream before discharging to atmosphere. -
Page 19: Checking And Replacing The Internal Filter
Fig. 9: Internal Filter Orientation Disposal If you want to dispose of the equipment, please contact your MAHA dealer or the following address, indicating equipment type, date of purchase and serial number: MAHA Maschinenbau Haldenwang GmbH & Co. KG Hoyen 20 87490 Haldenwang Germany... -
Page 20: Annex
Annex MDG 29 Test Procedures (Extract) The following text is an extract from the MDG 29 document (full title “Guideline for the management of diesel engine pollutants in underground environments”). The complete document can be downloaded from: http://www.dpi.nsw.gov.au/__data/assets/pdf_file/0018/225513/MDG-29-Guideline-for-the- management-of-diesel-engine-pollutants-in-underground-environments.pdf 6.3.2 Procedures for Monitoring Raw Diesel Particulate Emissions 6.3.2.1 Standard Method All diesel particulate testing shall be carried out using the following method unless the diesel engine cannot be held in the load condition for 20 seconds in which case testing shall be carried... - Page 21 Stop sampling timer on analyser. m The total sampling time is 60 seconds. The sampling must pick up rise and decay of the engine from idle to full throttle and return to idle. n Remove the probe if no further testing is required. o Record the mean (average) engine exhaust diesel particulate concentration in (mg/m Figure 1 –...
- Page 22 3 Engines with a constant load, such as a diesel generator or pump should be analysed with the load applied over the full 60 seconds. Start sampling timer on analyser. Continue to idle until timer indicates 8 seconds. k Have an operator quickly apply full throttle, hold until timer indicates 16 seconds and quickly release throttle.
-
Page 23: Company Information
Company Information © MAHA Maschinenbau Haldenwang GmbH & Co. KG Legal notice based on ISO 16016: The reproduction, distribution and utilization of this document as well as the communication of its contents to others without explicit authorization is prohibited. Offenders will be held liable for the payment of damages.
Need help?
Do you have a question about the MPM-4M and is the answer not in the manual?
Questions and answers