
Summary of Contents for WesAudio ngLEVELER
- Page 1 WESAUDIO 4/10/20 NGLEVELER USER MANUAL REV2 www.WesAudio.com ngLEVELER User manual Copyright 2020 by WesAudio...
- Page 2 WESAUDIO 4/10/20 NGLEVELER USER MANUAL REV2 Thank You for the purchase of ngLEVELER ngLEVELER Next generation 16-channel automation system With kind regards Radoslaw Wesolowski and Michal Weglicki...
- Page 3 NGLEVELER USER MANUAL REV2 Next Generation 16-channel automation system ngLEVELER – “Next generation Leveler” is analog automation system with convenient features for better studio integration. Besides its automation engine it also brings analog saturation per each channel which helps tracks to get more presence in the mix.
-
Page 4: Table Of Contents
7.1.1. Plug-in management panel ......................... 27 7.1.2. Plug-in channel description ........................ 29 7.1.3. Plug-in – automation of linked channels .................... 30 7.2. Third party controllers ..........................31 7.2.1. ngLEVELER management via HUI or Mackie Control third party controller ........32... - Page 5 WESAUDIO 4/10/20 NGLEVELER USER MANUAL REV2 7.2.1.1. Configuration ......................... 33 7.2.2. ngLEVELER and DAW management via HUI/Mackie control third party controller ......34 7.2.2.1. Configuration ......................... 34 7.2.2.2. DAW Toggle ........................... 38 7.2.3. ngLEVELER management via EUCON controller ................. 39 7.2.3.1.
- Page 6 WESAUDIO 4/10/20 NGLEVELER USER MANUAL REV2 Warranty ..............................64 History ..............................65...
-
Page 7: Overview
WESAUDIO 4/10/20 NGLEVELER USER MANUAL REV2 1. Overview ngLEVELER is an Automation system with full digital recall: MAIN FEATURES: 16 channels of analog automation with total recall +25 dBu (IN) / +28 dBu (OUT) of headroom 6dB passive attenuator (PAD) for better integration with high level signals Very low noise and distortion –... -
Page 8: Specification
WESAUDIO 4/10/20 NGLEVELER USER MANUAL REV2 2. Specification Short specification summary: 1U device, depth : 262mm Warranty: 2 years THD+N(20Hz-20kHz) at 0dBu < 0.008% Freq response: 0-250kHz (-3dB) Input impedance > 10kohm Output impedance < 50ohm ... -
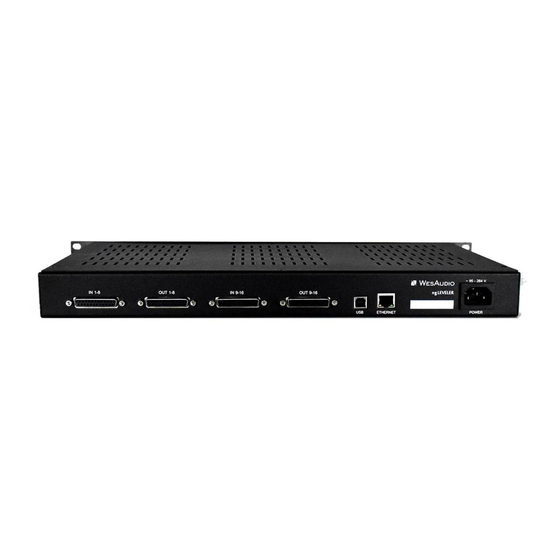
Page 9: Front Panel
5) IN metering – signal level for each channel measured after PAD, however before ngLEVELER main circuit (Leveling, THD, Solo, Mute). 6) OUT metering – signal level for each channel measured after ngLEVELER main circuit. 7) IN 1-8 DB-25 socket - input to channels 1-8. -
Page 10: Software Installation
If this is FIRST installation, please unplug all WesAudio devices from your workstation. When USB driver will be installed, application will inform that all devices should be connected –... -
Page 11: Troubleshooting
4.1.3. Troubleshooting If anything would fail during installation procedure please contact our support at support@wesaudio.com. We will get back to you as soon as possible. Below you can find some symptoms and description which will help to investigate the issue: “Can’t find my device on plugin drop down menu”... -
Page 12: Gcon Manager
WESAUDIO 4/10/20 NGLEVELER USER MANUAL REV2 GCon Manager 4.2. GCon Manager is generic application which implements configuration management over compatible units. It can be found in Application folder data: - For OSX: “/Applications/WesAudio/GConManager” - For WINDOWS: folder specified during installation phase, by default in: “c:/Program Files x86/WesAudio/GConManager.exe”. -
Page 13: How To Perform Firmware Upgrade
WESAUDIO 4/10/20 NGLEVELER USER MANUAL REV2 4.2.2. How to perform firmware upgrade. To perform firmware upgrade go to GConManager upgrade and hit “Start” button. This will trigger upgrade operation for all modules which are not up to date with your... -
Page 14: Set Up Gcon Connection
This chapter goes through possible setups and describes main configuration steps. Please note that audio signal connectivity is described in next chapter Signal connection, this chapter describes digital management side. In general ngLEVELER implements two connection types: USB 2.0+. ... -
Page 15: Usb
WESAUDIO 4/10/20 NGLEVELER USER MANUAL REV2 5.1. To connect your ngLEVELER frame directly to your workstation, just connect it to any available USB 2.0+ socket via USB cable. -
Page 16: Ethernet
Or directly connected to your workstation. In some cases it is mandatory to set IP addresses* for your workstation and ngLEVELER. Below you can find possible setup in your local area network, and how different devices can access ngLEVELER resources:... -
Page 17: Default Network Configuration
NGLEVELER USER MANUAL REV2 5.2.1. Default network configuration. Each ngLEVELER chassis by default has DHCP enabled. So if you would like to connect your ngLEVELER to your router, just do it! …However if you would like to change that configuration, please read description... -
Page 18: Enable/Disable Dhcp
2) Start GConManager and go to _CONFIG application. 3) Then select your ngLEVELER unit from the elements tree on the left. 4) Then change DHCP option to “ON”. Unit will restart, and your connection to ngLEVELER will be established again. -
Page 19: Static Ip Address
NGLEVELER USER MANUAL REV2 5.2.3. Static IP address In general there are few use cases when you would like to configure ngLEVELER IP address manually: 1) When you router doesn’t support DHCP 2) When your LAN network is configured manually for example through hardware switch. - Page 20 Wi-fi card) and check IP address. In this particular case IP address is 192.168.0.100. ngLEVELER IP address has to be in the same subnet, so for above example it would mean any IP address from 192.168.0.2 to 192.168.0.254, excluding currently occupied addresses by any devices connected to your network (like your workstation address, router address, etc.).
-
Page 21: Osx - How To Check Your Ip Address
WESAUDIO 4/10/20 NGLEVELER USER MANUAL REV2 5.2.3.2. OSX – how to check your IP address. Start “Terminal” (located in Applications/Utilities) application: Type “ifconfig” which will show current network configuration:... - Page 22 WESAUDIO 4/10/20 NGLEVELER USER MANUAL REV2 Then you have to find your currently connected network card (Ethernet card or Wi-fi card) and check IP address. In this particular case IP address is 192.168.0.100. Unit’s IP address has to be in the same subnet, so for above example it would mean any IP address from 192.168.0.2 to 192.168.0.254...
-
Page 23: Set Up Static Ip Address
To set up IP address for ngLEVELER, first connect it directly to your workstation using USB cable. Then start GConManager and select “_CONFIG” application. Select your ngLEVELER unit at the device list on the left side of the screen, then change IP address: To change any network specific configuration of your ngLEVELER:... -
Page 24: Direct Connection - Setting Ip Address On Pc/Mac
WESAUDIO 4/10/20 NGLEVELER USER MANUAL REV2 5.2.4. Direct connection – setting IP address on PC/MAC. To directly connect unit to your workstation via Ethernet cable, it is mandatory to set up IP address for your network interface (Ethernet network card). This activity is not in... -
Page 25: Signal Connection
In that sense ngLEVELER is classic 16-channel outboard equipment and can be integrated in your signal chain according to your needs. Please note that USB and Ethernet connections are implemented just to control the unit, audio signal is not passed to ngLeveler in any form through those interfaces. -
Page 26: Ngleveler Automation And Recall
Third party controllers (Third party controllers), DAW via HUI (ngLEVELER and DAW integration via HUI). DAW Plug-in 7.1. ngLEVELER plug-in allows to control all unit’s parameters, and it is available in all common standards VST2/VST3/AU/AAX. -
Page 27: Plug-In Management Panel
WESAUDIO 4/10/20 NGLEVELER USER MANUAL REV2 7.1.1. Plug-in management panel 1. Select connection button: This button shows all connected devices, if “drop- down” list with element IDs is not visible, that means that no devices has been detected which support GCon protocol. - Page 28 WESAUDIO 4/10/20 NGLEVELER USER MANUAL REV2 c. Connecting FONT GRAY/Style: ITALIC – Connection process is ongoing. If “Connecting” state is visible for longer period of time (more than 5 seconds), and plugin has no control over the unit, that would mean: i.
-
Page 29: Plug-In Channel Description
It is perfect solution if we have mono unit that we would like to drive harder to hear how it performs. In that scenario ngLEVELER channel X OUT should go straight to IN of our device,... -
Page 30: Plug-In - Automation Of Linked Channels
WESAUDIO 4/10/20 NGLEVELER USER MANUAL REV2 and channel Y IN of ngLEVELER should receive signal from the OUT of device. 3. THD - toggles THD level, possible steps – OFF (LEDs disabled), MED, HIGH. 4. SOLO/MUTE – Solo and Mute for particular channel. -
Page 31: Third Party Controllers
Server mode – Controller manages ngLEVELER exclusively. Server mediation mode – Controller manages ngLeveler and DAW – please refer to next chapters for more information. Any of those modes doesn’t put any limitations to a possible setup. That means... -
Page 32: Ngleveler Management Via Hui Or Mackie Control Third Party Controller
MIDI. This particular application runs in background and mediates all necessary information between controller and ngLEVELER. In this setup, DAW plug-in doesn’t have to be even started, it is enough to configure GCon server mode, and controller will... -
Page 33: Configuration
To make it work, it is enough to just configure controller MIDI Ports in GConManager _CONTROL application. For example: If more controllers are available, it is enough to add additional MIDI Ports. If adding ports didn’t work (controller didn’t synchronize to ngLEVELER state), please refer to troubleshooting section for more information - Troubleshooting. -
Page 34: Ngleveler And Daw Management Via Hui/Mackie Control Third Party Controller
That gives us full transport functions control from the controller, while still being able to control all parameters of ngLEVELER. This concept goes further, and allow us to toggle between DAW and ngLEVELER control with one of the function keys – F1 to F8 (assignable in the GConManager application - Toggle). - Page 35 NGLEVELER USER MANUAL REV2 If more controllers are available, it is enough to add additional MIDI Ports. If adding ports didn’t work (controller didn’t synchronize to ngLEVELER state), please refer to troubleshooting section (Troubleshooting) for more information. Next step is to configure DAW to integrate with GCon Service and properly receive mediated information.
- Page 36 WESAUDIO 4/10/20 NGLEVELER USER MANUAL REV2 7.2.2.1.1. Pro Tools configuration Below example correlates with previous GConManager configuration. You can access this window from Pro Tools application heading to “Setup” menu, then “Peripherals”, finally selecting “MIDI Controllers” tab.
- Page 37 WESAUDIO 4/10/20 NGLEVELER USER MANUAL REV2 7.2.2.1.2. Studio One 4 configuration Below example correlates with previous GConManager configuration. You can access this window from Studio One 4 application heading to “Studio One” menu, then “Options”, “external devices” tab, finally hitting “Add”.
-
Page 38: Daw Toggle
In GConManager _CONTROL application it is possible to assign function key (F1 to F8) - in GCon Server mediation mode it allows to toggle fader section of the Controller to either manage: DAW session (assigned function key will blink) ngLEVELER(s) (assigned function key LED will be ON). -
Page 39: Ngleveler Management Via Eucon Controller
– faders can’t be used. 7.2.3.1. Eucon controller in Mackie Control mode / ngLeveler Eucon controller (e.g. Artist Mix) can control ngLEVELER(s) using a mapping described here - Controller functions mapping to ngLEVELER. To use EUCON controller with ngLEVELER, eucon application needs to be already installed. - Page 40 WESAUDIO 4/10/20 NGLEVELER USER MANUAL REV2 Once this is done, most probably system restart is required. After the restart, GConManager configuration needs to be set up: MIDI ports needs to be selected in _CONTROL application: MIDI device IN should be set up to Euphonix MIDI port 1, MIDI device OUT should be set up to Euphonix MIDI port 1.
- Page 41 After this step, when selecting GConManager application (clicking on it) all configuration should be delivered to Eucon controller showing actual state of ngLEVELER(s). If this didn’t happen please check chapter Troubleshooting. When DAW window will become focused, Eucon controller will switch to fader section of the DAW.
- Page 42 WESAUDIO 4/10/20 NGLEVELER USER MANUAL REV2...
-
Page 43: Daw Channels / Eucon Controller / Ngleveler
DAW channels / Eucon controller / ngLeveler In this mode ngLeveler is configured to be manageable via DAW faders, and those faders can be also managed via Eucon controller. This gives us full integration of ngLeveler channel level, mute and solo. - Page 44 WESAUDIO 4/10/20 NGLEVELER USER MANUAL REV2 pages – for instance to control ngLEVELER 16 mono channels – 2 pages on Avid Artist mix will be used. Please find below example based on Artist Mix controller, how ngLEVELER parameters are mapped:...
-
Page 45: Controller Functions Mapping To Ngleveler
Controller functions mapping to ngLEVELER As controllers were created mostly to serve DAW management, not all controls exactly fits ngLEVELER needs. However because whole fader section is locked down to exclusively control ngLEVELER(s), GCon software maps some controls to better integrate with ngLEVELER capabilities. -
Page 46: How To Create Virtual Midi Ports
WESAUDIO 4/10/20 NGLEVELER USER MANUAL REV2 7.2.5. How to create Virtual MIDI ports This chapter describes how Virtual MIDI ports can be added on your platform. Please note that virtual MIDI ports are not necessary in GCon Server mode – in this configuration only controller MIDI ports need to be used. -
Page 47: Virtual Midi On Windows
If this won’t fix the issue, GCon Service application should be restarted – to do so, please go to the WesAudio Tray icon, select “service” and hit “restart”. If devices still won’t start communication – the last resort is workstation restart. -
Page 48: Ngleveler Control From Daw Faders
DAW level, using DAW faders. In that case ngLEVELER acts as HUI controller and Virtual MIDI ports have to be used in order to properly communicate with DAW. There are few rules to keep in mind: ... -
Page 49: Configuration - Gcon System
After our Virtual MIDI ports are created (We have to create 2 Virtual ports to receive and 2 virtual ports to send MIDI information per ngLEVELER, GConManager configuration needs to be modified. To do so, start GConManager and go to _CONTROL application: If more controllers are available, it is enough to add additional MIDI Ports. -
Page 50: Pro Tools Configuration
WESAUDIO 4/10/20 NGLEVELER USER MANUAL REV2 internet tutorials on how to add external controller – instead of the controller MIDI ports, please set up virtual ports previously created and configured in GConManager _CONTROL application. 7.3.2.1. Pro Tools configuration Below example correlates with previous GConManager configuration. You can access this window from Pro Tools application heading to “Setup”... -
Page 51: Studio One 4 Configuration
WESAUDIO 4/10/20 NGLEVELER USER MANUAL REV2 7.3.2.2. Studio One 4 configuration Below example correlates with previous GConManager configuration. You can access this window from Studio One 4 application heading to “Studio One” menu, then “Options”, “external devices” tab, finally hitting “Add”. For this scenario, 2 devices needs to be created for each ngLeveler. - Page 52 WESAUDIO 4/10/20 NGLEVELER USER MANUAL REV2...
-
Page 53: Configuration - Daw Faders & Plug-In
Finally when MIDI communication is in place, DAW session configuration needs to be created. To do so: Create empty 16 Faders for each ngLEVELER (less if Stereo channels are used, please refer to External controller and ngLEVELER(s) number of channels for more information). - Page 54 WESAUDIO 4/10/20 NGLEVELER USER MANUAL REV2...
-
Page 55: External Controller And Ngleveler(S) Number Of Channels
That all being said, number of ngLEVELER channels which are mapped to controller/DAW fader section is dynamic, as each channel pair of ngLEVELER can be either true stereo (absolute link) or dual mono (link, linked opposite, unlinked). Please find below examples... -
Page 56: Multiple Ngleveler Units
8. Multiple ngLEVELER units There is no physical limitation on how many ngLEVELER units can be used across one system. In fact theoretically as many as system can handle performance-wise can be used. There are few rules that have to be kept in mind: ... -
Page 57: Metering
On the unit front panel – using simple 3 steps LED presentation (Green/Orange/Red). Main idea behind ngLEVELER metering system, is to give user overview of the changes how internal ngLEVELER controls are affecting signal between input and output. It is simple VU-style metering which... -
Page 58: Usage Examples
Summing stage automation 10.1. ngLEVELER can be integrated at any stage of analog chain which requires signal level management or automation. One of such situation is level management or automation of signal which goes out from our outboard gear to the summing stage. This gives us few very important benefits: ... -
Page 59: Summing Automation/Level Management
WESAUDIO 4/10/20 NGLEVELER USER MANUAL REV2 10.1.1. Summing automation/level management... -
Page 60: Summing Mixer/Console Insert Points Automation
WESAUDIO 4/10/20 NGLEVELER USER MANUAL REV2 Summing mixer/console insert points automation 10.1.2. -
Page 61: Summing Mixer/Console Groups Insert Points Automation
WESAUDIO 4/10/20 NGLEVELER USER MANUAL REV2 10.1.3. Summing mixer/console groups insert points automation... -
Page 62: Any Analog Outboard Automation
In this particular example, ngLEVELER is integrated between each analog outboard process input, and output, of course it can be configured only to output, or only to input if needed. ngLEVELER allows us to work with very hot signals where many audio interfaces can’t deal with. Benefits: ... -
Page 63: Recording Session Management
Studios of each size need some centerpiece which will help to manage recording and mixing session. Using ngLeveler in such situations, allows to precisely set levels which will hit A/D converter, add some analog saturation, and using “Solo and Mute” buttons manage our sessions with ease. -
Page 64: Abbreviations And Terms
WesAudio warrants all of our products to be free of defective parts and workmanship for a period of two years. This warranty period begins at the original date of purchase and is transferable to any person who may subsequently purchase the product during this time. - Page 65 WESAUDIO 4/10/20 NGLEVELER USER MANUAL REV2 13. History Editor Version Date Description Michal 25.03.2020 Document created. Weglicki Michal 10.04.2020 Mackie Control and Eucon integration chapters Weglicki added. Metering chapter added. Linked parameter automation added.
Need help?
Do you have a question about the ngLEVELER and is the answer not in the manual?
Questions and answers