Table of Contents
Advertisement
Automated Canning
System V4.2 Manual
Toll Free: 1-800-661-8443 Direct: +1 403-640-4677 Fax: +1 403-640-4680 e-mail:
Technical Service & Support
1-800-661-8443 Option #4
support@cask.com
cask.com
Official supplier of Ball Corporation for the supply of printed aluminum cans to our customers
ACS V4.2
CASK BREWING SYSTEM INC.
Third Edition, November 2016
info@cask.com
Parts Order
1-800-661-8443 Option #4
parts@cask.com
Advertisement
Table of Contents
Troubleshooting

Summary of Contents for CASK ACS V4.2
- Page 1 Automated Canning System V4.2 Manual ACS V4.2 CASK BREWING SYSTEM INC. Third Edition, November 2016 Toll Free: 1-800-661-8443 Direct: +1 403-640-4677 Fax: +1 403-640-4680 e-mail: info@cask.com Technical Service & Support Parts Order 1-800-661-8443 Option #4 1-800-661-8443 Option #4 support@cask.com parts@cask.com cask.com...
- Page 2 The information presented in this manual has been reviewed and validated for accuracy. The included set of instructions and descriptions are accurate for the Cask Brewing Systems Inc. Automated Canning System Version 4.2 (ACS V4.2) in its stock condition as supplied by Cask Brewing Systems Inc., at the time of this manual's production. However, subsequent products and manuals are subject to change without notice.
- Page 3 Expanded Frequently Asked Questions section. Formatting update. November Can Seam Evaluation videos added. Third Edition ACS V4.2 2016 Updated Parts List. Expanded “Can Table Height Adjustment” section Future Updates As we evolve future iterations of this Manual, we will post the most recent versions and updates on-line at our website.
-
Page 4: Table Of Contents
Seamer Adjustment & Troubleshooting ....................... 43 Seamer Troubleshooting ............................47 Bearing Replacement ............................47 Section G. Safety ................................49 Section H. Warranty Information ........................... 50 Section I. Company Information ............................51 www.cask.com +1-800-661-8443 Third Edition, Nov 2016 ACS V4.2 Page... -
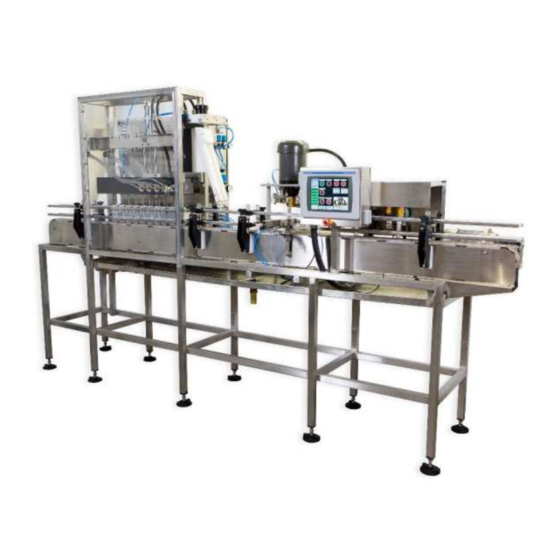
Page 5: Before You Begin
Before You Begin Unit Diagram Figure 1 Automated Canning System - Unit Diagram System Requirements Figure 2 Top View - Canning System Requirements – all hookups except drain on backside of unit www.cask.com +1-800-661-8443 Third Edition, Nov 2016 ACS V4.2 Page... -
Page 6: Section B
Cordless drill with Robertson/Phillips bit Figure 3 In case you’ve never seen a crate before B.2 Uncrating Procedure Refer to Figure 4 Uncrating your new Cask ACS. Inspect crate exterior and document any damage incurred in transit ... -
Page 7: Packing List / Loose Parts
Figure 5 Forklift moving Cask ACS into position B.4 Initial Adjustments & Settings Your Cask canning line has been factory tested prior to shipping to allow for trouble free installation by a Cask Technical Representative at your site. Your warranty period will also commence at the date of installation and commissioning by a Cask Technical Rep. -
Page 8: Unloading Cans
Require a 7.0 peak HP, 50 gal/200L tank c/w refrigerated dryer and autofloat drain for Depal Compressed Air and ACS combined operation. Cask recommend compressor is CompAir L05 FS – 200 (23.66 CFM-0.67 mᶟ/min). ½” cold water line – garden hose connection (testing) Water Supply ½”... - Page 9 Section B. Unit Setup Figure 6 Forklift carrying your printed cans (A) and a pallet of can lids or ends (B) www.cask.com +1-800-661-8443 Third Edition, Nov 2016 ACS V4.2 Page...
-
Page 10: Section C
Main screen to start the seamer motor and the belt. Also, controlling CIP, Top Up, Foam Valves, Lid Dispenser. Main Screen has integrated timers for better production monitoring while filling. Figure 7 HMI Panel – Main Page screenshot www.cask.com +1-800-661-8443 Third Edition, Nov 2016 ACS V4.2 Page... - Page 11 Table 2 HMI Panel – Main Page – Button Functions C.2.2 HMI Panel – Filler Page Manually Control Can Fill, CO2 Purge, Gate, Lid Purge. Figure 8 HMI Panel – Filler Page screenshot www.cask.com +1-800-661-8443 Third Edition, Nov 2016 ACS V4.2 Page | 10...
- Page 12 HMI Panel – Seamer Page Manually Control all aspects of the seamer. Table Up/Down, Die1/2 in-out, Push Cylinder #2, Seamer Motor Control. Figure 9 HMI Screen – Seamer page screenshot www.cask.com +1-800-661-8443 Third Edition, Nov 2016 ACS V4.2 Page | 11...
-
Page 13: Hmi Control Panel Operations
It allows for the discreet control of each individual operation and allows you to perform step-by-step operation of the machine to see and evaluate each process individually. You would typically use this mode when adjusting the seamer or troubleshooting individual system functions. www.cask.com +1-800-661-8443 Third Edition, Nov 2016 ACS V4.2 Page | 12... -
Page 14: Electrical Panel Overview
5. E-stop (to immediately cease all operation) C.4 Electrical Panel Overview C.4.1 Top Row of Breakers RELAYS VIBRATOR POWER SEAMER MOTOR SUPPLY PANEL CONVEYOR MOTOR Figure 11 Top row of breakers www.cask.com +1-800-661-8443 Third Edition, Nov 2016 ACS V4.2 Page | 13... - Page 15 Section C. ACS Operations Overview Figure 12 Variable Frequency Drives (VFD’s): #1 for main conveyor motor and #2 for seamer motor www.cask.com +1-800-661-8443 Third Edition, Nov 2016 ACS V4.2 Page | 14...
- Page 16 19. BEER VALVE 5B 20. FOAM VALVE 1 21. FOAM VALVE 2 22. FOAM VALVE 3 23. FOAM VALVE 4 24. FOAM VALVE 5 Figure 13 Relay wiring diagram www.cask.com +1-800-661-8443 Third Edition, Nov 2016 ACS V4.2 Page | 15...
- Page 17 The sensor immediately upstream of the gate counts 5 cans before re-closing the gate and beginning the next fill cycle. www.cask.com +1-800-661-8443 Third Edition, Nov 2016 ACS V4.2 Page | 16...
- Page 18 Section C. ACS Operations Overview Gate Figure 15 Can Gate downstream of fill head Figure 16 ACS fill head showing fill sensors, foam tube and fill tube. www.cask.com +1-800-661-8443 Third Edition, Nov 2016 ACS V4.2 Page | 17...
-
Page 19: Can Filling
Regular filling then continues until the cans are full. Once the beer/foam level reaches the sensors the corresponding valves will close and filling will stop for that fill station. www.cask.com +1-800-661-8443 Third Edition, Nov 2016 ACS V4.2 Page | 18... -
Page 20: Lid Dispenser
The actuators, valves, and most of the regulators are contained behind the back panel of the equipment. With the door open you will see something similar to the Figures below. www.cask.com +1-800-661-8443 Third Edition, Nov 2016 ACS V4.2 Page | 19... -
Page 21: Parts In Motion: Motors
Mounted on the conveyor tunnel of the machine, there will always be one motor that drives the conveyer (Figure 20 - #1) On top of the seamer assembly is the motor that turns the chuck. (Figure 20 - #2) www.cask.com +1-800-661-8443 Third Edition, Nov 2016 ACS V4.2 Page | 20... - Page 22 There should be no adjustments needed to any of these motors after initial installation. MOTORS Figure 20 The ACS has two motors to drive the seamer and the main conveyor www.cask.com +1-800-661-8443 Third Edition, Nov 2016 ACS V4.2 Page | 21...
-
Page 23: Section D
ACS System Operations D.1 Initial Start-up Adjustments & Settings Your Cask canning line has been factory tested prior to shipping to allow for trouble free installation by a Cask Technical Representative at your site. Follow these steps to ensure optimum operation. -
Page 24: Startup & Operation
ACS running as best and as long as possible. PLEASE ENSURE ALL PARTIES INVOLED IN CLEANING ARE WEARING PROPER PPE (PERSONAL PROTECTIVE EQUIPMENT). www.cask.com +1-800-661-8443 Third Edition, Nov 2016 ACS V4.2 Page | 23... -
Page 25: Acs Post-Operation Shutdown Checklist
Clean all exposed surfaces with hot water and sanitizer solution (peracetic acid, iodophore, etc.) Air inlet valve closed? Primary filter purged? CO2 inlet valve closed? Water inlet valve closed? Control panel power off? www.cask.com +1-800-661-8443 Third Edition, Nov 2016 ACS V4.2 Page | 24... -
Page 26: System Periodic Maintenance
Assembly is to allow you to easily identify parts for reordering. Figure 22 contains an exploded view of 1) Seamer spindle and 2) a labelled view of the seaming roll www.cask.com +1-800-661-8443 Third Edition, Nov 2016 ACS V4.2 Page | 25... - Page 27 C. Seaming Tool F. Seamer Spindle D. Seaming Roll Spindle E. Pivot Arm Figure 22 Exploded view of (1) seamer spindle house assembly and labelled view of (2) seaming roll www.cask.com +1-800-661-8443 Third Edition, Nov 2016 ACS V4.2 Page | 26...
-
Page 28: Adjustment & Troubleshooting
Figure 23 shows set bolts for adjustment of can lid dispense height. Set screws under the retaining bars. Figure 23 Setting bolts to adjust can lid dispenser height www.cask.com +1-800-661-8443 Third Edition, Nov 2016 ACS V4.2 Page | 27... - Page 29 Check for proper height of Lid Dispenser Slide (see Figure 25). If height is found to be incorrect: Loosen ¼” Bolts and carefully adjust to suitable height to catch lid with can. www.cask.com +1-800-661-8443 Third Edition, Nov 2016 ACS V4.2 Page | 28...
- Page 30 This enables the lip of the can to catch the Can Lid and drag it off of the Can Slide Table. Figure 25 Ideal can lid dispensing diagram www.cask.com +1-800-661-8443 Third Edition, Nov 2016 ACS V4.2 Page | 29...
- Page 31 To test a possible bad partition, remove and swap with a mating partition. If the problem moves to the swapped out part, you have a bad partition and need to replace. www.cask.com +1-800-661-8443 Third Edition, Nov 2016 ACS V4.2 Page | 30...
- Page 32 This becomes important when setting up the system and setting the timing. Typically these should not require adjustment once initial setup is complete. All adjustments are to be made on the cylinders themselves (see Figure 25). www.cask.com +1-800-661-8443 Third Edition, Nov 2016 ACS V4.2 Page | 31...
-
Page 33: Frequently Asked Questions
Also check that the cans are not over-filled. Also check that push arm #1 is not moving too quickly. Try slowing down the extension of the cylinder to see if the problem abates. www.cask.com +1-800-661-8443 Third Edition, Nov 2016 ACS V4.2 Page | 32... - Page 34 In manual mode, test the length of the stroke: with a full can in place press and hold the push cylinder #1 button and verify that the can is being delivered all the way onto the can lift table. www.cask.com +1-800-661-8443 Third Edition, Nov 2016 ACS V4.2 Page | 33...
- Page 35 Check the position of the lower metal retaining bar – it may have popped out of the recessed groove in which it should be positioned AND/OR the elastic tension may need to be increased D.9.2.2 Cans topple at lid dispenser Problem Symptoms www.cask.com +1-800-661-8443 Third Edition, Nov 2016 ACS V4.2 Page | 34...
- Page 36 2. If pressing the start button has no effect check the sensor on the top of the fill head air piston. The green light on the sensor should be on. If it is not on, try repositioning the sensor (move it up or down until the light comes on www.cask.com +1-800-661-8443 Third Edition, Nov 2016 ACS V4.2 Page | 35...
- Page 37 (not the back rail where the sensor is mounted) and slide it back and forth in front of the sensor while checking the sensor indicator light and verifying that it illuminates each time the can passes in front of it. www.cask.com +1-800-661-8443 Third Edition, Nov 2016 ACS V4.2 Page | 36...
-
Page 38: Section E. Seam Measurement
E.1 Can Seam Evaluation Training Videos There are three detailed Can Seam Evaluation training videos available on our website which supplement the instruction in the following several pages: www.cask.com/service-support/seam-evaluation-videos/ www.cask.com +1-800-661-8443 Third Edition, Nov 2016 ACS V4.2 Page | 37... -
Page 39: Manual Seam Evaluation Process
The following example (Figure 34) reads 10 “Ticks” each “Tick on the Thimble Sleeve is worth 0.025” therefore the Micrometer reads 0.250”. Simply explained “2” = 0.200” + 2 “Ticks” (0.025”) = 0.050” for a Total of 0.250”. www.cask.com +1-800-661-8443 Third Edition, Nov 2016 ACS V4.2 Page | 38... -
Page 40: Seam Measurement
Seams should be checked on a regular basis in order to ensure the quality of your product. The procedure for checking the quality of your seams is to tear them apart and make various measurements as outlined below. www.cask.com +1-800-661-8443 Third Edition, Nov 2016 ACS V4.2 Page | 39... - Page 41 Note: to properly measure seam width place your finger on the micrometer as you tighten the thimble sleeve. Thimble sleeve must be tightened to just a sufficient degree (and no more) that when you remove your finger (see Figure 36) the micrometer does not move or sag. www.cask.com +1-800-661-8443 Third Edition, Nov 2016 ACS V4.2 Page | 40...
- Page 42 This video also shows the process of a Manual Can Teardown. Body Cover and Hooks Now that you have taken the seam apart you can measure the cover and body hooks using the micrometer. www.cask.com +1-800-661-8443 Third Edition, Nov 2016 ACS V4.2 Page | 41...
-
Page 43: Seam Troubleshooting
Note: the above dimensions are standard for 12oz (355mL), 16oz (473mL) and 500 ml Ball cans; however, if you are using another format, can size or manufacturer, please refer to the manufacturer’s specification sheet for proper values. www.cask.com +1-800-661-8443 Third Edition, Nov 2016 ACS V4.2 Page | 42... -
Page 44: Section F
If this dimension is not in range, the cover and body hooks will be out of spec so always adjust this dimension first. The following Figure 39 identifies all the locations required to adjust and fine tuning the seaming process. www.cask.com +1-800-661-8443 Third Edition, Nov 2016 ACS V4.2 Page | 43... - Page 45 Can Platform Height Adjust CW – DOWN CCW - UP Figure 39 Can Seamer Adjustments To ensure that the seam stays within specifications the following adjustments can be made. www.cask.com +1-800-661-8443 Third Edition, Nov 2016 ACS V4.2 Page | 44...
- Page 46 (0.003”-0.005”). Approximately 1.5 times that for the second operation seaming wheel. (Figure 41 Photo C) Once the seam wheel height has been adjusted, retighten the set bolt. www.cask.com +1-800-661-8443 Third Edition, Nov 2016 ACS V4.2 Page | 45...
- Page 47 F.1.3.1 Can Table Pressure - Test for Too Low Place a full, seamed can of beer in place. Raise the table. www.cask.com +1-800-661-8443 Third Edition, Nov 2016 ACS V4.2 Page | 46...
-
Page 48: Seamer Troubleshooting
If it is too short, the seam roll height must be raised. F.3 Bearing Replacement Changing bearings on the Cask Canning System is relatively simple; however, it can be frustrating if these simple steps below in Figure 43 are not followed in order of operation. - Page 49 Spindle Housing Mate (#6) 7. Bearing Retainer Ring & 4 Bolts OUTTER 8. Lock washer & Spanner RACE INNER RACE Figure 43 Spindle and Can Table Bearing Replacement schematic www.cask.com +1-800-661-8443 Third Edition, Nov 2016 ACS V4.2 Page | 48...
-
Page 50: Section G
Safety Safety is always a concern in every facet of life. Always remember to use caution when operating any Machinery. Keep these simple steps in mind when operating Cask Brewing Systems Machinery. Always wear Safety Glasses when operating Machinery to prevent damage to your eyes. -
Page 51: Section H
Section H. Warranty Information Section H. Warranty Information The warranty shall be limited to the following from the date of installation of the Canning System by a Cask Technician Representative at the customer’s site Item Warranty Duration Large and small coils... -
Page 52: Section I
Section I. Company Information Section I. Company Information Cask Brewing Systems Inc. Bay 60, 5100-64 Ave SE Calgary, Alberta, T2C 4V3 CANADA Toll Free +1-800-661-8443 Direct +1 403-640-4677 +1 403-640-4680 Email info@cask.com Website www.cask.com Technical Service & Support Parts Order...
Need help?
Do you have a question about the ACS V4.2 and is the answer not in the manual?
Questions and answers