Advertisement
Quick Links
Advertisement

Summary of Contents for Amico NuLook FlexWall
- Page 1 Installation lnstructions NuLook FlexWall...
-
Page 2: User Responsibility
• Headwall installation should conform to the local building codes. All on-site preparations must be done prior to the delivery of the Headwall. Please contact Amico to confirm and review all information listed below. Failing to do so may result in discrepancies/misalignments during installation. - Page 3 Hardware Provided by Amico Hardware 1 3/4" 1/4" Head Cap Screws 1/4" x 3/4" Part #: C-H-HDCAP-0207 1/4 BS Plate Washer Part #: C-H-WFS-02 1/4"-20 Nylon-Insert Locknut Part #: C-H-NLN-0220 Hardware 2 1 1/4" 0.164" #8-Self Drilling/Flat Head Screw Yellow Zinc Plated Part #: H-SDF-QX-08125 www.amico.com...
-
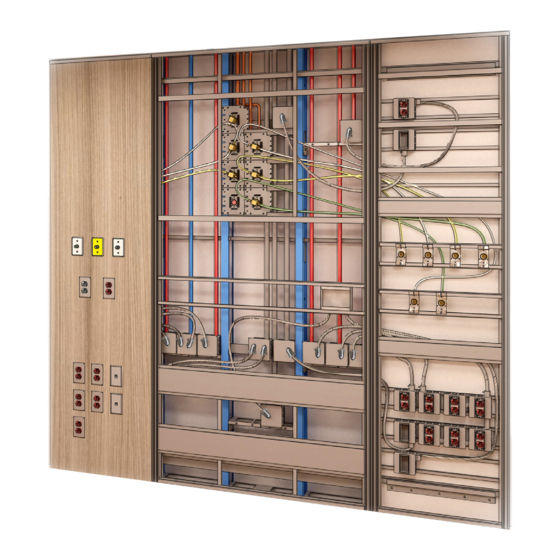
Page 4: Step 1 - Engine Installation
Installation Step 1 - Engine Installation 1. Ensure top and bottom tracks are at correct height before fastening The Amico Engine. NOTE: Please refer to the dimensions indicated on shop drawings. 2. Insert Engine into tracks using lift and drop method (Figure 1). - Page 5 Blocking required behind drywall (provided by others). Secure the Engine to See approved shop the top and bottom drawings for the tracks using hardware exact location. compliant to local building codes (hardware provided by others) Engine Placed in Rough Opening www.amico.com...
- Page 6 3. Remove device cover plates and panels. IMPORTANT: See Page 10 for panel removal and handling instructions. Figure 3 Figure 4 Ceiling Line Blocking (by others) Brackets secured to the wall (hardware by others) Blocking (by others) Stud Floor Line Amico Corporation...
- Page 7 (Hardware 1). IMPORTANT: Make sure the frames are flush along the top and front. (Figure 7). Figure 5 Figure 6 0.750" Bolt & Nut Connections Top View Detail/Cross Section Figure 7 Flush Bolt the frames together Hanging Brackets www.amico.com...
- Page 8 19" to 32" wide section = 2 screws b. 32.1" to 48" wide section = 4 screws Figure 8 Ceiling Line Top Track Screw provided by Amico (Hardware 2) Brackets secured to the Blocking wall (hardware by others) Stud...
- Page 9 IMPORTANT: Do not overtighten the medgas and electrical cover plates. IMPORTANT: (If Applicable) Install the Vertical Rails onto Frames with screws. Reinsert the Vinyl Strip into the Rail to cover the Screws. (Must use the same hardware removed from the rails in Step 3 of Panel Frame Installation). www.amico.com...
- Page 10 • Stack panels face to face to prevent damage. • Keep panels as flat as possible when handling or storing. • Do not drag panels on other panels in order to prevent scratch or scuff. • Panels must be stored in controlled environment Amico Corporation...
- Page 11 NO FLY ZONE NuLook FlexWall - Engine NO FLY ZONE Horizontal opening required to install stud frame is 52 1/8" 2" [51 mm Termination Box from 4 3/4" [120 mm] Top of Stud TYP. HIGH POWER TERM BOX TERM BOX...
- Page 12 Amico Corporation | 85 Fulton Way, Richmond Hill, ON L4B 2N4, Canada 600 Prime Place, Hauppauge, NY 11788, USA Toll Free Tel: 1.877.462.6426 | Tel: 905.764.0800 | Fax: 905.764.0862 Email: info@amico.com | www.amico.com ACA-IM-NULOOK-FLEXWALL 03.06.2020...
Need help?
Do you have a question about the NuLook FlexWall and is the answer not in the manual?
Questions and answers