Advertisement
Quick Links
Advertisement

Related Manuals for HI-POD Super-Lite

Summary of Contents for HI-POD Super-Lite
- Page 1 © 2020 HI-POD INC. (PAGE 1) HI-POD Super-Lite Setup Manual...
-
Page 2: Manual Index
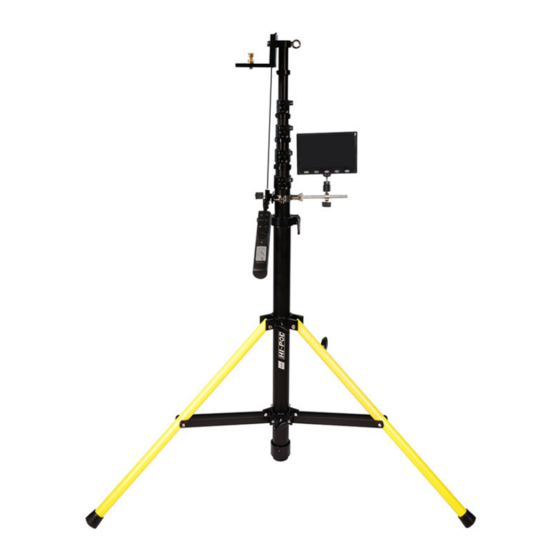
Manual Index: • Page 6 - Take Tower Out Of Bag • Page 7 - Set Legs and Weight Bags • Page 11 - Hi-Pod Head • Page 13 - LCD Mounting Rod • Page 14 - Attach LCD • Page 15 - Sony Remote •... - Page 3 Congratulations on Your New Hi-Pod! Now you can begin to elevate your game. - The HI-POD Super-Lite gives the operator maximum ease of use and transportation. It's a 25 lbs tower that will fit into the trunk of an economy car . Once you are familiar with the setup procedures it should take 10-15 mins to fully configure a unit.
- Page 4 © 2020 HI-POD INC. (PAGE 4) Super-Lite CHECKLIST Handle Head Monitor Bracket 3 Piece Raingear 3 Sandbags LCD Visor LCD Battery / 5-9 Volt Adapter Cable HDMI Cable Lanc Cable Gold Screw for Power Bank Camera Remote Camera Camera Power Bank...
- Page 5 © 2020 HI-POD INC. (PAGE 5) 3 IMPORTANT THINGS: • ALWAYS use the Strain Relief Plate for your cables • ALWAYS use your sandbags • Take note of the 'Text on Screen' instructions to display record status ...and other camera settings - (page 47)
- Page 6 © 2020 HI-POD INC. (PAGE 6) Take Tower Out Of Bag Take the tower out of your case, and place it on the ground. There are two black twist knobs on the base of the tower, and you will need to...
- Page 7 © 2020 HI-POD INC. (PAGE 7) Set Legs and Weight Bags You will want to setup the base of the tower with the black slats between the yellow legs as even/level with the ground as possible. This will give you maximum stability during operation.
- Page 8 © 2020 HI-POD INC. (PAGE 8) The included weight-bags are NOT optional. You must apply them every time you use the tower. This is intended to provide your safety weight. With a tower of 25 lbs, and an approximate extra 35 lbs in the bags, this gets you to ~ 60 lbs in total.
- Page 9 © 2020 HI-POD INC. (PAGE 9) YOUR WEIGHT BAGS!
- Page 10 © 2020 HI-POD INC. (PAGE 10) NEVER WALK AWAY FROM AN ELEVATED TOWER. NEVER. When a tower is elevated you must manage it at all times. Anything can happen at any time - unexpected winds can pop up, rain can...
- Page 11 © 2020 HI-POD INC. (PAGE 11) Hi-Pod Head Find the Hi-Pod Head in the case, and attach it to the opening at the top of the tubes. You'll see a threaded hole on the top tube which the head will connect to.
- Page 12 © 2020 HI-POD INC. (PAGE 12) Before we mount the Handle and LCD mount to the unit, note the function of the black collar which has a ratchet attached to it. The ratchet (pointed to by the red arrow to the above) serves to lock the tubes so they can't rotate, or to release the tubes so they can spin 360 degrees.
- Page 13 © 2020 HI-POD INC. (PAGE 13) LCD Mounting Rod The LCD Mount allows for the screen to attach to the unit. You will find a metal item shown in the image to the left. Simply screw this part into the...
- Page 14 © 2020 HI-POD INC. (PAGE 14) Attach LCD You'll find the LCD in the electronics bag. Note the metal part mounted beneath with an open hole (red arrow). Slide onto the silver rod and tighten with the black knob below to hold...
- Page 15 © 2020 HI-POD INC. (PAGE 15) Sony Remote See a picture of the Sony remote with mounting arm below. To install, line up the groove in the back of the remote to the arm, and snap into place. When ready to remove the remote, press the button on the left / top of...
- Page 16 © 2020 HI-POD INC. (PAGE 16) Hi-Pod Handle The basic handle is included in the list price and it pivots up and down. It has a black knob on the side which will either lock the arm in place if...
- Page 17 © 2020 HI-POD INC. (PAGE 17) For the handle there is a cord which you'll find in a small plastic bag (see image right). This is what you use to connect the handle to the head. On the head you'll see a small hole cut out where you'll thread the cable.
- Page 18 © 2020 HI-POD INC. (PAGE 18) At this point in the setup that's as much as you'll do. The final connection from the head to the basic handle is done at the very end up setup, after the tubes have been elevated (unlike the advanced handle which you can connect immediately).
- Page 19 © 2020 HI-POD INC. (PAGE 19) Cable Setup See an image of the cable bundle for your system below. There are two cables (HDMI for video and 'Lanc' for remote control) that are installed in two metal plates (Strain Relief and Quick Release plates).
- Page 20 © 2020 HI-POD INC. (PAGE 20) First, take the carabineer and attach it to the metal 'eye-hook' connected to the very top of the Hi-Pod tubes.
- Page 21 © 2020 HI-POD INC. (PAGE 21) • Strain Relief Plate w/ Quick Release • Carabineer To mount the strain relief plate with quick release attached, use the smaller of the two middle holes on the bottom of the strain relief portion of the plate.
- Page 22 © 2020 HI-POD INC. (PAGE 22) Note the hole which has the circular rubber 'grip' installed around it. This is the hole you will use to connect the strain relief plate to the Hi- Pod head.
- Page 23 Any yanking or pulling on the cables will occur below the plates, not at the delicate connection ports. You must use these plates EVERY time with the Hi-Pod, otherwise you will cause damage to the cables causing them to become non-functional.
- Page 24 / camera bag as shown in the image to the right. This is what is used to secure the plates to the Hi-Pod head. Here is a view from below of what the brass screw, lever, and strain relief...
- Page 25 © 2020 HI-POD INC. (PAGE 25) Now, from below the Hi-Pod head, take the brass screw and thread it into the strain relief plate as shown. Note the red arrow pointing out the position of the lever pointing back.
- Page 26 © 2020 HI-POD INC. (PAGE 26) When complete your setup should look like this (view from above). Note the red arrow again pointing to the lever which is facing back. There is a long strap of velcro (image right) on the cables which...
- Page 27 © 2020 HI-POD INC. (PAGE 27) Camera and Cable Connections Now that the cables are mounted to the tower it's time to connect your camera. If you received the Sony CX405 camera from us (included in all default purchases) we will ship the camera with a mounting adapter already attached.
- Page 28 © 2020 HI-POD INC. (PAGE 28) HDMI / SD Card If you open the LCD window physically attached to the camera, you will see a little door that you can open by pulling down. Inside you'll find the HDMI (micro) and SD card ports.
- Page 29 © 2020 HI-POD INC. (PAGE 29) USB Cable Inside of the hand-strap on the camera you'll find a small USB cable. This is used to transfer data to a computer after filming, and it also charges the small internal battery included with the camera.
- Page 30 © 2020 HI-POD INC. (PAGE 30) Your setup should look like this. Now connect the HDMI and remote (Multi) cables to the camera. Note that the cable for the remote - which connects to the 'Multi' port - has a yellow tag attached.
- Page 31 © 2020 HI-POD INC. (PAGE 31) Camera Battery There is an external USB style battery that you'll need to connect to the tower to act as the camera's primary power source. See a picture of it to the right (actual battery can change over time, but function remains the same).
- Page 32 © 2020 HI-POD INC. (PAGE 32) See a reverse angle of camera / screw setup.
- Page 33 © 2020 HI-POD INC. (PAGE 33) Take the USB battery and connect it to the brass screw. Tighten the secondary thumbnail on the screw to lock in place.
- Page 34 © 2020 HI-POD INC. (PAGE 34) Now you need to connect the external battery to the camera. Note the USB cable inside of the camera's hand strap, and the USB port on the external battery we just installed. These will be connected by an adapter cable.
- Page 35 © 2020 HI-POD INC. (PAGE 35) Connect the male side of the USB cable to the battery. Connect the female side of the USB cable to the camera's male USB.
- Page 36 © 2020 HI-POD INC. (PAGE 36) Once this is complete you'll have a lot of extra cabling. You'll need to clean this up so nothing catches and unplugs the battery during use (very important). The best option is to bind up...
- Page 37 © 2020 HI-POD INC. (PAGE 37) Make sure to confirm the correct battery (external USB) is set as the default power source for the camera. See how to do this below. You'll need to check the LCD window attached to the camera. If you...
- Page 38 © 2020 HI-POD INC. (PAGE 38) Finish LCD Setup See the open HDMI port on the LCD in the image to the right. Connect the standard sized HDMI cable at the bottom of the cable bundle to the port.
- Page 39 © 2020 HI-POD INC. (PAGE 39) On the back for your LCD you'll see a long strip of velcro. Find the larger LCD battery (with velcro pre-attached) and stick it onto the back of the screen.
- Page 40 © 2020 HI-POD INC. (PAGE 40) Now you need to find this USB cable in your camera bag. It will provide power from the battery directly into the LCD. In the first image below you'll see a red arrow pointing to the USB port on the LCD.
- Page 41 © 2020 HI-POD INC. (PAGE 41) Finish Remote Setup In the image below you'll see a red arrow pointing to a port on the remote control. This is where you will plug in the cable on the bundle (top end of this cable has the yellow tag which plugged into camera).
- Page 42 © 2020 HI-POD INC. (PAGE 42) IMPORTANT: The white strain relief is NOT permanently attached to the cable head. It can shift backwards or forwards when the system is put away or when it sits in the case. If the white strain relief shifts forward on the cable head, the cable itself will not make a physical connection to the remote, and therefore will not function properly.
- Page 43 © 2020 HI-POD INC. (PAGE 43) Troubleshooting See an image below of the cable with the strain relief removed. You can do this for testing, but please replace the strain relief after confirming any variables to protect the cable. Common Issue...
- Page 44 © 2020 HI-POD INC. (PAGE 44) button light up on the remote - so the client believes everything is connected correctly - but then they have no control over zoom and record functions. This means you only have a half-connection of the cable into remote - enough to receive power, but not enough to communicate signals back and forth.
- Page 45 © 2020 HI-POD INC. (PAGE 45) Text (REC) On Screen (Optional) In general, cameras under $1,000 do not have the ability to save a setting to push out text (record/battery status) from the camera down to the LCD. There is a way to achieve this on less expensive cameras, but it's applied every time the camera is turned on.
- Page 46 © 2020 HI-POD INC. (PAGE 46) • Scroll down until you find 'Scene Selection' and click on it Your screen will change to look like this. Click on the bottom right arrow to continue.
- Page 47 This text overlay will not be on your final video files. It is only seen by the Hi-Pod operator when they are filming. *Note: If you have a remote which has a 'Photo' button option - DO NOT HIT IT.
- Page 48 © 2020 HI-POD INC. (PAGE 48) Camera Settings Continued: Dual Video REC On new cameras (example CX405), they appear to default ship with a setting called 'Dual Video REC' enabled in the camera settings. When this feature is active the camera saves two copies of the same clip in different quality settings (one is higher def, one is for online sharing).
- Page 49 © 2020 HI-POD INC. (PAGE 49) Camera Settings Continued: Confirming Camera Battery For those clients using either the grey or white USB batteries, you need to confirm that the battery is turned on and is set as the main power source before elevating.
- Page 50 © 2020 HI-POD INC. (PAGE 50) Click the button on the side of the battery to turn it on. You will see the buttons on the battery light up blue. When connected correctly and turned on, the battery button in the top right of the LCD will disappear.
- Page 51 © 2020 HI-POD INC. (PAGE 51) Raingear There are three parts to the raingear for the Hi-Pod: • Camera • LCD • Remote See the camera raingear below: This image is shown without the wheeled head. The brass screw will be...
- Page 52 © 2020 HI-POD INC. (PAGE 52) Use the same hole on the strain relief plate to attach the brass screw as you do with the raingear. Just make sure that now, the raingear plate is below the strain relief plate, but on top of the wheeled plate.
- Page 53 © 2020 HI-POD INC. (PAGE 53) There is a cinch cord which will allow you to organize your cables, arrange the bag, and then completely close so no water can get inside. There are different ways to accomplish this, but the key is to pull the...
- Page 54 © 2020 HI-POD INC. (PAGE 54) Note the length of cord, and general position. Pull shut. The LCD raingear attaches by simply sliding it over the mounted screen, with battery attached in the back. Velcro to seal.
- Page 55 © 2020 HI-POD INC. (PAGE 55) Raingear for the remote will attach as shown in the image below. Most often, you seal the bag and operate the remote from outside. However, there is a slot in the bag (to the right) with another cinch cord if you wanted your hand to be inside as well.
- Page 56 © 2020 HI-POD INC. (PAGE 56) Elevating Tubes At this point in the setup, your unit is set to elevate. Grab a pole above a collar, unlock, raise to your desired height, and lock again. Note the lever (camlock) which you'll use to release and lock the tube collars.
- Page 57 © 2020 HI-POD INC. (PAGE 57) See the collar and camlock on the tubes after the pole has been elevated. Close the lever (camlock) to hold the pole in place at your desired height. Again, repeat for all tube stages.
- Page 58 See this image mentioned earlier in the manual. The gap between the brass screw and metal frame of the handle is where you'll secure the long cable attached to the Hi-Pod head. Once the cable is in place close the brass screw behind it to secure.
- Page 59 © 2020 HI-POD INC. (PAGE 59) Lowering Tubes When lowering the tubes, always grab the pole above a collar before opening that collar. If you do not grab the pole first, it will shoot down. Velcro Cables to Tubes We include a strap of velcro above every collar. Use this to attach your video/lanc cables to the tower.
- Page 60 © 2020 HI-POD INC. (PAGE 60) Putting The Tower Away When it's time for you to put away the unit, most of the setup can just be done in reverse. Two key things to point out: (1) When attempting to fold the tower, unlock all knobs and push your foot lightly down on the black slats between the legs, and pull up on the top.
- Page 61 © 2020 HI-POD INC. (PAGE 61) Setup Complete For more information, see http://hipod.com (see 'Manuals' tab). For help call us at: 818-982-2601 9am - 5pm Pacific, M-F...
Need help?
Do you have a question about the Super-Lite and is the answer not in the manual?
Questions and answers