Table of Contents
Advertisement
Quick Links
Advertisement
Table of Contents
Troubleshooting

Subscribe to Our Youtube Channel
Summary of Contents for Fitbit Zip Flow
- Page 1 Fitbit Flow User Manual Version B 129-0575-01 May 2020...
- Page 2 The Fitbit Flow has not been FDA cleared or approved; The Fitbit Flow has been authorized by FDA under an EUA; The Fitbit Flow is authorized only for the duration of the declaration that circumstances exist justifying the authorization of the emergency use of ventilators under section 564(b)(1) of the Act, 21 U.S.C.
-
Page 3: Table Of Contents
Table of Contents Glossary Purpose of this manual Safety Information Definitions General Warning Statements Symbols and Markings Fitbit Flow Overview Indications for Use Target Patients Target Environment Operational Use Breathing Circuit Respiratory Parameter Controls Safety Features Compatible Manual Ventilator Tubing, Sensors, and Valves (outside enclosure) - Page 4 Alarm List Additional Troubleshooting Installation and Setup Assemble the Stand Components Assembly Instructions Assemble the Fitbit Flow Air Pathway System Components Assemble the Patient Circuit Assemble the BVM Inside the Fitbit Flow Power the Fitbit Flow Operating Procedures Turn On the Fitbit Flow...
- Page 5 Replace Accessories Specifications Physical Accuracy Labeling Parameters Electrical Alarm Conditions Appendix A.1 FiO2 Flow and Minute Ventilation Standards Compliance General Standard Particular Standards User Assistance Information Technical Support Trademark Information For use only while FDA’s Emergency Use Authorization is in effect.
-
Page 6: Glossary
Glossary Acute respiratory distress syndrome (ARDS) A life-threatening lung condition in which fluid enters the lungs, causing low blood oxygen Assist control (AC) An optional setting which provides support for patient-triggered breaths when enabled Bag valve mask (BVM) See Manual resuscitator. Dual limb breathing circuit Patient circuit with two tubes: one tube between the gas outlet and the patient for inspiratory gas, and one tube between the patient and the exhalation block for exhalation gas... - Page 7 Manual resuscitator A bag used to provide positive pressure ventilation to patients who are not breathing. Also known as a bag valve mask (BVM). Patient-triggered breath A breath initiated by the patient Peak inspiratory pressure (PIP) The highest pressure measured during the inspiration phase Plateau Pressure (Pplt) The pressure within the breathing circuit following an end-inspiratory pause Positive end-expiratory pressure (PEEP)
- Page 8 Volume control mode (VCV) A mode of ventilation in which a fixed volume is applied during the inspiratory phase For use only while FDA’s Emergency Use Authorization is in effect.
-
Page 9: Purpose Of This Manual
This user manual contains information on the safe and effective use, setup, and maintenance of your Fitbit Flow. Before operating the Fitbit Flow, be sure to read and understand all the instructions in this manual. The Fitbit Flow is intended for use by qualified, trained personnel under the direction of a physician only when an FDA-cleared clinical ventilator is not available. - Page 10 ● Provide sufficient space around the Fitbit Flow for adequate air flow. Do not position next to objects that may block the flow of air. Failure to do so may cause the equipment to overheat, thereby interfering with patient ventilation.
- Page 11 ● When operating in PCV (Pressure Control Mode) the Fitbit Flow may not achieve a constant pressure throughout the entire inspiratory period, which may reduce the delivered tidal volume. ● When Assist Control is enabled, it is important to monitor for breath stacking (also called breath dyssynchrony stacking), which can result in unintended high tidal volumes as a consequence of incomplete exhalation between consecutive cycles.
-
Page 12: Symbols And Markings
This symbol appears on the Fitbit Flow’s back panel. It signifies where the AC connector cable is located. This symbol appears on the Fitbit Flow’s back panel in two locations: the holes where the external display attachment should be screwed in, and above the HDMI and USB connections. - Page 13 This symbol appears on the control panel’s start/stop button. It is used to start or stop ventilation. For use only while FDA’s Emergency Use Authorization is in effect.
-
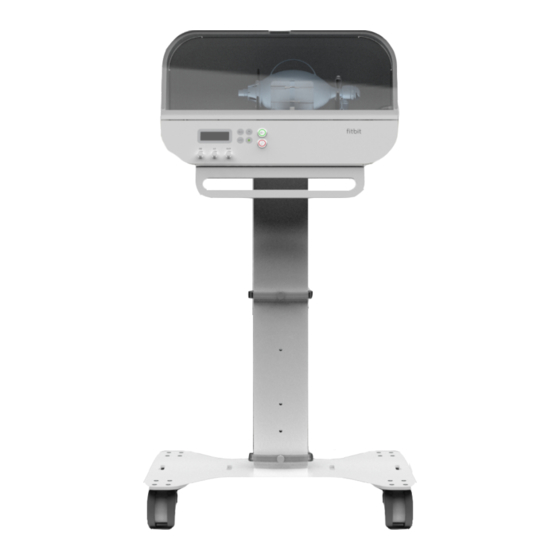
Page 14: Fitbit Flow Overview
The Fitbit Flow is not intended for home use. The Fitbit Flow must be operated by respiratory therapists, doctors, or nurses. The Fitbit Flow should only be used on adult patients when an FDA-cleared clinical ventilator is not available. - Page 15 Figure 1: System Diagram For use only while FDA’s Emergency Use Authorization is in effect.
-
Page 16: Breathing Circuit
Figure 2: Internal Air Pathway The Fitbit Flow connects to a medical gas source through the manual resuscitator bag or the reservoir bag, as per the indications of use of the manual resuscitator. The Fitbit Flow accessory uses motorized arms to automatically compress a resuscitator bag (see Figure 3). -
Page 17: Respiratory Parameter Controls
Safety Features The Fitbit Flow accessory has a pressure sensor at the patient connection and flow sensors on the inspiratory path and expiratory path for monitoring and feedback control. These pressure and flow sensors connect to standard ventilator tubing connectors, as listed below. There are hardware pressure valves which limit the pressure in either limb to 1 PSI (70 cmH O). -
Page 18: Compatible Manual Ventilator
Compatible Manual Ventilator Part Supplier Part Ambu SPUR II Adult Ambu Ambu Spur II Resuscitator Tubing, Sensors, and Valves (outside enclosure) Part Supplier Part Quantity Heat Moisture Exchange (HME) plus virus filter, 22 mm connector Hsiner 70531 Virus filter, 22OD/22ID connector Hsiner 70530 PEEP Valve, 30 mm ID, manual adjustable... -
Page 19: Tubing, Sensors, And Valves (Inside Enclosure)
Eldon James Risks and Benefits The benefits for the use of the Fitbit Flow have been reviewed against the risks of use and have found to outweigh the risks of use during the COVID-19 health emergency. For use only while FDA’s Emergency Use Authorization is in effect. -
Page 20: Device Description
Device Description User Interface The user interface consists of an LCD panel and control buttons and knobs on the front of the box. The LCD screen displays values from the system sensors, as well as mode and alarm settings. Settings may be selected and adjusted with the buttons and knobs as described below (Figure 4). - Page 21 Scroll up through menu items or increase a parameter value Back Return to the previous menu Start/Stop Start or stop the Fitbit Flow Confirm Accept the new setting Alarm Press to see information on an active alarm. Press and hold to silence an active alarm.
-
Page 22: Front Panel
Front Panel Figure 5: Front Panel Reference and Name Description LCD Screen Displays ventilator parameters, sensor values, and alarm information Knob Controls Used to adjust respiration rate, inspiration time, tidal volume, and inspiratory pressure Button Controls Used to navigate the UI, see alarm details, and start/stop ventilation For use only while FDA’s Emergency Use Authorization is in effect. -
Page 23: Back Panel
Holes to attach an optional external display Display connector HDMI and USB connections for an optional external display Service connector USB connection for when the Fitbit Flow needs to be serviced On | Off Switch Switch to turn the Fitbit Flow on and off... -
Page 24: Left Panel
Left Panel Figure 7: Side Panel (Left) Reference and Name Description Medical gas inlet Connects the Fitbit Flow to a medical gas source For use only while FDA’s Emergency Use Authorization is in effect. -
Page 25: Right Panel
Right Panel Figure 8: Side Panel (Right) Reference and Name Description PEEP Valve Connector for PEEP valve to maintain positive end-expiratory pressure. Expiration Inlet for expiratory air coming from the patient via the patient circuit. Inspiration Outlet for inspiratory air to be delivered to the patient via the patient circuit. -
Page 26: Size And Weight
Size and Weight Item Height Width Depth Weight Fitbit 25.2 inches 13.7 inches 15.2 inches 40.3 lb Flow 641.0 centimeters 348.3 centimeters 386.9 centimeters 18.2 kg Stand 37.5 inches 28.4 inches 22.2 inches 28.0 lb 95.2 centimeters 72.2 centimeters 56.4 centimeters 12.7 kg... -
Page 27: Alarms And Troubleshooting
Alarms and Troubleshooting WARNING Do not cover or obstruct the alarm button. The operator must be able to see the alarm button when the device is connected to the patient, particularly in noisy environments where the operator may not hear the alarm. Frequent alarms are possible. -
Page 28: Alarm Display
Alarm Display When an alarm is triggered: ● The alarm button illuminates: ● An audible alarm sounds Press the alarm button to show the alarm details on the LCD screen. Figure 9: Example of Alarms Screen If there are multiple alarms, use the up and down buttons to scroll through them. -
Page 29: Alarm List
Inspiratory tidal pressure target is set too volume is over high programmed limit VTi low The Fitbit Flow cannot Check for kink or occlusion in the Inspiratory tidal achieve set Vt due to inspiratory path. Reduce PEEP. Adjust volume is below physiology, high PEEP, or P in PCV mode. -
Page 30: Additional Troubleshooting
Lid open The Fitbit Flow box lid is Close the lid of the Fitbit Flow. For user open while it is running safety, the Fitbit Flow does not operate when the lid is open. Additional Troubleshooting See the table below for additional troubleshooting steps. -
Page 31: Installation And Setup
Installation and Setup Set up the Fitbit Flow in an area where air can circulate freely. Avoid direct exposure to sunlight, and set the Fitbit Flow on a flat, stable surface where air inlets and outlets are not obstructed. - Page 32 ● 1x Device plate (Part C) ● 16x Caster screws (M6x16, Hex Flathead) (Part D) ● 16x Caster nuts (M6) (Part E) ● 4x Floor plate: vertical support screws (M5x25, Hex, Button Head) (Part F) ● 4x Floor plate: vertical support washers (M5 Flat Washer) (Part G) ●...
-
Page 33: Assembly Instructions
● 4x Device plate: vertical support screws (M5x16, Hex, Flat Head) (Part K) ● 2x Device plate: device screws (M4x22 mm, Hex, Button Head) (Part L) ● 2x Device plate: device washers (M4 Flat Washer) (Part M) Note: Only necessary on some units. - Page 34 1. Add 1 M5 washer (Part G) to each screw (Part F). Use the screws to attach the vertical support (Part B) to the floor plate (Part A). The M5 screws are secured using a 3mm hex wrench. Figure 11: Attaching Vertical Support to Floor Plate 2.
-
Page 35: Assemble The Fitbit Flow Air Pathway System
Figure 13: Attaching Device Plate to Vertical Support 4. Place the Fitbit Flow on the stand, inserting the Fitbit Flow’s feet in the holes. Secure with 1 washer (Part M) to each screw (Part L). Secure using hex wrench. Note: Washer (Part M) is only present on some stands. - Page 36 ● 1x Heat moisture exchange (HME) plus virus filter, 22 mm connecter (Part B) ● 2x virus filter, 22OD/22ID connector (Part C) ● 1x Patient Valve (or Non Rebreathing Valve (NRV))- with 60cm H2O pop off valve and expiratory diverter for PEEP connection, 30 mm OD (Part D) For use only while FDA’s Emergency Use Authorization is in effect.
- Page 37 ● 1x Tubing adapter for PEEP valve, 22mm ID x 30 mm OD (Part E) ● 1x Tubing adapter for patient valve, 30mm ID x 22 mm OD (Part F) ● 1x Corrugated tubing, 60 inches (Part G1) ● 2x Corrugated tubing, 30 inches (Part G2) For use only while FDA’s Emergency Use Authorization is in effect.
- Page 38 ● 1x pressure line adapter, 22mm OD x 22mm ID, fits 3/16” ID pressure sensing tubing (Part H) ● Flexible tubing for air way inspiratory pressure sensing, 3/16-inch ID, 60 inch long (Part ● 1x Water trap, 22M, adult, disposable (Part J) For use only while FDA’s Emergency Use Authorization is in effect.
-
Page 39: Assemble The Patient Circuit
1. Connect the virus filters (Part C) to both the inspiratory and expiratory ports on the right-hand side of the Fitbit Flow housing. 2. Connect the 60-inch long corrugated tubing (Part G1) to the end of the virus filter on the inspiratory limb to the inspiratory port of the NRV patient valve (Part D). -
Page 40: Assemble The Bvm Inside The Fitbit Flow
(not provided). This completes the patient airway circuit. 12. Use the tubing adapter (Part E) to connect the adjustable PEEP valve (Part L) to the PEEP valve port on the Fitbit Flow. Figure 15: Patient Circuit Assembly Figure 16: Patient Valve Assembly Assemble the BVM Inside the Fitbit Flow 1. -
Page 41: Power The Fitbit Flow
Power the Fitbit Flow WARNING The Fitbit Flow does not have an internal backup battery and does not have the capability to sound an alarm when power is interrupted. Connect the Fitbit Flow to a UPS to provide backup power. - Page 42 The Fitbit Flow is powered with an AC connection. 1. Connect the female end of the Fitbit Flow’s AC power cable to the AC connector on the back of the Fitbit Flow. Figure 18: AC Power Cable Connector 2. Connect the male end of the AC power cable to the AC power outlet.
-
Page 43: Operating Procedures
Turn On the Fitbit Flow To turn on the Fitbit Flow, turn the ON | OFF switch to the ON position, as shown below. Figure 19: ON | OFF Switch (“ON” Position) The LCD screen will display a welcome message and the current firmware version for 5 seconds when the Fitbit Flow turns on. -
Page 44: Volume Control Mode
Volume Control Mode From the main menu on the LCD screen: 1. Press the up button (if needed) to move the selector to VCV. 2. Press the confirm button to choose the ventilation mode. If the VCV mode is already active, you’ll see the following critical settings and measurements: ●... -
Page 45: Pressure Control Mode
Accept and press the confirm button . If ventilation is not in progress, the Fitbit Flow will use the selected parameters when ventilation is turned on. If ventilation is already in progress, the selected parameters are applied on the next breath. - Page 46 3. Press the down button to move the selector next to PCV. 4. Press the Confirm button to choose the ventilation mode. If the mode is already active, you’ll see the following critical settings and measurements: ● PCV: Indicates which mode you selected ●...
-
Page 47: Assist Control
Accept and press the confirm button . If ventilation is not in progress, the Fitbit Flow will use the selected parameters when ventilation is turned on. If ventilation is already in progress, the selected parameters are applied on the next breath. -
Page 48: Inspiratory Hold
When Assist Control is disabled, an alarm will trigger if spontaneous breaths are detected. Inspiratory Hold The inspiratory hold function pauses the Fitbit Flow at end-inspiration for one second. This maneuver can be used to measure the patient’s plateau pressure (also called alveolar pressure). -
Page 49: Stop Ventilation
5 seconds. Turn off the Fitbit Flow To turn off the Fitbit Flow, turn the ON | OFF switch to the OFF position, as shown below. Figure 24: ON | OFF Switch (“OFF” Position) The LCD screen turns off. - Page 50 7. When the parameter is set to the number you want, press the confirm button 8. Press the back button to return to the previous screen. Adjustable parameters include: ● Pmax: This parameter sets the maximum allowed airway pressure. If it’s exceeded, the Pmax alarm is triggered and the inspiration cycle in progress is immediately terminated.
-
Page 51: Cleaning And Maintenance
Flow clean. To clean the surfaces: 1. Dampen a soft, clean cloth with a mild soap solution. Remove any excess liquid. 2. Wipe the external case of the Fitbit Flow with the damp cloth. Do not immerse the Fitbit Flow in liquid. -
Page 52: Replace Accessories
Specifications The Fitbit Flow provides continuous mechanical ventilation by automatically compressing a resuscitator bag. The Fitbit Flow can operate in Volume Control mode, Pressure Control mode, with or without the Assist Control setting. The ventilatory parameters are listed below. Physical... -
Page 53: Accuracy
(.21-1.0) *FiO is not measured by system. A table (see Appendix Table A.1) is provided as guidance for matching the source gas flow to minute ventilation, to maintain desired FiO monitoring is recommended. I:E ratio (1:1-1:3) Yes* *Can do 1:4... -
Page 54: Electrical
-tidal volume Electrical The Fitbit Flow uses a 138W medical-grade Class II power supply, which supports 100-240 VAC, 47-63 Hz. The power supply accepts a 2 prong, detachable power cord and is compliant For use only while FDA’s Emergency Use Authorization is in effect. -
Page 55: Alarm Conditions
Alarm Conditions The Fitbit Flow has a set of visual and audible alarms to alert the operator when ventilator conditions exceed set limits. Default values are listed, but values should be changed based on recommendations from professionals caring for COVID-19 patients. - Page 56 3. The volume has reached an alarm limit. For use only while FDA’s Emergency Use Authorization is in effect.
-
Page 57: Appendix
The percentage of oxygen in the air delivered to the patient (FiO ) is determined by the source oxygen content and flow rate, and the patient minute ventilation. The minute ventilation is the product of the respiratory rate (RR) in breaths per minute (bpm) and tidal volume (V ) in milliliters (mL). -
Page 58: Standards Compliance
Support Equipment for Ventilatory Insufficiency Particular Standards The manual resuscitator bag that has been tested with the Fitbit Flow is the Ambu Spur II. This is an FDA cleared device. The Ambu Spur II claims conformance to the following standards: ●... -
Page 59: User Assistance Information
User Assistance Information This manual is for SKU: FB605WTWT. Technical Support For assistance or support, email support_flow@fitbit.com or call 1-800-676-1401 (Mon-Fri: 5am-5pm PT, Sat-Sun: 8am-5pm PT) . Manufactured by: Fitbit, Inc. 199 Fremont St. 14th Floor San Francisco, CA 94105 www.fitbit.com Trademark Information ©2020 Fitbit, Inc.
Need help?
Do you have a question about the Flow and is the answer not in the manual?
Questions and answers