Table of Contents
Advertisement
Quick Links
E-FLIGHT BLADE CX
COMPLETE DISASSEMBLY
JANUARY 2006
THIS IS NOT AN OFFICIAL E-FLIGHT MANUAL OR INSTRUCTION. IT IS BEING PROVIDED FOR INFORMATIONAL PURPOSES ONLY.
AERONUTS
AUTHOR ASSUMES NO LIABILITY FOR DAMAGE – USE AT OWN RISK.
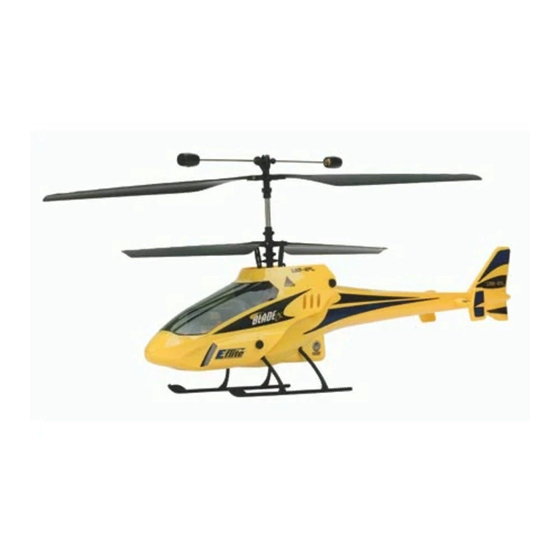
The E-Flight Blade CX in basically stock form, prior to disassembly. You will be
working with small parts and screws that are easy to lose. Keep a plastic cup or
other container on your work surface to contain screws and/or small parts.
The only tool you will absolutely need for the disassembly (not including mods) is
the precision Phillips head screwdriver (far left) that was supplied in the parts bag
with your Blade CX.
I prefer something with a little more grip, so I use a Stanley precision screwdriver
(center). These are available in a set from just about any retail store (got mine at
WalMart).
You will also find a set of ball link pliers (right) helpful, although not necessary.
Remove the canopy and slide the two CF rods out of the frame and tail section.
To remove skids, grasp strut firmly against body and gently pull strut from battery
holder assembly on bottom of main frame. Do this for each of the four struts.
Gently slide tail section off of frame and antenna.
PAGE 1 OF 8
Advertisement
Table of Contents

Subscribe to Our Youtube Channel
Related Manuals for E-flight BLADE CX


Summary of Contents for E-flight BLADE CX
- Page 1 E-FLIGHT BLADE CX COMPLETE DISASSEMBLY JANUARY 2006 THIS IS NOT AN OFFICIAL E-FLIGHT MANUAL OR INSTRUCTION. IT IS BEING PROVIDED FOR INFORMATIONAL PURPOSES ONLY. AERONUTS AUTHOR ASSUMES NO LIABILITY FOR DAMAGE – USE AT OWN RISK. The E-Flight Blade CX in basically stock form, prior to disassembly. You will be working with small parts and screws that are easy to lose.
- Page 2 AERONUTS To remove the drive gear for the inner shaft, loosen the screws on each side of the aluminum retaining collar. This will allow the inner shaft to be pulled out of the rotor mast. Just as a suggestion, back the screws all the way out, then screw them back in 1 ½ to 2 turns so you can keep the screws in the collar and not misplace them.
- Page 3 AERONUTS Remove the flybar and upper blades from the upper rotor. This tutorial assumes that the user is familiar enough to be able to remove blades without further instruction. Gently pull the cap at the end of the outer drive shaft that holds the bearing for the inner drive shaft.
- Page 4 AERONUTS This photo, and the one that precedes, were posted by LRHann. He recommends to mark the outer drive shaft with a sharpie horizontally at the top of the rotor hub, and vertically in line with the set holes. This makes lining up the screws easier during reassembly.
- Page 5 AERONUTS Slide the retaining collar up and off of the outer drive shaft. Remove the four screws that hold the battery tray to the main frame. Gently work each of the four points where the battery tray attaches to the man frame, and separate the tray from the main frame.
- Page 6 AERONUTS You may want to mark these connections to assure that you return them to the proper locations on the 4in1 during reassembly. Gently twisting the 4in1 unit will often be enough to get the double sided adhesive tape that holds it in place to release. If not, gently working at the tape joint with a razor blade or flathead screwdriver should allow for separation.
- Page 7 AERONUTS Gently remove the back of the case. By pushing gently on the battery lead, and pulling gently on the circuit board, the adhesive that holds the board inside the case should break free and allow removal of the 4in1 board from its case. The empty case can now be safely cut or drilled to perform a 4in1 cooling mod.
- Page 8 AERONUTS The starboard side servo is held by one screw at the top and double stick tape at the bottom. Disassembled BCX. Can I put this back together?!?!?!?! Just reverse the steps and use a little common sense and good judgement. Obviously, this tutorial is not exhaustive or all-inclusive.
Need help?
Do you have a question about the BLADE CX and is the answer not in the manual?
Questions and answers