Table of Contents
Advertisement
Quick Links
Advertisement
Table of Contents

Summary of Contents for Skip-Line MST-02
- Page 1 MST-02 Installation and Operation ...
-
Page 2: Read Before Installing
CAUTION READ BEFORE INSTALLING! THIS EQUIPMENT IS FOR 12 VOLT NEGATIVE GROUND SYSTEMS ONLY! Do not connect to positive ground systems or damage will result. All control units have threaded inserts on each side to facilitate mounting. Fabricate a suitable "U"... - Page 3 MST-o2 Wiring W-30 PIN # Color Function ORANGE/BLACK #1 PAINT GREEN/BLACK #2 PAINT RED/BLACK #3 PAINT BLUE/BLACK #4 PAINT WHITE/BLACK #1 BEADS BLUE #2 BEADS ORANGE #3 BEADS WHITE #4 BEADS GREEN 10 BLACK/WHITE +12 VOLTS IN 12 BLACK 13 GREEN/WHITE 14 RED/WHITE PUMP STROKE 2 15 BLUE/WHITE...
- Page 4 Sensor Cable PIN # Color Function POWER CLEAR SENSOR SIGNAL BLACK GROUND SHIELD GROUND ...
-
Page 5: Menu Modes
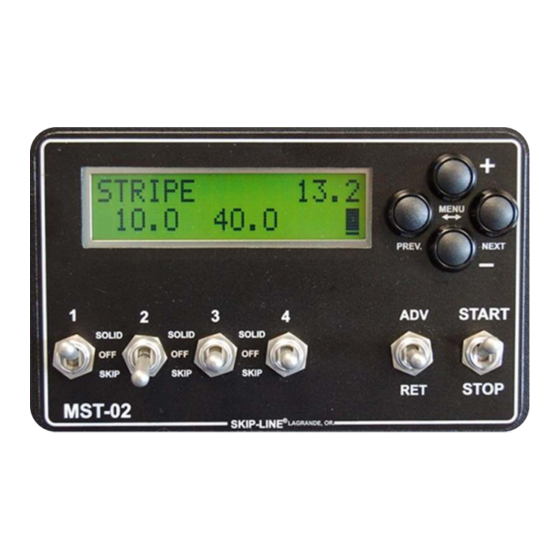
MENU MODES There are (4) MENU levels in the MST-02 Skip-timer. To access the different MENU levels press PREV. and NEXT simultaneously. PAINT MENU shows STRIPE and CYCLE numbers and MPH (Km/H). To adjust STRIPE, the word “STRIPE” must appear on the display. In the Main Menu use (+) or (-) to raise or lower the STRIPE length. - Page 6 Press the PREV. button again to access the “BEADS ON/OFF” menu item. From this display screen, press (+) to turn on the beads, and (-) to turn the beads off. The beads can be turned ON or OFF while painting. MONITOR MENU To change to the COUNTERS Menu, from the MAIN Menu, press the menu keys (PREV.
- Page 7 squirt a little longer paint pattern than the electrical system commands. The "hanging on" also causes some variation in stripe length with truck speed. The effect will be most evident at high truck speed. If a paint gun hangs on for .050 second, the error will be 1.1 foot at 15 mph. The STRIPE length can be calibrated by adjusting the GUN FACTOR for each gun.
-
Page 8: Calibration: (Setup Menu)
CALIBRATION: (SETUP MENU) Before entering the calibration mode, erase the ODOMETER counter channel. Next, drive a known distance (1000 feet or more) with the START switch in the START position. Now enter the DISTANCE CALIBRATION menu item. From the STRIPE and CYCLE menu, press PREV. - Page 9 "DELAY 1st SHOT" (SETUP MENU) DELAY1 is a feature that delays the first stripe to allow full coverage by the glass beads. The paint gun is actually delayed in turning on by the amount dialed into the beginning bead registration as described below. To activate the "DELAY1"...
- Page 10 COUNTERS (MONITOR MENU) From the PAINT MENU, press the MENU buttons (PREV. and NEXT) two times to view the counters. The NEXT button will then advance to the next counter channel. The PREV. button will take you to the previous counter channel. TO RESET ONE CHANNEL: Push and hold the (+) button.
- Page 11 Hold the ADV control in the UP position a moment to shift the pattern forward on the pavement. The RE control shifts the pattern backward. The longer each control is held, the greater the pattern displacement. When not in motion this control has no effect.
-
Page 12: Limited Warranty
LIMITED WARRANTY LIMITED WARRANTY In the event that equipment manufactured by SKIP- LINE, INC. (hereinafter referred to as manufacturer) fails to operate properly due to defect in material or workmanship within a period of 180 days from the date of the original purchase, said equipment will be repaired at manufacturer's facilities without charge for parts or labor.
Need help?
Do you have a question about the MST-02 and is the answer not in the manual?
Questions and answers
Does the mst-02 count the footage that is painted and if so how do you retrieve that info