Advertisement
Quick Links
Advertisement

Subscribe to Our Youtube Channel
Summary of Contents for MedKlinn O3 HYDRO 5
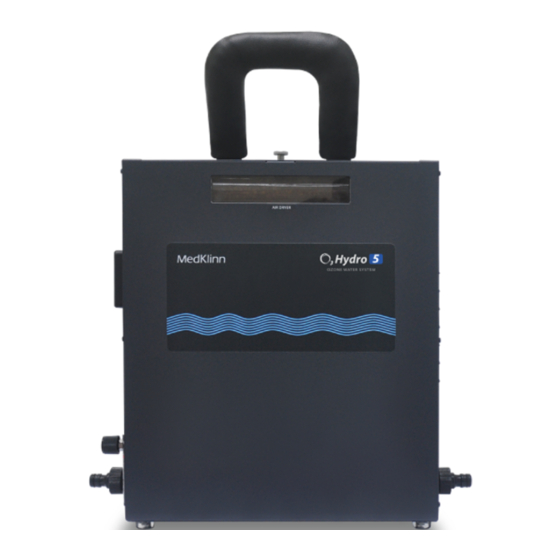
- Page 1 O3 HYDRO 5 O3 HYDRO 5 USER MANUAL...
-
Page 2: Table Of Contents
TABLE OF CONTENT 1. Safety Precautions 2. Device Identi cation 3. System Overview 4. Getting Started 5. Basic Maintenance... -
Page 3: Safety Precautions
User. Opening the device or tampering with it in any way will cause the Warranty to become void. If you encounter any problems with the device, please contact the nearest authorized Medklinn Service Centre. - Page 4 NOTE – Radio, TV or sensitive equipment Interference: If the device should cause interference to radio, television reception or any sensitive equipment, try to correct the interference by one or more of the following measures: Reorient or relocate the receiving antenna. Increase the distance between the device and radio/TV receiver/sensitive equipment.
-
Page 5: Device Identi Cation
To switch the device ON/OFF Ozone water ows out from Water Outlet here ON/OFF Button Controls the amount of oxygen O2 Control owing into the device’s ozone Power Inlet module O2 Control Water Outlet Medklinn O3 Hydro 5 (Left Side View) - Page 6 Device Identi cation Functional parts Water Inlet Water supply ows into here Air Ventilation Holes Attach to give better stability Base Support to the device Water Inlet Base Support Medklinn O3 Hydro 5 (Right Side View)
- Page 7 Device Identi cation Hose Outlet Hose Quick Plug (Female) Medklinn O3 Hydro 5 Accessories (Hose 1) Functional parts Hose Outlet: Focuses the spray pattern of the water Quick Plug (Female): Secures the hose to the water source and/or device...
- Page 8 Device Identi cation Quick Plug (Female) Hose Quick Plug (Female) Medklinn O3 Hydro 5 Accessories (Hose 2) Functional parts Secures the hose to the water source and/or Quick Plug (Female): device...
-
Page 9: System Overview
Dissolves oil and grease When the Medklinn O3 Hydro 5 operates, the air is drawn into the air dryer chamber, which dries the air. The dry air is supplied to the ozone module which breaks it down to ozone (O3) with the use of electricity. It is then infused into the water through a... -
Page 10: Getting Started
Getting Started: Connecting the hose Using Quick Plug 1. Connect a Quick Plug (Male) to the water source pipe with male threaded end. Hose 2 Quick Plug (Male) Quick Plug (Female) ¾” Pipe with male threaded end (water source) NOTE: Make sure that there is enough Te on tape when attaching the Quick Plug (Male) to the threaded end of the pipe to avoid leakage at that point... - Page 11 2. Pull the yellow cap of the Quick Plug (Female) while connecting to the Quick Plug (Male). Release the cap to secure the connection. There should be a “click” sound when the Quick Plugs are secured together. Pull the hose gently to con rm that the connection is indeed secured. 3.
- Page 12 To a water tap 1. If you have a water tap, please remove one end of the Hose 2 Quick Plug (Female) by loosening the cap. Hose 2 2. Pull out the Quick Plug.
- Page 13 3. Connect the hose to the water tap with a hose clip. Tighten the hose clip with a screwdriver. Ensure it is tight so that water will not leak out when Hose Clip the tap is turned on. 4. Connect the other Quick Plug (Female) of Hose 2 to the device’s Water Inlet.
- Page 14 Controlling the ozone level into the water The Medklinn O3 Hydro 5 ozone level is controlled by turning the knob of the O2 Control to increase or decrease the level ozone generation. It is advisable to keep the ow rate between 1 - 1.5 lpm.
- Page 15 NOTE: Leave a distance of 1.5 cm screw length from the wall. Do not screw all the way in. The length allows the device to be hooked on safely. 2. Hook the Medklinn O3 Hydro 5 mounting slots onto the screws. Mounting Slots...
- Page 16 Option B: Table top 1. Remove the 4 pieces of M4 screws from the device (2 at the back, 2 at the bottom) 2. Align and secure the Base Support to the device using the same 4 screws. M4 screws Base Support...
-
Page 17: Basic Maintenance
Basic Maintenance Cleaning the Fan Filter 1. Turn o the AC power outlet. Make sure the light at the ON/OFF Button is not lit. 2. Remove the Fan Filter by pulling out the Filter Cover. Filter mesh Filter cover... - Page 18 3. Brush the Filter Mesh with a soft bristle brush. Rinse and dry the Filter Cover. Wipe the Fan gently with a dry cloth. Filter Mesh Filter Cover 4. Assemble the Fan Filter in proper order and reattach it to the Fan. 5.
Need help?
Do you have a question about the O3 HYDRO 5 and is the answer not in the manual?
Questions and answers