Zimmer enPulsPro User Manual
Hide thumbs
Also See for enPulsPro:
- Instructions for use manual (53 pages) ,
- Instructions for use manual (53 pages) ,
- Instructions for use manual (46 pages)
Table of Contents
Advertisement
Quick Links
Advertisement
Table of Contents

Related Manuals for Zimmer enPulsPro


Summary of Contents for Zimmer enPulsPro
- Page 1 User Manual enPulsPro...
- Page 3 Illustrations Front of the device Fig. 1 Selection and 1 Control unit operating elements 2 Pulse energy controller 3 Display 4 Frequency controller 5 Slot for SD card 6 Power switch Handpiece 7 Handpiece 8 Vent, front 9 Vent with fan, rear 10 Holder for hand piece Footswitch 11 Footswitch...
-
Page 4: Illustrations
Illustrations Rear of the device Fig. 2 Switches / 13 Socket for mains cable Connector sockets 14 Mains fuse 15 Socket for handpiece channel I 16 Socket for handpiece channel II 17 Socket for footswitch 18 Identification plate... -
Page 5: Screens / Displays
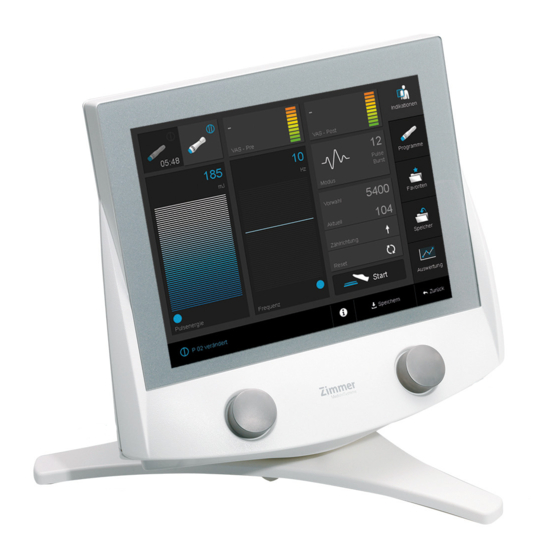
Illustrations Screens / Displays Fig. 3 Displays / Therapy 19 On-screen buttons screen 20 Status bar 21 Navigation bar 22 VAS- Pre scale 23 VAS- Post scale Fig. 4 Navigation bar (A) Back Takes you back one step Description of the (B) Therapy Switches to the therapy screen functions... -
Page 6: Applicator Heads And Accessories
Illustrations Applicator heads and accessories Fig. 5 Applicator heads 24 Applicator head, 25 mm 25 Applicator head, 15 mm 26 Applicator head, 6 mm Accessories 27 Silicone protection cap... -
Page 7: Explanation Of Symbols
Explanation of Symbols In the instructions for use, this symbol indicates danger. In the instructions for use, this symbol indicates a "Caution" with regard to Caution possible damage of the device. Socket for handpiece Socket for footswitch User Manual Follow user manual Serial number Article number Manufacturer... -
Page 8: Table Of Contents
Applicator heads and accessories Explanation of Symbols Page Indications / Contraindications Side Effects Application Information Warnings enPulsPro – in brief Device Set-Up Settings Operating Instructions 8.1 Device Description 8.2 Notes on Operation 8.3 Performing the Treatment 8.4 Display and Buttons 8.5 SD card... - Page 9 Error Messages / Troubleshooting / Disposal Manufacturer´s EMC Declaration Valid for the device enPulsPro (NG). This user manual is an integral part of the device. It must be stored with the device and kept accessible at all times for anyone authorized to operate this device.
-
Page 10: Indications / Contraindications
Indications / Contraindications Indications For relief of minor muscle aches and pains and for temporary increase in local blood circulation. Contraindications vascular diseases present in or near the treatment area local infections in the treatment area around malignant or benign tumors ... -
Page 11: Side Effects
Side Effects Side Effects Treatments with enPulsPro may occasionally cause irritation, petechial, bruising, swelling or pain. Page 2... -
Page 12: Application Information
Please keep a safe distance of several meters. enPulsPro is not suitable for use in areas with an explosive, flammable or combustive environment. When in operation, the device must be positioned in such a way that direct access to the device's central power supply is possible, so that it can be disconnected from the mains at any time. -
Page 13: Warnings
15 min. If the treatment time is exceeded, the handpiece may overheat. Users of the enPulsPro radial pulse therapy device must be instructed in the Caution proper use of the system and must possess the appropriate skills. - Page 14 Warnings In worst case condition maximum therapy time is limited to 4 minutes treatment time and a break time of 5 min. If you will exceed this duty cycle the handpiece can be in overtemperature. Page 5...
-
Page 15: Enpulspro - In Brief
The impact energy delivered from the applicator head results in radial pulses developed in the target tissue. With enPulsPro, a maximum penetration depth of about 35 mm into human tissue can be achieved. -
Page 16: Device Set-Up
Device Set-Up Note: If enPulsPro is not mounted on the designated system trolley, please make sure that it is standing on a stable surface. We recommend using the optional swivel base. Note: Make sure that the power switch on the device is set to "0". -
Page 17: Settings
Settings Note: Changes to the basic settings can only be made from the start –up screen. Start –up screen Once the device has been switched on and the self-test performed, the home start – up screen opens. Note: Pressing the "Therapy" button (1) immediately switches to the therapy screen Configuration menu The factory settings can be changed and adjusted individually using the configuration menu. - Page 18 Settings (1) Startup settings 1. Start menu: Individual startup settings options. The selection is made directly in the corresponding row. (2) Language Selecting the language. The selection is made directly in the corresponding row. (3) Welcome Pressing the "Welcome" field opens a window with an alphabetic keyboard to enter a welcome message for the start-up screen.
-
Page 19: Operating Instructions
The pulse generator in the handpiece is a wear part and must be replaced after a certain period of operation, as its ability to function decreases with time. Zimmer MedizinSysteme GmbH guarantees the unrestricted use of at least two million shocks per radial pulse generator. - Page 20 In addition to temperature monitoring, enPulsPro features temperature regulation by means of a temperature sensor in the handpiece. The fan in the handpiece starts upon activation using the footswitch and automatically stops when a certain temperature is reached.
-
Page 21: Notes On Operation
8.2 Notes on Operation Therapy Please hold the handpiece as shown in the picture below. enPulsPro works using mechanical energy, which is transferred to the patient via a handpiece. In order to achieve this, the handpiece with the applicator head is placed perpendicular to the treatment area or the point of treatment. -
Page 22: Performing The Treatment
Set the pulse energy using the left controller. energy Note: enPulsPro offers two options for the pulse output. Pulse emission with pre-set number of pulses For pulse emission with pre-set number of pulses, the treatment is terminated by the device after the pre-set number of pulses has been emitted. -
Page 23: Display And Buttons
Operating Instructions 8.4 Display and Buttons Description of the display elements and buttons (1) Pulse energy Displays the pulse energy setting. During active therapy, the bar graph is filled. The pulse energy can be set both before and during the delivery of pulses. The pulse energy is adjustable between 60 and 185 mJ, in 10mJ increments. - Page 24 Operating Instructions 8.4 Display and Buttons (5) Mode Displays the selected operating mode. Upon activation of the menu, the selection menu appears with the following operating modes: Series Pulse, Burst - 4 pulses, Burst - 8 pulses, Burst - 12 pulses. The desired operating mode is selected directly in the corresponding row.
-
Page 25: Sd Card
Operating Instructions 8.5 SD Card SD card Custom settings are stored on the SD card. If the SD card is not inserted, the following message appears when the "Favorites" and "VAS" buttons are pressed: "No SD card found". The use of "Favorites" and "VAS" requires an SD card. Insert the card and confirm with "OK". -
Page 26: Favorites List - Retrieving Programs, Editing Lists
Operating Instructions 8.6 Favourites List – Retrieving Programs / Editing Lists The parameters of the pre-defined programs can be individually modified and saved. Saving and naming Pressing the "Save" button opens the field for entering the program name. the program The program name is entered via the keyboard. - Page 27 Operating Instructions 8.6 Favourites List – Retrieving Programs / Editing Lists The individually stored programs are listed in the favorites list. Here these can be 1. retrieved for treatment 2. edited (the sequence altered or entries deleted). Select favorites list Pressing the "Favorites"...
- Page 28 Operating Instructions 8.6 Favourites List – Retrieving Programs / Editing Lists Editing favorites Pressing button (1) returns you to the program. Pressing button (2) moves the program up. Pressing button (3) moves the program down. Pressing button (4) deletes the program. Pressing button (5) confirmed the processing.
-
Page 29: Vas - Visual Analogue Scale
8.7 VAS – Visual Analogue Scale VAS information enPulsPro features a visual analogue scale, also referred to as the pain scale. The pain scale is commonly used in pain therapy. The pain scale is used to measure the patient's subjective pain intensity. - Page 30 Operating Instructions 8.7 VAS – Visual Analogue Scale Editing the VAS list Pressing button (3) as well as button (4) and selecting the program to be edited directly in the corresponding row opens the screen for editing the data. Pressing the "Delete" button deletes the program. Pressing the "Scroll"...
- Page 31 Operating Instructions 8.7 VAS – Visual Analogue Scale Performing The pain sensation after treatment is establishes by activating the "VAS Post" VAS-Post field. Note: The execution of the "VAS-Post" is identical to the execution of "VAS-Pre" and is therefore not described again. Repeating Existing patients are activated in the VAS list directly on the corresponding line.
- Page 32 Operating Instructions 8.7 VAS – Visual Analogue Scale Table Pressing button (1) also displays the therapy progress in tabular form. Page 23...
-
Page 33: Technical Information
Interval operation Accuracy ± Dimensions enPulsPro with H 54.33 Inch (138 cm) x W 20.87 Inch (53 cm) x L 20.47 Inch (52 cm) SysCart enPulsPro H 11.81 Inch (30 cm) x W 13.78 Inch (35 cm) x L 7.87 Inch (20 cm) SysCart H 42.91 Inch (109 cm) x W 20.87 (53 cm) x L 20.47 Inch (52 cm) - Page 34 Technical Information Handpiece enPuls (version 2.2) Dimensions 9.06 Inch (230 mm) long, 1.97 Inch (50 mm) diameter Weight 1.87 lb (850 g) Lifetime 2,000,000 shocks (radial pulse generator) Applicator heads 0.24 / 0.59 / 0.98 Inch (6 / 15 / 25 mm) Diameter; can be changed without tools 150,000 shocks guaranteed Handpiece ZWave (version 2.2) Dimensions...
-
Page 35: Info-Chart Duration Of Treatment
Technical Information 9.1 Info-Chart Duration of Treatment Maximum pulses per treatment Frequency (Hz) Page 26... -
Page 36: Cleaning Disinfection
Cleaning Disinfection - Before starting any maintenance and cleaning measures the device must always be switched off at the main switch and the mains cable unplugged. - Make sure that when cleaning and disinfecting the labels of the device (such as warnings, labels of control devices, identification plate) are not damaged. - Page 37 Cleaning Disinfection Applicator head / Cleaning (only manually) handpiece Tools: Disposable wipes (cellulose, paper) Alcohol-free plastic cleaner (e.g. cleaner for medical devices) Remove the silicon protective cap from the applicator head before cleaning. Then proceed as indicated under “housing / foot switch”. Disinfection (only manually): Tools: ...
- Page 38 Cleaning Disinfection the inner and outer surfaces of the protective are wetted. Leave the protective cape in the solution as long as defined by the manufacturer of the disinfection agent. Rinse off the protection cap under running water. Cleaning / Disinfection, by machine: Preparation: Visible contaminations must be removed by manually before performing cleaning / disinfection.
-
Page 39: Scope Of Delivery And Accessories
Scope of Delivery and Accessories Scope of delivery in combination with column Part No. 5430 enPulsPro controller unit 9160 SysCart with tray mount 5413 Handpiece (version 2.2) 93133521 Applicator head, 6 mm 93133511 Applicator head, 15 mm 93133502 Applicator head, 25 mm... - Page 40 Equipment Combinations For enPulsPro no combinations devices are provided by the manufacturer. Anyone who, acting contrary to this specification, combines devices and thus operates a medical system does so at their own risk. Page 31...
-
Page 41: Safety And Maintenance
Safety and Maintenance 14.1 Safety enPulsPro is manufactured according to the DIN EN 60601-1 safety regulations. As manufacturer, Zimmer MedizinSysteme can only be considered responsible for safety and reliability if the device is operated using a proper power outlet with a properly grounded, contact and the electrical installation complies with DIN VDE 0100 part 710, ... -
Page 42: Maintenance
Safety and Maintenance 14.2 Maintenance Before commencing cleaning and maintenance, the machine must always be switched off at the main switch and the mains socket. Checking the impact During the course of normal use, a deformation / shortening of the rear impact dome dome on the applicator heads may occur. -
Page 43: Functional Test
Functional Test enPulsPro performs a self-test when switched on checking all the internal components. In the event of a fault, an error message appears. In addition, a further function test can be performed as described below. This test should be performed monthly or in case of doubt about the proper function of the device. -
Page 44: Safety Check Metrological Control
Safety Check Metrological Control Neither a safety check (STK) nor a metrological control (MTK) is required for the device enPulsPro in Germany. In Germany, the Medical Devices Operator Ordinance (Medizinprodukte- Betreiberverordnung, MPBetriebV) and the DGUV (Vorschrift 3 Elektrische Anlagen und Betriebsmittel) apply in their current version, amongst other regulations. -
Page 45: Error Messages Troubleshooting Disposal
Error Messages Troubleshooting Disposal Loss of function In the status bar the message "Ready" appears and no pulse is triggered in handpiece spite of activating the footswitch Possible cause 1 Handpiece / footswitch not properly connected or defective. Remedy for cause 1 Make sure that the footswitch and handpiece are correctly connected. - Page 46 Error Messages Troubleshooting Disposal Applicator not found In the status bar, the message "No applicator found" appears. Possible cause Handpiece not or improperly connected. Remedy for cause Make sure that the handpiece is properly connected. The plug must be fully inserted.
- Page 47 Fax +49 (0)731. 9761-118 www.zimmer.de export@zimmer.de Disposal Please observe the national regulations regarding disposal. Contact your distributor if necessary. The device may only be returned to the factory in the original packaging. It must be disposed of by Zimmer MedizinSystems. Page 38...
-
Page 48: Manufacturer´s Emc Declaration
The device enPulsPro does not contain any components which age over the course of the device lifetime and could lead to a deterioration of the electromagnetic compatibility. Thus, no maintenance is required during the life of the device to ensure basic safety. - Page 49 Table 2 Guidance and Manufacturing Declaration- Electromagnetic Immunity The device enPulsPro is intended for use in the electromagnetic environment specified below. The customer or user of the device enPulsPro should ensure that it is used in such environment. Immunity Tests...
- Page 50 Table 3 Guidance and Manufacturing Declaration- Electromagnetic Immunity The device enPulsPro is intended for use in the electromagnetic environment specified below. The customer or user of the device enPulsPro should ensure that it is used in such environment. Immunity Test...
- Page 51 Manufacturer's EMC Declaration Table 4 Electromagnetic immunity to HF radio communication equipment Test Maximum Immunity Test Band Distance Frequency Service Modulation Energy Level (MHz) (MHz) (V/m) 380-390 TETRA 400 Pulse modulation 18 Hz 430-470 GMRS 460, FRS 460 ± 5k Hz Derivation 1k Hz sine 704-787 LTE band 13, 17...
- Page 52 User Manual Zimmer MedizinSystems 3 Goodyear, Suite B Irvine, CA 92618 Tel: (800)-327-3576 Fax: (949)-727-2154 www.zimmerusa.com info@zimmerusa.com...
Need help?
Do you have a question about the enPulsPro and is the answer not in the manual?
Questions and answers