Table of Contents
Advertisement
Available languages
Available languages
Quick Links
Advertisement
Table of Contents

Related Manuals for SPIT DWS 225 Series

Summary of Contents for SPIT DWS 225 Series
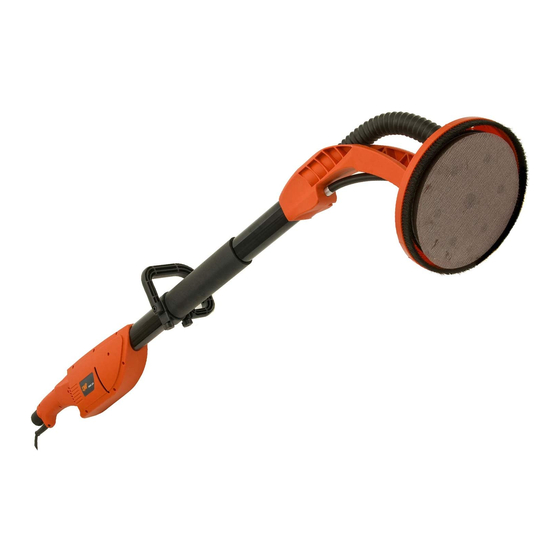
- Page 3 1. Sanding head 1. Tête de ponçage 2. Column 2. Colonne 3. Bail handle 3. Poignée avec anse 4. Main handle 4. Poignée principale 5. Vacuum swivel mount 5. Monture sur pivot de l’aspirateur 6. ON/OFF switch 6. Interrupteur MARCHE/ARRÊT 7.
-
Page 5: Specific Safety Rules
If you have any questions related to its application do not use the tool and contact your Spit dealer. 9. Use the machine with both hands at all times. Loss of control can cause personal injury. -
Page 6: Technical Specifications
Hand-arm-vibrations (K) Confirmation declaration We declare in sole responsibility that the product type Spit DWS 225 referred to in this declaration conforms to the following standards and further normative documents. We declare under our sole responsibility that this product is in conformity with the... -
Page 7: Functional Description
It is designed to work in conjunction with the Spit vacuum cleaner AC 1600 for minimum dust and best sanding results. The pivoting sanding head allows excellent results with minimum time and effort. - Page 8 The brush bristles on the edge of the sanding plate cover serve two purposes. They keep the sanding disc properly aligned with the work surface without gouging and they also help the efficiency of the dust collection by the Spit vacuum cleaner AC 1600. These brush bristles will wear with continued use.
- Page 9 (6). Removal is the opposite of assembly. The Spit vacuum cleaner AC 1600 Ensure that you have a dust bag installed in your vacuum cleaner which is approved and rated for drywall dust.
-
Page 10: How To Use The Tool
Switching the machine on and off To switch on While holding the left hand on the column and the right hand on the main handle, press the rocker to switch to the right with the thumb of the right hand. Anticipate and be ready for the start up torque when the machine first starts (8). -
Page 11: Maintenance
Sanding operations Once the machine and vacuum cleaner are set up and all safety measures and equipment are in place, begin by turning on the vacuum cleaner and then the machine. (If you are using a vacuum cleaner with integrated switching, then simply turn the machine on) Begin sanding and carefully contact the work surface as lightly as possible - just enough to keep the sanding head flat against the surface. - Page 12 When replacing the 2 motor and handle cover halves take great care that all wires are in place and not in a position to be pinched when it is retightened. It is recommended that, at least once a year, you take the tool to a Spit authorized service centre for a thorough cleaning and lubrication.
-
Page 13: Règles De Sécurité Spécifiques
été conçu. Si vous avez des questions concernant son application, n’utilisez pas l’outil et contactez votre revendeur Spit. 9. Utilisez la machine avec les deux mains à tout moment. Une perte de contrôle peut provoquer des blessures corporelles. -
Page 14: Caractéristiques Techniques
Déclaration de confirmation Nous déclarons qu’il est de notre seule responsabilité que le type de produit Spit DWS 225 auquel il est fait référence dans la présente déclaration soit conforme aux normes suivantes et à des documents normatifs complémentaires. Nous déclarons qu’il est de notre seule responsabilité que ce produit soit conforme aux... -
Page 15: Description Fonctionnelle
Elle a été conçue pour être utilisée avec l’aspirateur Spit AC 1600 pour une poussière minimum et les meilleurs résultats de ponçage. La tête de ponçage pivotante offre d’excellents résultats pour un minimum de temps et d’efforts. - Page 16 également l’efficacité de la récupération de poussière par l’aspirateur Spit AC 1600. Ces poils de brosse s’useront en cas d’utilisation permanente. Le couvercle du plateau ponceur doit être remplacé lorsque les poils sont trop usés pour garantir une récupération de poussière efficace ainsi que la stabilisation de la tête...
- Page 17 à baïonnette du flexible dans le sens horaire pour la verrouiller (6). La procédure de dépose est l’inverse de la procédure de montage. Aspirateur Spit AC 1600 Veillez à installer un sac à poussière dans votre aspirateur qui soit homologué...
- Page 18 Mise sous tension et hors tension de la machine Mise sous tension Tout en maintenant la main gauche sur la colonne et la main droite sur la poignée principale, poussez l’interrupteur à bascule vers la droite avec le pouce de la main droite.
-
Page 19: Entretien
Travaux de ponçage Une fois que la machine et l’aspirateur sont réglés et que toutes les mesures et équipements de sécurité sont en place, commencez par allumer l’aspirateur, puis la machine. Si vous utilisez un aspirateur avec interrupteur intégré, mettez simplement la machine sous tension. - Page 20 à ce que tous les câbles soient en place et qu’ils ne soient pas susceptibles d’être pincés lors de leur resserrage. Il vous est conseillé d’emmener l’outil dans un centre de service agréé Spit au moins une fois par an pour un nettoyage et un graissage approfondis.
Need help?
Do you have a question about the DWS 225 Series and is the answer not in the manual?
Questions and answers