
Related Manuals for WAREMA Comfort Timer

Summary of Contents for WAREMA Comfort Timer
- Page 1 WAREMA Controls WAREMA Comfort Timer Operating and installation instructions (Keep for future use) Valid from 1st December 2011 890202_b...
- Page 2 WAREMA Renkhoff SE Hans-Wilhelm-Renkhoff-Strasse 2 D-97828 Marktheidenfeld/Main, Germany WAREMA and the WAREMA logo are trade marks of WAREMA Renkhoff SE. All other brand or product names included in this document are trade marks or regis- tered trade marks of their respective owners.
-
Page 3: Table Of Contents
Contents General .....................4 Safety information ...................5 Installation ....................9 Disassembly ...................14 Operation in display mode ..............17 Notes on operation / display ..............18 Explantion of symbols ................19 Programming ..................21 Setting the time / date ................ 22 Setting the product ................23 Train ...................... -
Page 4: General
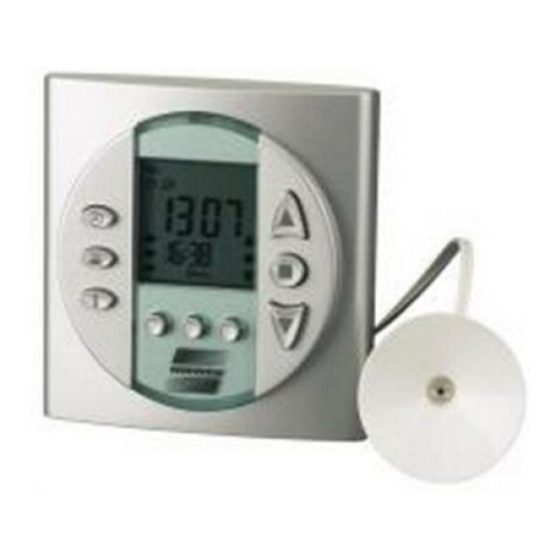
General Thank you for purchasing the WAREMA Comfort Timer! The WAREMA Comfort Timer is a time switch with floating out- put designed specifically for actuating sun protection blinds, in particular roller shutters as well as external and internal venetian blinds. These can be actuated automatically using an integrated time switch control. -
Page 5: Safety Information
Safety information We have developed and tested the WAREMA Comfort Timer fol- lowing the fundamental safety requirements. Nonetheless, some risks remain! For this reason, please read these instructions before setting up and operating the control! Keep these instructions for future use! The safety information in these instructions are marked with warn- ing symbols. - Page 6 Therefore use our product only as intended! Target group These instructions are intended for persons installing the WARE- MA Comfort Timer including all necessary components and for persons operating, programming or setting up the control. We reserve the right to carry out improvements...
- Page 7 Persons installing or connecting the control must know and have understood the content of these instructions. Retrofitting and modifications The WAREMA Comfort Timer has been safely designed and constructed by our company. All required settings are made at initial commissioning. Modification of the unit parameters is...
- Page 8 Safety information Safe working Whenever you intend to carry out work on motor-operated win- dows or building facades on which motor-operated sun protection products are installed, carry out the following steps first: Switch the system to a de-energized state first of all! Make sure that the system has been sufficiently secured against unauthorized or unintentional reactivation! In any case, use suitable safety devices for personal protection!
-
Page 9: Installation
Safety information Therefore switch off the entire system before attaching or detaching connecting lines! WARNING Danger to life and property damage through sudden movement of the mechanism! Installation Follow the points below in the order given: • First determine where the individual components are to be mounted. Use the instructions given in this chapter to do this. • Then determine which cables are required to connect the components with one another. - Page 10 Installation For flush mounting, the WAREMA Comfort Timer requires rough- ly the same area as a wall-mounted switch and a deep flush-fit- ted wall box. The dimensions can be found in figure 6. The con- trol may only be fitted in interior areas, in dry and easily accessi- ble locations.
- Page 11 Installation Power unit Control panel Fig. 2 Installation • Before mounting, the transport protection (cardboard between the control panel and the power unit) must be removed! Do not fit the control panel onto the power unit in an unas- sembled state! • Connect the lines in accordance with the wiring diagram (connecting the spring terminals, see fig.1). Fitted on the out- side using casing screws or screws and anchors.
- Page 12 Installation Fig. 3: Wall mounting • Use appropriate anchors and screws for mounting. • The screw heads must be screwed in flush to the mounting plate otherwise the control panel will not fit correctly. • If preferred, the device can also be screwed onto the flush- fitted wall box. Note: Screws and anchors are not included. We reserve the right to carry out improvements 890202_b•en•16.11.2011...
- Page 13 Connecting the dusk/dawn sensor If you are using the dawn/dusk sensor, connect this to • the rear of the WAREMA Comfort Timer control panel. Ob- serve the colours on the connection cable. If the wire are connected incorrectly, the brightness evaluation function will not work.
-
Page 14: Disassembly
Disassembly For disassembly, grip the time switch on points 1 and 2. • Then remove the device from the wall holder in direction 3. • Please refer to the following diagrams in this regard: Fig. 5: Disassembly We reserve the right to carry out improvements 890202_b•en•16.11.2011... - Page 15 Dimensions 80.0 mm Fig. 6: Dimensions 890202_b•en•16.11.2011 We reserve the right to carry out improvements...
- Page 16 Wiring diagram M 1~ PE N H05RR - F4G0.75mm black Plug-and-socket connection 230 V AC 50 Hz / 6 A power cable from customer Fig. 7: Wiring diagram We reserve the right to carry out improvements 890202_b•en•16.11.2011...
-
Page 17: Operation In Display Mode
Operation in display mode Menu Fig. 8: Operating and display elements You are in display mode when the time is displayed on the dis- play (1) and the colon between the hour and minutes display is flashing. The control buttons have the following functions in dis- play mode: "Up"... -
Page 18: Notes On Operation / Display
Notes on operation / display These operating instructions use certain symbols and designa- tions, which are explained on the next few pages. In both operat- ing modes (display mode and setting mode) the symbols have different meanings. These are shown in a clear table format on the next few pages. -
Page 19: Explantion Of Symbols
Explantion of symbols Symbol Meaning in display Meaning in setting mode mode Current weekday, Weekday [Mo] [Tu] display [Mo]... [Su] [We] [Th] [Fr] [Sa] [Su] [Mo - Su] Calendar week [Mo - Fr] Working week [Sa Su] Weekend Time switch active Setting the time switch Automated random func- Setting the automated... - Page 20 Explantion of symbols Symbol Meaning in display Meaning in setting mode mode Setting mode is opened Setting mode is closed [Menu] when this button is when this button is pressed pressed When this button is pressed, the settings are seleced in ascend- ing order When this button is pressed, the settings are...
-
Page 21: Programming
If you want to exit set- ting mode again, press the [Menu] button. The WAREMA Comfort Timer will then go back into display mode. If there are no further inputs within three minutes, the WAREMA Comfort Timer will automatically go back to display mode. -
Page 22: Setting The Time / Date
Setting the time / date In menus 11 to 16 you can set the time, automatic conversion between summer/winter time, and the date. Menus 11 to 12 Set time Press or hold the [Menu] button followed by the button until menu 11 appears. Set the current hour using the but- tons and save using the... -
Page 23: Setting The Product
Setting the product In menus 17 to 19 you can set your product to be controlled. Here you can choose between permanent mode and radio time mode, to set the run time and the turn time. If you want to oper- ate a roller shutter or an awning with this control, we recommend using the PM - permanent mode setting. - Page 24 Setting the product In menu 19 you can set the turn time. After the run time elapses, the blind is acuated for this time in the opposite direction. This means that with external venetian blinds, for example, the slats are turned or with roller blinds, these are moved to view- ing slits (in lengthwise direction).
-
Page 25: Train
Note: T he function keys A, B, C on the hand-held transmitter do not have a function on the WAREMA Comfort Timer. Note: The WAREMA range includes transmitters in an enclosure for wall mounting. These wall-mounted transmitters have... -
Page 26: Time Switch Control
Time switch control The time switch control is a comfort function which allows the sun protection to be raised or lowered at a specific time. Switch times can be set: • For one day individually (Monday to Sunday) [Mo], [Tu], [We], [Th], [Fr], [Sa], [Su] • For an entire working week together (Monday to Friday) [Mo-Fr] • For an entire calendar week together (Monday to Sunday) - Page 27 Time switch control Menu 01 Select weekdays First select the weekdays for which you Mo Tu We Th Fr want to set the time switch commands. In our example, we select all weekdays. Note the top row (weekdays): Press button until [Mo Tu We Th Fr] (weekdays) flashes on the display.
- Page 28 Time switch control Menus 02 to 03 Setting a "lower" switch time Press the button until menu 02 ap- Tu We Th Fr pears. On the left-hand side, the symbol ("lower" move command) is shown, and at the same time the display [Hour] will flash. Set the hour [22] using the button and save using the...
- Page 29 Time switch control Menu 06 Automated random function You can activate the automated random function here. Press the [Menu] button until menu 06 appears. In the display, the sym- (random) will be displayed, and at the same time the display [OFF] will flash. Use the buttons to select the com- mand [ON] and save using the...
- Page 30 Time switch control Useful notes Tip: If you know that you will want to use the same switch times each day, with perhaps just a few exceptions, you can also set the switch times for an entire calendar week first. Then change only the switch time for the exceptions.
-
Page 31: Dawn/Dusk Control
1. Dawn/dusk control controlled by the astro function: The "Astro" operating mode controls the WAREMA Comfort Timer according to astronomic data for sunset time (relative to your location and the current calendar day), and triggers a "lower"... - Page 32 Dawn/dusk control Switching on the dawn/dusk control Press the [ ] button. Depending on the setting (menu 21), either the symbol dawn/dusk control with astro function or the symbol for dawn/dusk control with dusk sensor will be shown on the display. The dawn/dusk control is switched on.
- Page 33 [Other number] The astro function is switched Note: If the WAREMA Comfort Timer is not being used in Ger- many, you will find in the appendix a table with the the most important international cities along with the relevant code number.
- Page 34 Dawn/dusk control Then set the difference time: Note: The next menu 22 only appears if the astro function has been selected in menu 21. Menu 22 Setting the difference time Press or hold the [Menu] button followed Mo Tu We Th Fr Sa Su by the button until menu 22 appears.
- Page 35 Dawn/dusk control How to switch off the astro function: Menu 21 Switching off the astro function Press or hold the [Menu] button followed by Mo Tu We Th Fr Sa Su button until menu 21 appears. Use buttons to set the number [000] and save using the button [000] The astro function is switched off.
- Page 36 Dawn/dusk control Tip: The dusk limit value can be set in 15 stages between 0 and 500 Lux. If the set value is not reached for at least 10 min- utes for the dusk setting being used, the sun protection is lowered.
-
Page 37: Software Version/Factory Settings
Software version/factory settings The software version is shown in menu 20 Menu 20 Press or hold the [Menu] button followed by button until menu 20 appears. The software version will be shown. Menu Loading the factory settings You can load the factory parameters in menu 25. All parameters are overwritten with the factory settings. -
Page 38: Maintenance And Cleaning
Maintenance and cleaning There are no parts within the device that require maintenance. Clean the enclosure with a soft, damp cloth. Do not use any scouring agents, solvents or steam cleaners! Liability Failure to comply with the product information in these instruc- tions and use of the device in a manner that contravenes its intended use and purpose may result in the manufacture refusing to honour warranty claims for product damage. -
Page 39: Technical Data
Technical data WAREMA Comfort Timer Min. Typ. Max. Unit Power supply 230 V AC / 50 Hz Operating voltage V AC Power consumption Floating output Switching capacity at 230 V AC / cos ϕ 0.6 Switching capacity at 24 V DC... -
Page 40: User Information
Technical data WAREMA Comfort Timer Min. Typ. Max. Unit Article numbers WAREMA Comfort Timer, white 1002 220 WAREMA Comfort Timer, silver 1002 225 Optional accessories White AP housing 1002 226 Silver AP housing 1002 223 Cover panel, green 317 452... -
Page 41: Troubleshooting
Comfort Timer There are reinforced Reduce the dis- concrete covers or tance to the WARE- walls Comfort Timer or choose a different mounting position Menu 23 (dusk lim- Astro function is still Switch off astro it value) is not ap-... - Page 42 Troubleshooting WAREMA Comfort Help with faults Timer Type of fault Possible cause Remedy With dusk sensor: The dawn/dusk Switch on function Sun protection is not control is switched button lowered at dusk The dusk limit val- Set a higher val- ue has been set too ue.
- Page 43 Possible cause Remedy The movement times Random function is Switch off random of the WAREMA activated function (menu 06) Comfort Timer do not match the pro- grammed times Automatic conver- Switch on function sion between sum- (menu 13) mer/winter time is...
-
Page 44: Appendix
Appendix Code list (worldwide) for setting the astro function. For correct functioning, set the code for the city closest to your location in menu 21. Code Country Town Code Country Town Afghanistan Kabul Iran Tehran Egypt Cairo Ireland Belfast Algeria Algiers Ireland Dublin... - Page 45 Appendix Code Country Town Code Country Town Pakistan Islamabad Philadelphia Paraguay Asuncion Phoenix Peru Lima Alaska Anchorage Philippines Manila San Francisco Poland Warsaw Seattle Portugal Lisbon Washington Puerto Rico San Juan D.C. Romania Bucharest Miami Russia Kaliningrad Venezuela Caracas Russia Krasnoyarsk United Arab Abu Dhabi...
- Page 46 Setting menus Here you will find an overview of the setting menu. Menu Function Possible Factory settings setting Time switch control: Select weekday, Weekday, weekend, working week or weekend, calendar week working week or calendar week Time switch control: Lower sun pro- Hour tection switching time Time switch control: Lower sun pro-...
-
Page 47: Notes
Notes 890202_b•en•16.11.2011 We reserve the right to carry out improvements...
Need help?
Do you have a question about the Comfort Timer and is the answer not in the manual?
Questions and answers