Table of Contents
Advertisement
Cashflow SC66 Install Guide
Mars Inc. 2002 Printed in USA.
MEI is a trademark of Mars, Inc. Information is subject to change without notice. MEI has made every effort to ensure that the
information in this document is accurate. However, we cannot be held responsible for any errors or omissions.
Technical Support 1-800-345-8172
CASHFLOW SC66 Page-1
www.meiglobal.com
Part # 252053040 Y1
Advertisement
Table of Contents

Related Manuals for MEI Cashflow SC Series

Summary of Contents for MEI Cashflow SC Series
- Page 1 Mars Inc. 2002 Printed in USA. MEI is a trademark of Mars, Inc. Information is subject to change without notice. MEI has made every effort to ensure that the information in this document is accurate. However, we cannot be held responsible for any errors or omissions.
-
Page 2: Table Of Contents
TABLE OF CONTENTS OVERVIEW Model Number ......................3 Serial Number......................3 Features ........................ 4,5 Main Components of the SC66 Bill Acceptor ............ 6 Specifications ......................6 Input Voltage ......................6 INSTALLATION AND REMOVAL OF COMPONENTS Installing the Chassis ..................... 7 Inserting and Removing the Cashbox.............. -
Page 3: Model Number
OVERVIEW Model Number S C 66 XX X “ ” Flash Unit “P” Prom Unit 00- OEM Configurable (No Harness) 02- OEM Proprietary 04- Opto Isolated EBDS 07- RS232 EBDS Serial Number W W Y L C C # # # # # Sequential Production Number Configuration Code Manufacturing Location... - Page 4 OVERVIEW Technical Support 1-800-345-8172 CASHFLOW SC66 Page-4 www.meiglobal.com Part # 252053040 Y1...
-
Page 5: Features
OVERVIEW Features LIGHT BAR LENSED RECEIVER CUSTOM BAR CODE READER MHZ DSP PROCESSOR EARLY BILL PICK SMOOTH SEALED BILL PATH DIRECT ROLLER DRIVE RIDGES MATE WITH ACCEPTOR INTERNAL DIRECT ROLLER DRIVE ELEVATOR SHORT BILL PATH DURABLE WELDED PLASTIC EXTERIOR RECESSED PLASTIC GEARS DUAL LOCK CAPABILITY COMMON ACCEPTOR MODULES PC STYLE EDGE CONNECTOR INTERFACE CARDS... -
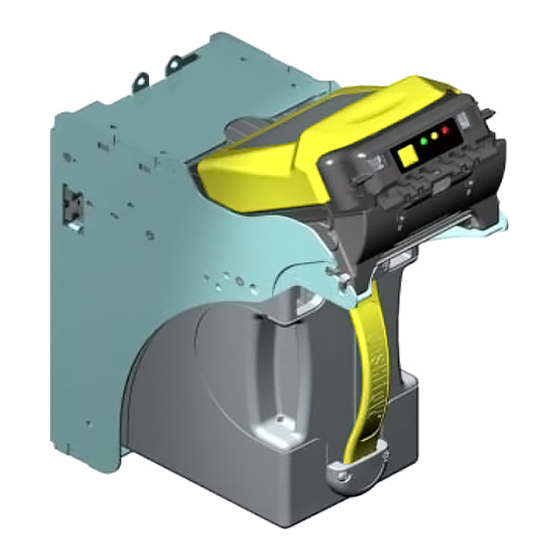
Page 6: Main Components Of The Sc66 Bill Acceptor
OVERVIEW Parts of the Cashflow SC66 Bill Acceptor The SC66 consists of three main components Cashbox/LRC Acceptor Module Chassis The Acceptor Module and Cashbox are interchangeable with other identical SC66 models. Bill Entry Guides for the SC66 Not all bill entry guides fit in every machine. Your choice regarding bill entry guides will depend on machine specifications. -
Page 7: Installing The Chassis
INSTALLATION ALWAYS POWER DOWN MACHINE PRIOR TO INSTALLATION. The cashbox does not lock to the chassis. When you remove the unit from the container or when the unit is not installed in the machine, you must never carry the bill acceptor by the handle of the cashbox. -
Page 8: Inserting And Removing The Cashbox
INSTALLATION Removing the Cashbox • When the bill acceptor is installed in a machine, you just need to grab the yellow strap on the cashbox and pull firmly to release it. The cashbox does not lock on to the Chassis. •... -
Page 9: Installing A Bill Entry Guide
INSTALLATION Installing The Bill Entry Guide • To install the bill entry guide, just slide onto the Acceptor Module until it locks into place. No screws are required. If the bill entry guide has lights, you will have to first connect the har- ness from the bill entry guide to the eight pin connector located on the left hand side of the face of the Acceptor Module. -
Page 10: Installing Locks On The Cashbox
Locks vary greatly in price, security, keying policies, etc. The customer is responsible for selecting a lock with performance that is fit for the intended purpose. MEI does not test or endorse any specific brand of lock for security characteristics. -
Page 11: Harnessing And Connectors
HARNESSING AND CONNECTORS Cashflow SC66 bill acceptors with an EBDS Interface will have a harness that terminates with a 12 Pin Connector. RS232 EBDS version Connector Pin # Wire Color Signal P2 pinSee 4.1 White Gray ———— Yellow Blue Ground D &... -
Page 12: Maintenance
MAINTENANCE Periodic maintenance can improve the performance and extend the working life of a bill accep- tor. Additional attention may be required if the bill acceptor becomes inoperable due to a jammed object or acceptance rates fall below normal. Cleaning And Clearing The Bill Path and Sensor Area. Note: You must remove the Acceptor Module from the chassis to open the front sensor area. -
Page 13: Diagnostic Codes
MAINTENANCE Diagnostic Codes The chart below indicates the 15 color-coded combinations of diagnostic LEDs on the bill acceptor. For each color, there is a solid indicator and four flashing combinations. If multiple failure conditions occur, the most severe condition will be displayed. Red conditions - Hard Fault. -
Page 14: Sc66 Dimension Drawings
MAINTENANCE Technical Support 1-800-345-8172 CASHFLOW SC66 Page-14 www.meiglobal.com Part # 252053040 Y1...
Need help?
Do you have a question about the Cashflow SC Series and is the answer not in the manual?
Questions and answers