Table of Contents
Advertisement
Quick Links
Advertisement
Table of Contents

Summary of Contents for PhotosynQ MultispeQ v2.0
- Page 1 MultispeQ v2.0 Modified: February 14, 2020 Version: v1.2.24 1 of 8...
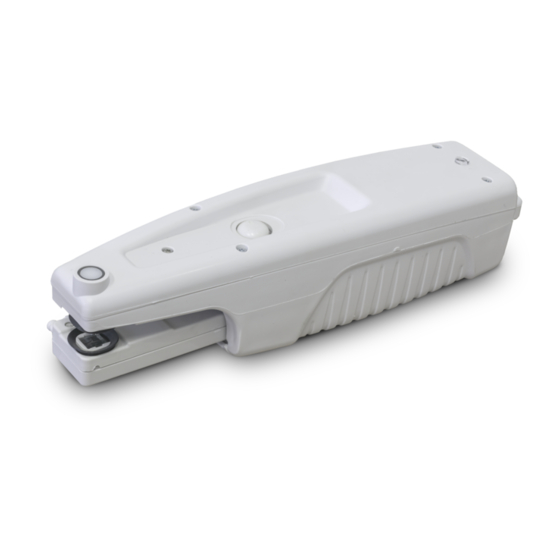
- Page 2 MultispeQ v2.0 Getting Started Charging: Before using your MultispeQ, charge it for 8 hours using the supplied micro-USB cable*. When plugged in, the small green LED next to the micro-USB port lights up. Once the instrument is fully charged, the light will turn off. Turn On: Press and hold the power/reset button in the rear for 5 seconds. Software: Go to https://photosynq.org/software and download the Android app or the Desktop app. Check Tutorials: Before Using Your Instrument Make Sure To Check Out The "Getting Started" Tutorials on how tho connect the Instrument and take the first Measurement. * Power supply not included. Use a computer or standard USB power supply. Charging time depends on the power output of the power supply. About MultispeQ v2.0 side and back view 2 of 8...
- Page 3 Leaf Clamp Button Push down the leaf clamp button to open the leaf clamp. Push and release with an even motion and prevent it from snapping back. In case the open and closing feels rough, a small amount of lithium grease can be used to make the open and closing motion more smoothly. PAR Sensor The PAR sensor located on top of the instrument. When taking measurements, depending on the measurement protocol, the light intensity measured will be replicated inside the instrument. Make sure the PAR sensor is clean and not to cover or shade, to prevent altering the actual intensity. Seal The Nitrile seal around the light guide on the main body and the clamp is ensuring the area measured is sealed from outside light. Light Guide The light guides are made from acrylic. Make sure, it is clean and prevent clamping hard, rough materials which can cause scratches. You may need to clean the light guides occasionally. Gently clean the light guides with a damp, soft cloth. Do not submerge in water, do not use solvents or detergents and do not use abrasive or rough cloths to clean the light guides. IR Contactless Temperature The leaf temperature can be measured with the IR Contactless Temperature. When taking a measurement, make sure that the leaf is covering the IR sensor. The sensor is inside a little groove and not flush with the clamp surface. The leaf or material should not touch the the sensor, since it can alter the measured temperature reading. Temperature & rel. Humidity Vent The two vents allow air to be exchanged inside the Instrument. There are two sensors inside the clamp, one is close to the vents and the light guide while the second one is located on the other end of the clamp. Tubes can be attached in combination with a pump to provide a constant air flow and/or gas exchange. 3 of 8...
- Page 4 Instrument Action Indicator The Action Indicator has the following: Indicator Function Instrument is on, and fully charged. The indicator is flashing every 5s Instrument is on, and battery is emptying. The indicator is flashing every <1s Instrument clamp open. The indicator is flashing rapidly. Instrument is busy (e.g. Measurement). The indicator is constantly on. Power/Reset Button The button in the back allows the instrument to be turned on as well as reset. Hold the button for at least 5 seconds to turn the Instrument on. Wait for the Action Indicator to start flashing, to confirm the Instrument is on and booted up. A short push on the button will reset the instrument, in case a protocol crashes, etc. When the Instrument is running, hold the button for 5 seconds, to restart the instrument. Wait for the Action Indicator to start flashing, to confirm the Instrument is booted up again. Make sure to only press the power button through the silicon covering. Micro-USB The Micro-USB port allows the Instrument to be charged and when connected to a computer for data transfer. When unplugging the cable, make sure not to bend the cable up and down, to not break of the Instrument connector. Accessory Port The USB-C port allows to attach accessory equipment. When unplugging the cable, make sure not to bend the cable up and down, to not break of the Instrument connector. Charge Indicator The little LED in the back indicates, when the Instrument is charging. When the battery is fully charged, the LED will turn off. 4 of 8...
- Page 5 Configuration MultispeQ v2.0 measurements Body Measurements Size 224.2 mm x 53.6 mm x 56.6 mm (l, w, h) Total Weight 340 g (incl. battery) Light Guide Surface 8 mm x 8 mm (64mm²) Leaf Clamp Opening 13 mm Safety Ring for leash Updates Firmware updates through Applications Lights There are sets of five LEDs each on the main body and the leaf clamp. Main Body # Emission Peak Model Specifications 530nm LED (green), Lumileds, LXZ1-PM01 view 655nm LED (red), Lumileds, LXZ1-PA01 view 590nm LED (amber), Lumileds, LXZ1-PL01 view 448nm LED (blue), Lumileds, LXZ1-PR01 view 950nm LED (NIR), OSRAM, SFH 4441 view Leaf Clamp 5 of 8...
- Page 6 # Emission Peak # Emission Peak Model Model Specifications Specifications 950nm LED (NIR), OSRAM, SFH 4441 view 655nm LED (red), Lumileds, LXZ1-PA01 view 850nm LED (NIR), OSRAM, SFH 4451 view 730nm LED (far red), Everlight, ELSH-Q61F1-0LPNM-JF3F8 view 820nm LED (NIR), OSRAM SFH 4786S view Emission Spectra for LEDs Emission spectra for LEDs build in the MultispeQ v2.0 - Emission normalized to maximum emission peak Detectors The MultispeQ v2.0 comes with two detectors. One covering the near infrared on the main body, the other covering the visual range on the leaf clamp. # Detection Range Model Specifications 1 700nm - 1150nm Hamamatsu, S6775-01 (main body) view 3* 400nm - 700nm Hamamatsu, S6775 (leaf clamp) view *Note The detector 3 is covered with a BG-18 bandpass filter with a center wavelength...
- Page 7 The MultispeQ v2.0 has a set of sensors to measure the environmental parameters. Sensor Model Specifications Ambient Temperature, BOSCH, BME280 view Humidity, Pressure (2x) Melexis, MLX90615SSG-DAG-000- Contactless Temperature view Accelerometer Freescale, MMA8653FCR1 view Magnetometer Freescale, MAG3110FCR1 view Hall Effect Sensor TT Electronics, OHS3150U view AMS-TAOS USA, TCS34715FN + PAR light sensor view 700nm low pass filter Filters The MultispeQ v2.0 has two filters, a Band Pass filter covering the visible light detector (#3) and a Low Pass filter used in the PAR sensor. Filter Model Specifications Band Pass Schott, BG-18 1mm thickness view Low Pass UQC Optics, Hot Mirror HM-07 view Indicator Lights The MultispeQ v2.0 has now two indicator lights. One to indicate if the device is charging which is located next to the micro-USB port. The second one is located on top to indicate progress or required actions. Model Specifications Charging Indicator...
- Page 8 References Kuhlgert, S., Austic, G., Zegarac, R. Osei-Bonsu, I.,Hoh, D., Chilvers, M. I., et al. (2016). MultispeQ Beta: a tool for large-scale plant phenotyping connected to the open PhotosynQ network. R. Soc. Open Sci. 3, 160592. doi:10.1098/rsos.160592. 8 of 8...
Need help?
Do you have a question about the MultispeQ v2.0 and is the answer not in the manual?
Questions and answers