Table of Contents
Advertisement
Available languages
Available languages
Quick Links
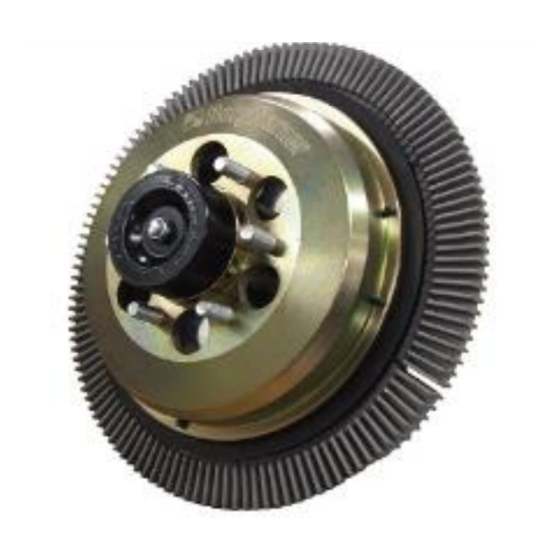
DuroSpeed™ Technology for Heavy-Duty Truck Applications
Rear Air
DuroSpeed™
Fan Drives
borgwarner.com/aftermarket/thermal-management
For Additional BorgWarner
Thermal Systems Information:
800-927-7811 USA
49-7544-969-207 Germany
88-574-820-9696 China
thermal@borgwarner.com
Installation & Service Guide
31392 – DuroSpeed Installation and Service Guide
Revision A 08/21/2019
ECM-01221
Advertisement
Table of Contents

Summary of Contents for Borg Warner DuroSpeed Series
- Page 1 Installation & Service Guide DuroSpeed™ Technology for Heavy-Duty Truck Applications Rear Air DuroSpeed™ Fan Drives borgwarner.com/aftermarket/thermal-management For Additional BorgWarner Thermal Systems Information: 800-927-7811 USA 31392 – DuroSpeed Installation and Service Guide 49-7544-969-207 Germany Revision A 08/21/2019 88-574-820-9696 China ECM-01221 thermal@borgwarner.com...
-
Page 2: Table Of Contents
DuroSpeed™ INSTALLATION | SERVICE Proper precautions must be taken to prevent personal injury from contact with moving parts, unintended engine start, or other hazards present when working with powered equipment. Refer to the vehicle owner's manual and/or appropriate service manual for proper safety precautions before beginning any diagnostic or repair procedures. WARNING!: Always use care in handling the magnet ring. -
Page 3: Retro-Fit Kit Installation
Retro-fit Kit Installation WARNING!: Always use care in handling the magnet ring. Any interaction with a metallic object may cause a pinch point that could result in personal injury. Caution: Do not apply the Retro-fit Kit to Aluminum or Front Air Clutches. Verify clearance for all rotating components before starting the vehicle. -
Page 4: Clutch Installation
Clutch Installation WARNING!: Always use care in handling this Clutch when the Magnet Ring is exposed. Any interaction with a metallic object may cause a pinch point that could result in personal injury. Tools & Parts Required • Foot-pound or Newton-meter torque wrench •... - Page 5 Clutch Installation WARNING!: Always use care in handling this Clutch when the Magnet Ring is exposed. Any interaction with a metallic object may cause a pinch point that could result in personal injury. Step 5. Install the new coupling onto the hub. For clutches that have been upgraded with the Retro-fit kit, remove the old rear-o-ring and install the new one.
-
Page 6: Embrague Durospeed™ Adjetivo Técnico
Note - This document has been translated solely as a convenience to the non-English reading public. BorgWarner’s official text is in English. Any differences in the translation is not binding on the company and has no legal effect. Nota.- Este documento ha sido traducido exclusivamente para conveniencia de los lectores en español. -
Page 7: Mantenimiento
DuroSpeed™ INSTALLATION | SERVICE PRECAUCION!: sea cuidadoso en el manejo de este embrague cuando el anillo magnético este Siempre expuesto. Cualquier interacción con objetos metálicos puede causar en algún punto que se pellizquen los dedos causando una lesión personal. Este embrague requiere de 90 a 120 PSI de presión de aire para DESACOPLAR (6.2 – 8.2 bar). La presión del aire se desfoga para ACOPLAR el ventilador. - Page 8 Instalación Kit de Conversión (Continua) DuroSpeed™ Kit de reconversión (1033-40700-01) Descripción de Partes Cantidad Uso del Componente Partes y Herramientas requeridas Pasta • Torquímetro (Nm ó Inch-lbs) Anillo Magnético Actualización del • Dado con punta hex de 5/16” y matraca flexible Tornillos cabeza plana Torx Embrague •...
-
Page 9: Instalación Del Embrague
Instalación del Embrague PRECAUCION!: sea cuidadoso en el manejo de este embrague cuando el anillo magnético este Siempre expuesto. Cualquier interacción con objetos metálicos puede causar en algún punto que se pellizquen los dedos causando una lesión personal. Partes y Herramientas requeridas •... - Page 10 Instalación del Embrague (continua) Step 5. Instale el nuevo acoplador en la masa. Para los embragues que se han actualizado con el kit de reconversión, retire el viejo-sello O-ring trasero e instalar nueva. Aplique grasa del paquete de grasa apropiado a la nueva placa tórica trasera. Si el número de serie del embrague NO termina con la letra "K", a continuación, utilice el paquete de grasa Aeroshell, de lo contrario utilice el tubo de grasa Multemp ET-100k.
- Page 11 Guide d’installation et d’entretien Technologie DuroSpeed™ pour les poids lourds Entraînements de ventilateur avec air à l’arrière DuroSpeed™ borgwarner.com/aftermarket/thermal-management Note - This document has been translated solely as a convenience to the non-English reading public. BorgWarner’s official text is in English. Any differences in the translation is not binding on the company and has no legal effect.
- Page 12 DuroSpeed™ INSTALLATION | ENTRETIEN Des précautions appropriées doivent être prises pour éviter tout risque de blessure en cas de contact avec des pièces mobiles, de démarrage involontaire du moteur ou d’autres dangers liés à l’utilisation d’un équipement motorisé. Consultez le manuel du propriétaire du véhicule etle manuel d’entretien approprié...
- Page 13 Installation de la trousse de modernisation AVERTISSEMENT! Toujours manipuler la bague magnétique avec précaution. Toute manipulation d’un objet métallique peut provoquer un point de pincement qui peut entraîner des blessures corporelles. Attention : Ne pas utiliser la trousse de modernisation sur les embrayages en aluminium ou les embrayages à air avant. Vérifier le dégagement de tous les composants rotatifs avant de démarrer le véhicule.
- Page 14 Installation de l’embrayage AVERTISSEMENT! Toujours manipuler cet embrayage avec précaution lorsque la bague magnétique est exposée. Toute manipulation d’un objet métallique peut provoquer un point de pincement qui peut entraîner des blessures corporelles. Outils et pièces nécessaires • Clé dynamométrique pieds-livres ou Newton-mètre •...
- Page 15 Installation de l’embrayage AVERTISSEMENT! Toujours manipuler cet embrayage avec précaution lorsque la bague magnétique est exposée. Toute manipulation d’un objet métallique peut provoquer un point de pincement qui peut entraîner des blessures corporelles. Étape 5. Monter le nouvel accouplement sur le moyeu. Pour les embrayages qui ont été mis à...
Need help?
Do you have a question about the DuroSpeed Series and is the answer not in the manual?
Questions and answers