
Related Manuals for Dualit QCS-2-800


Summary of Contents for Dualit QCS-2-800
- Page 1 CONVEYOR TOASTER MODEL QCS-2-800 QCS-3-1000 Installation and Operation Instructions 2M-HG0657 Rev. D 6/13/05...
-
Page 2: Safety Symbols
RETAIN THIS MANUAL FOR FUTURE REFERENCE NOTICE Using any part other than genuine Dualit factory supplied parts relieves the manufacturer of all liability. NOTICE Dualit reserves the right to change specifications and product design without notice. Such revisions do not entitle the buyer to corresponding changes, improvements, additions or replacements for previously purchased equipment. MAINTENANCE AND REPAIRS Contact your local authorized service agent for service or required maintenance. Please record the model number, serial number, voltage and purchase date in the area below and have its ready when you call to ensure a faster service. -
Page 3: Table Of Contents
CONTENTS Safety Symbols ............2 Maintenance ............. 8 Maintenance & Repairs ........... 2 Troubleshooting Guide ........... 9 Dualit Contact Information ........2 Wiring Diagram Model Specifications ..........3 QCS2-800 ............10 QCS3-1000 ............11 General Installation Data ........4 EXPLODED VIEW ........... 12 Inspection &... -
Page 4: General Installation Data
If damage is discovered, file a claim immediately with the carrier that handled the shipment. Do not operate the unit if it was damaged during shipping. ASSEMBLY AND INSTALLATION T he QCS-2-800 unit was shipped fully assembled and ready to plug into a standard outlet specified for its voltage and amp draw. If improper electrical supply is determined, contact a qualified electrician prior to using the unit. Removal and replacement of the power cord and plug will void the warranty. For assistance, contact your local authorized service agent for service or required maintenance. -
Page 5: Electrical Connection
Level unit using the adjustable feet under the unit (approximately 1/2" adjustment). Before using the unit for the first time, wipe down the exterior with a damp cloth. CAUTION Allow enough space around the toaster for adequate ventilation. Do not operate the unit without the crumb tray properly positioned. Overheating and poor toasting may occur. Read all labels on the unit and follow their instructions. ELECTRICAL CONNECTION WARNING B efore making any electrical connection to this unit, check that the power supply is adequate for the voltage, amperage and requirements stated on the rating plate. A wiring diagram is included herewith. D isconnect the unit from the power source before installing or removing any parts. B e absolutely sure that the earth connection for the receptacle is properly wired. Do not connect equipment to power without proper earth connections. Improper grounding (earth) may result in personal injury or fatality. WARNING DO NOT CUT OR REMOVE THIS PLUG OR GROUNDING (EARTH) PRONG FROM THE PLUG. -
Page 6: Cooking Procedures
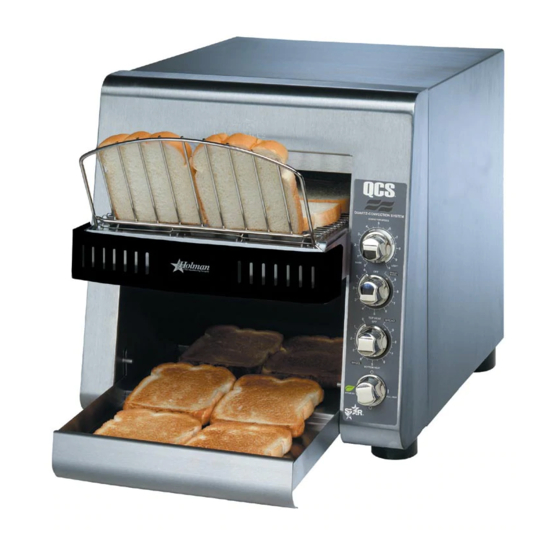
COOKING PROCEDURES BREAD TOASTING S ome toasters are equipped with a swinging heat shutter at the toaster entrance. This shutter will move out of the way as the product passes under it. 1) Turn the power saver to FULL POWER. 2) Set the conveyor speed to HIGH. 3) If your toaster is equipped with separate top and bottom heat controls set them both at HIGH. 4) Allow warm up time of 5 to 10 minutes. 5) Place a sample product on the conveyor belt to test the settings. • If toasting is too light, turn conveyor speed control counterclockwise to a slower speed. • If toasting is too dark, turn heat control to a lower heat. (NOTE: Some products may require adjustment of the top and bottom heat controls in order to achieve the desired results) TOASTER COMPONENTS FRONT LOAD UP SPEED CONTROL CRUMB TRAY... -
Page 7: Daily Operation
OPERATING HINTS AND SAFETY Disconnect power to the unit with the switch at the end of each day of operation. Do not leave the unit in operation without an attendant. Turn Power Saver Switch to Standby during idle periods. It will take only a few minutes to regain operating temperature. Do not leave the unit at high temperature when not in use or during idle periods. This will cause food particles and grease film to carbonize. CLEANING Preventive maintenance for your Dualit toaster consists of the following recommended cleaning procedures. To keep your toaster in its top operating condition, these steps should be performed on a daily or weekly as indicated. A. C lean air intake on bottom of unit. B. F or lightly soiled conveyor belts, turn conveyor speed control to fastest setting (100) and wipe with a damp cloth (daily) For heavily soiled conveyors, turn conveyor speed control to fastest setting and wipe with a light abrasive pad (as needed). C. Turn main power saver switch to the OFF position. Disconnect unit from power source. D. After the unit cools, remove interior crumb tray (as shown below) and clean. Slide crumb ` tray back into position. -
Page 8: Maintenance
MAINTENANCE PROCEDURES A. REPLACING HEATER TUBES 1) DISCONNECT UNIT FROM POWER SOURCE. 2) Remove the enclosure. 3) Remove heater tube wire from terminal block connection, keeping top and bottom wires separate. 4) Lift heater tube retainers by loosening retaining screws and sliding the retainer plate up. Hand tighten the plate to hold it up so the heater tubes will slide out freely. 5) Gently, pull defective heater tube out of unit. 6) Gently, put new heater tube into unit. 7) Loosen retainer screws and slide the retainer back into place. Tighten the screw to secure the retainer in place over the ends of the heater tubes. B. REPLACING FAN MOTOR 1) DISCONNECT UNIT FROM POWER SOURCE. 2) Remove screws from the enclosure and the back panel at rear of unit. 3) Remove the enclosure and the back panel. 4) Unplug power supply cord from fan motor. -
Page 9: Troubleshooting Guide
A. UNIT WILL NOT HEAT, CONVEYOR BELT WILL NOT MOVE. 1) Be sure the main circuit breaker is switched to the ON position. 2) Check to see if the toaster is plugged in and all controls are turned to the ON position. B. UNIT HAS HEAT ONLY ON ONE SIDE, CONVEYOR BELT TURNS FREELY. 1) Call the Dualit Help Desk at +44 (0) 1293 652 500, as heating element may need replacing. C. CONVEYOR WILL NOT TURN, UNIT HEATS PROPERLY. To check for mechanical binding: 1) DISCONNECT UNIT FROM POWER SOURCE. - Page 10 MODEL: Dualit QCS-2-800 (4 Tube) - SERIES THIS DRAWING CONTAINS INFORMATION CONFIDENTIAL TO DUALIT LTD. 065266 09/10/2002 NO REPRODUCTION OR DISCLOSURE OF ITS CONTENTS IS PERMITTED.
-
Page 11: Qcs3-1000
MODEL: QCS-3-1000 (4 TUBE) - PARALLEL THIS DRAWING CONTAINS INFORMATION CONFIDENTIAL TO DUALIT LTD. 065607 02/24/2003 NO REPRODUCTION OR DISCLOSURE OF ITS CONTENTS IS PERMITTED. -
Page 13: Qcs2-800
PARTS LIST QCS-2-800 Conveyor Toasters Number Part Key Description & Model Number Number Unit HF-101372 ENCLOSURE, QCS2 HF-402449 PANEL, BACK, QCS2 HC-100571 BAFFLE, AIR FLOW 2U-200560 MOTOR, FAN, 230V 2U-200590 MOTOR, DRIVE (INCLUDES FAN) 2A-202900 SHAFT, DRIVE HA-112261 BUSHING, REAR 2P-Z8779 SPROCKET, DRIVEN (25B11 X 5/16”) 2P-200645 SPROCKET, DRIVE (25B17 X 5/16”) 2P-150013 CHAIN, DRIVE (19”) 2P-115501 JUMPER, TERMINAL BLOCK, SMALL, 2 POS. 2P-115502 JUMPER, TERMINAL BLOCK, SMALL, 3 POS. HC-115381 BLOCK, TERMINAL, SMALL, 4 POS. HC-115390 BLOCK, TERMINAL, SMALL, 10 POS. -
Page 14: Qcs3-1000
CORD, FAN MOTOR 2K-200465 BUSHING, CORD HEYCO 2R-200721 BLADE, FAN 2-5/16” (drive motor) 1P-Z8914 EXTREME PRESSURE MULTIPURPOSE SYNTHETIC GREASE (-62°C TO 204°C) , TUBE 8 oz. PAGE IMPORTANT: WHEN ORDERING, SPECIFY VOLTAGE OR TYPE GAS DESIRED INCLUDE MODEL AND SERIAL NUMBER Some items are included for illustrative purposes only and in certain instances may not be available. Dualit, Ltd.
Need help?
Do you have a question about the QCS-2-800 and is the answer not in the manual?
Questions and answers