Table of Contents
Advertisement
Available languages
Available languages
Quick Links
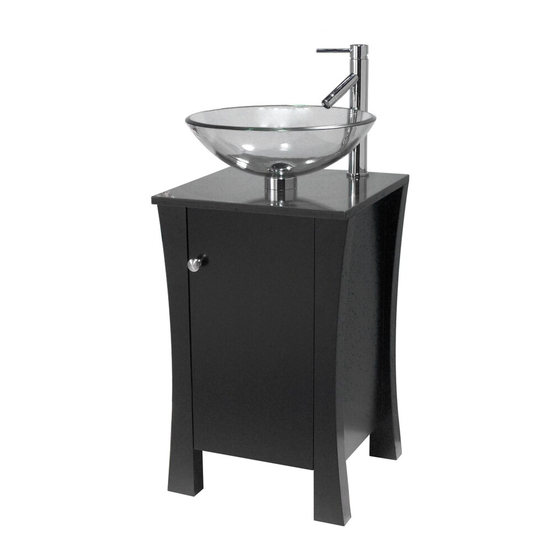
PrODuCt DEsCriPtiOn
Espresso Finished Wood Vanity with Granite Countertop
• Elegantly Refined Wood Base
• Black Granite Countertop
• Storage Cabinet
• Single Hole Faucet Drilling
• Shown with the 1112T-TNG Glass Vessel (sold separately)
PrODuCt MEAsurEMEnts
• Width: 18 inches (45.72 cm)
• Depth: 18 inches (45.72 cm)
• Height: 29 inches (73.66 cm)
rECOMMEnDED ACCEssOriEs
• DECOLAV
1112T-TNG Glass Vessel
®
• DECOLAV
9100 Bottle Trap
®
• DECOLAV
9290 Umbrella Drain
®
• DECOLAV
9020 Mounting Ring
®
thAnk yOu
Dear Valued Customer,
®
DECOLAV
would like to take this opportunity to thank you for your purchase – It is our sincere hope that you are completely
satisfied with your new product. We welcome and look forward to helping you create another unique look for your next
bathroom project.
Prior to installation, please take a moment to review all provided materials and hardware. For assistance with your new product, please contact
®
our dedicated DECOLAV
customer service staff.
Sincerely,
Robert H. Mayer
Chief Executive Officer and President
BEFOrE yOu BEgin
1. P rior to installation, unpack your new DECOLAV
are ready to install it.
2. The wall must be square, plumb and level.
3. S hut the water supply off when replacing an existing fixture. Preparation of the floors and walls, including all additional wall
supports, may be required.
4. Observe all local plumbing and building codes.
5. It is recommended that this installation be done with a minimum of two people. Do not install this fixture alone.
Customer service: 561-274-2110
www.decolav.com
MODEL nuMBEr: 5405
®
product and inspect it. Keep the product in its original package until you
CH AN GI NG THE WA Y Y O U VI E W TH E B A TH ROOM
Let your dreams come aLive, your passions
become reaLity, be the envy of your neighbors™
®
Advertisement
Table of Contents

Related Manuals for Decolav 5405


Summary of Contents for Decolav 5405
- Page 1 MODEL nuMBEr: 5405 PrODuCt DEsCriPtiOn Espresso Finished Wood Vanity with Granite Countertop • Elegantly Refined Wood Base • Black Granite Countertop • Storage Cabinet • Single Hole Faucet Drilling • Shown with the 1112T-TNG Glass Vessel (sold separately) PrODuCt MEAsurEMEnts • Width: 18 inches (45.72 cm) • Depth: 18 inches (45.72 cm) • Height: 29 inches (73.66 cm) rECOMMEnDED ACCEssOriEs • DECOLAV 1112T-TNG Glass Vessel ® • DECOLAV 9100 Bottle Trap ® • DECOLAV 9290 Umbrella Drain ® • DECOLAV 9020 Mounting Ring ® thAnk yOu Dear Valued Customer, ®...
-
Page 2: Recommended Tools
MODEL nuMBEr: 5405 rECOMMEnDED tOOLs adjustable Wrench tape measure pipe clamp channel Locks drill hacksaw Level phillips flathead pipe Wrench scroll saw silicone putty Knife pipe cutter screwdriver screwdriver pencil square ruler rOughing-in DiMEnsiOns Finished 4 1/2" [11.43 cm] Wall 2"... - Page 3 MODEL nuMBEr: 5405 PArts item Description Granite Top Vanity instALLAtiOn instruCtiOns • stEP #1 o With assistance, place Vanity (B) in desired location. o It is recommended to locate at least one stud wall within the area where the Vanity (B) is to be installed. Pre-drill holes through Top Horizontal Wood Rail and Wall Stud. Using Wood Screws fasten Vanity (B) to Wall Stud through Top Horizontal Wood Rail. o NOTE: WOOD SCREWS NOT PROVIDED! o Refer to Figure #1. Wood Screws (Not Provided) Top Horizontal Wood Rail Figure #1 Customer service: 561-274-2110 Let your dreams come aLive, your passions www.decolav.com...
- Page 4 MODEL nuMBEr: 5405 instALLAtiOn instruCtiOns • stEP #2 o Apply silicone to top of Vanity (B) and carefully place Granite Top (A) above Vanity (B). o Align Granite Top (A) to Vanity (B) and wipe off excess silicone if needed. o Refer to Figure #2. Apply Silicone Here Figure #2 • stEP #3 o K nob is attached to the inside of the door for shipping safety. Remove Knob and Knob Bolt, and attach Knob to front side of door. o Refer to Figure #3. Knob Bolt Knob Figure #3 Customer service: 561-274-2110 Let your dreams come aLive, your passions www.decolav.com...
- Page 5 MODEL nuMBEr: 5405 instALLAtiOn instruCtiOns • stEP #4 o Install Vessel and Drain according to manufacturer’s installation instructions. o Refer to Figure #4. o N OTE: SHOWN WITH DECOLAV 1112T GLASS VESSEL, 9020 MOUNTING RING AND 9290 UMBRELLA ® DRAIN. ALL SOLD SEPARATELY. Drain Drain Thin Washer Glass Bowl Mounting Ring Washer Mounting Ring Drain Thick Washer Drain Hard Washer Drain Nut Figure #4...
- Page 6 MODEL nuMBEr: 5405 instALLAtiOn instruCtiOns • stEP #5 o Install Waste System according to the manufacturer’s installation instructions. o Refer to Figure #5. o N OTE: TRAP SYSTEM SHOWN, DECOLAV 9100 DECORATIVE BOTTLE TRAP, IS A RECOMMENDED ® ACCESSORY AND NOT INCLUDED. Drain Tailpiece Bottle Trap Washer Bottle Trap Nut Horizontal Leg Bottle Trap Figure #5 • stEP #6 o Install faucet and water supply according to manufacturer’s installation instructions.
-
Page 7: Care And Cleaning
LiFEtiME WArrAnty DOEs nOt COVEr Any DAMAgEs CAusED By shiPPing, MisusE, ABusE, ACCiDEnts, nEgLECt, unAuthOriZED rEPAirs Or ALtErAtiOns, MODiFiCAtiOns, usE OF OthEr thAn gEnuinE DECOLAV rEPLACEMEnt PArts, Dirt, LiME sCALE, AnD OthEr MinErALs, sCuFFs AnD sCrAtChEs, EXPOsurE tO MArinE ArEAs, ABnOrMAL usAgE, AnD nOrMAL WEAr AnD tEAr. -
Page 8: Accessoires Recommandés
Avant de procéder à l’installation, prenez le temps de passer en revue toutes les pièces et tous les matériaux fournis. Si vous avez besoin d’aide ® concernant votre nouveau produit, veuillez communiquer avec le personnel spécialisé du service à la clientèle de DECOLAV Sincèrement, Robert H. -
Page 9: Outils Recommandés
DE mODèLE : 5405 OutiLS rECOmmAnDéS collier de serrage clé à molette ruban à mesurer pince multiprise perceuse scie à métaux niveau pour tuyau tournevis à tête tournevis à tête scie sauteuse clé à tuyau silicone couteau à mastiquer coupe-tuyau étoilée... - Page 10 DE mODèLE : 5405 pièCES pièce Description Qté Comptoir en granite Meuble-lavabo inStruCtiOnS D’inStALLAtiOn • étApE 1 o Avec l’aide d’une autre personne, placez le meuble-lavabo (B) à l’emplacement désiré. o Il est conseillé de placer au moins un poteau mural là où sera installé le meuble-lavabo (B). Percez des avant-trous dans la traverse en bois horizontale supérieure et dans le poteau mural.
- Page 11 DE mODèLE : 5405 inStruCtiOnS D’inStALLAtiOn • étApE 2 o Appliquez du silicone sur la partie supérieure du meuble-lavabo (B) et installez délicatement le comptoir en granite (A) sur le meuble-lavabo (B). o Alignez le comptoir en granite (A) et le meuble-lavabo (B) et essuyez l’excédent de silicone au besoin.
- Page 12 Installez le lavabo et le drain conformément aux directives d’installation du fabricant. o Reportez-vous à la figure 4. o REMARQUE : L’ASSEMBLAGE MONTRÉ COMPREND LE LAVABO EN VERRE 1112T, L’ANNEAU DE MONTAGE 9020 ET LE DRAIN PARAPLUIE 9290 DECOLAV . CES ACCESSOIRES SONT TOUS VENDUS ®...
- Page 13 • étApE 5 o Installez le circuit d’évacuation conformément aux directives d’installation du fabricant. o Reportez-vous à la figure 5. o REMARQUE : LE CIRCUIT D’ÉVACUATION ILLUSTRÉ ( S IPhON BOUTEILLE DÉCORATIF DECOLAV 9100) EST ® RECOMMANDÉ, MAIS NON INCLUS.
- Page 14 La décision de DECOLAV de réparer ou de remplacer le produit en vertu de la présente garantie à vie ne couvre pas les frais de main d’œuvre reliés à la désinstallation ou à...
- Page 15 único para el proyecto de su próximo baño. Antes de comenzar la instalación, revise todos los materiales y todas las herramientas que le fueron suministrados. Para realizar consultas sobre su ® nuevo producto, llame a nuestro dedicado personal de atención al cliente de DECOLAV Atentamente, Robert H. Mayer Director General y Presidente CH AN GI NG THE WA Y Y O U VI E W TH E B A TH ROO M ®...
-
Page 16: Herramientas Recomendadas
DE MODELO: 5405 HERRAMiEntAs RECOMEnDADAs Llave ajustable cinta métrica abrazadera de tubería pinzas de extensión taladro sierra de mano nivel destornillador destornillador Llave inglesa sierra de sable espátula cortador de tubería silicona transparente phillips plano Lápiz escuadra regla MEDiDAs APROxiMADAs Pared 4 1/2"... - Page 17 DE MODELO: 5405 PiEzAs Artículo Descripción Cant. Mostrador de granito Tocador instRuCCiOnEs DE instALACión • PAsO n.º 1 o Con la ayuda de otra persona, coloque el tocador (B) en la posición deseada. o Se recomienda ubicar por lo menos un montante de pared dentro del área donde se va a instalar el tocador (B). Haga agujeros en el travesaño superior horizontal de madera y en el montante de pared. Utilizando tornillos para madera, sujete el tocador (B) al montante de pared, a través del travesaño horizontal superior de madera. o NOTA: LOS TORNILLOS PARA MADERA NO ESTÁN INCLUIDOS. o Vea la figura 1. Tornillos para madera (no incluidos) Travesaño horizontal superior de madera Figura 1 servicio al cliente: 561-274-2110 Let your dreams come aLive, your passions www.decolav.com...
- Page 18 DE MODELO: 5405 instRuCCiOnEs DE instALACión • PAsO n.º 2 o Aplique silicona en la parte superior del tocador (B) y coloque con cuidado el mostrador de granito (A) sobre el tocador (B). o Alinee el mostrador de granito (A) con el tocador (B) y quite el excedente de silicona si fuera necesario. o Vea la figura 2. Aplique silicona aquí Figura 2 • PAsO n.º 3 o L a perilla está sujeta al interior de la puerta por motivos de seguridad durante el envío. Quite la perilla y el perno de la perilla y fíjela en el frente de la puerta. o Vea la figura 3. Perno de la perilla Perilla Figura 3...
- Page 19 DE MODELO: 5405 instRuCCiOnEs DE instALACión • PAsO n.º 4 o Instale el desagüe y la vasija según las instrucciones de instalación del fabricante. o Vea la figura 4. o N OTA: EN LA IMAGEN APARECE CON LA VASIJA DE VIDRIO DECOLAV 1112T, EL ANILLO DE MONTAJE ® DECOLAV 9020 Y EL DESAGÜE DECORATIVO DECOLAV 9290. TODO SE VENDE POR SEPARADO.
- Page 20 DE MODELO: 5405 instRuCCiOnEs DE instALACión • PAsO n.º 5 o Instale el sistema de desagüe según las instrucciones de instalación del fabricante. o Vea la figura 5. o N OTA: EL SISTEMA DE TRAMPA QUE SE MUESTRA (TRAMPA DECORATIVA DECOLAV 9100) ES UN ® ACCESORIO RECOMENDADO Y NO ESTÁ INCLUIDO. Brazo de desagüe vertical Arandela para la trampa Tuerca de la trampa decorativa...
-
Page 21: Cuidado Y Limpieza
DisEÑADO, Y EL DEsGAstE nORMAL. LA instALACión, EL MAntEniMiEntO, LA MAniPuLACión Y CuALQuiER usO inCORRECtO O inADECuADO, O DistintO DE LOs QuE sE DEtALLAn En LAs instRuCCiOnEs, AsÍ COMO tAMBiÉn CuALQuiER OtRO ACtO QuE ExCEDA EL COntROL DE DECOLAV, DEJAn sin EFECtO LA PREsEntE GARAntÍA DE POR ViDA.
Need help?
Do you have a question about the 5405 and is the answer not in the manual?
Questions and answers